Recipes › Desserts
Chocolate Vanilla Pinwheel Cookies
By Samira Kazan
updated December 22, 2023


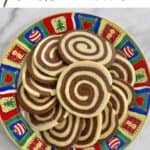
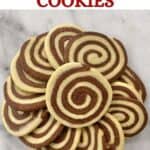
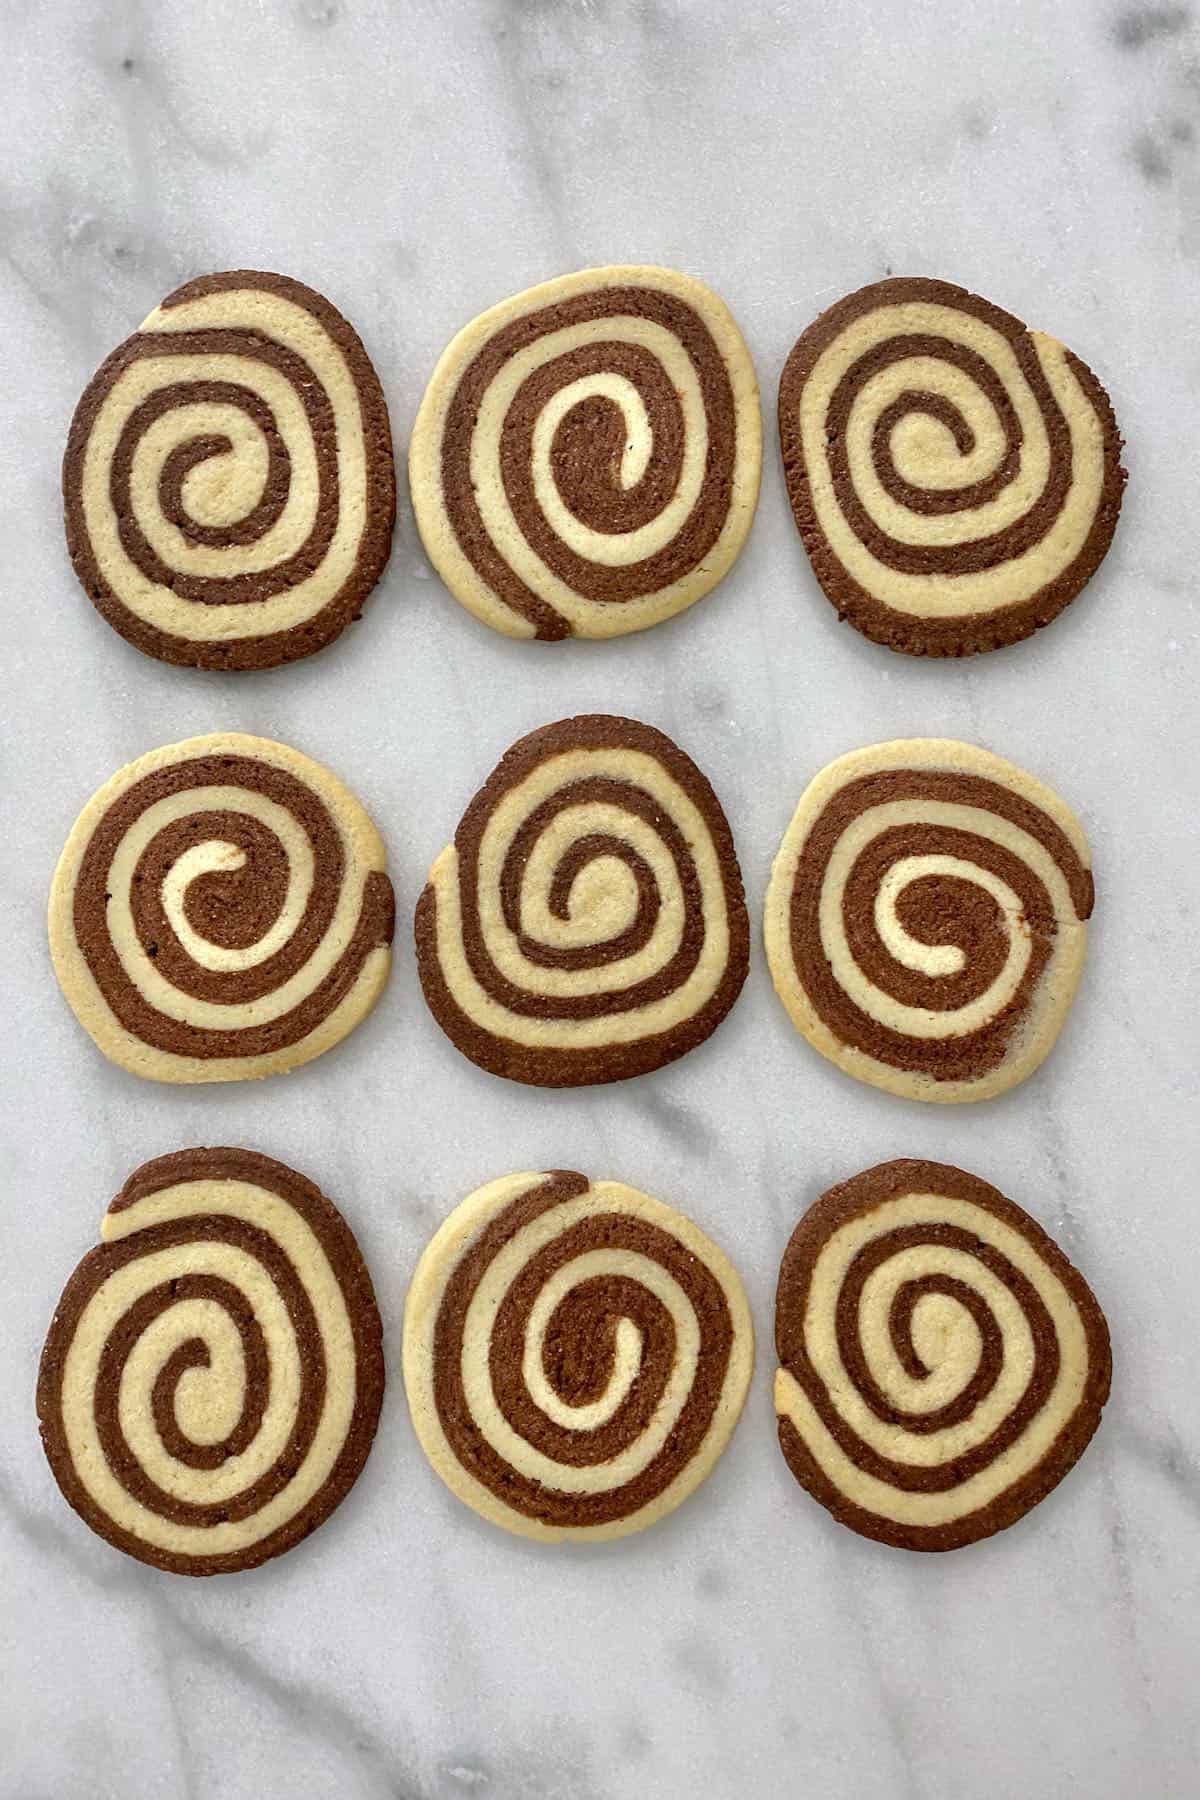
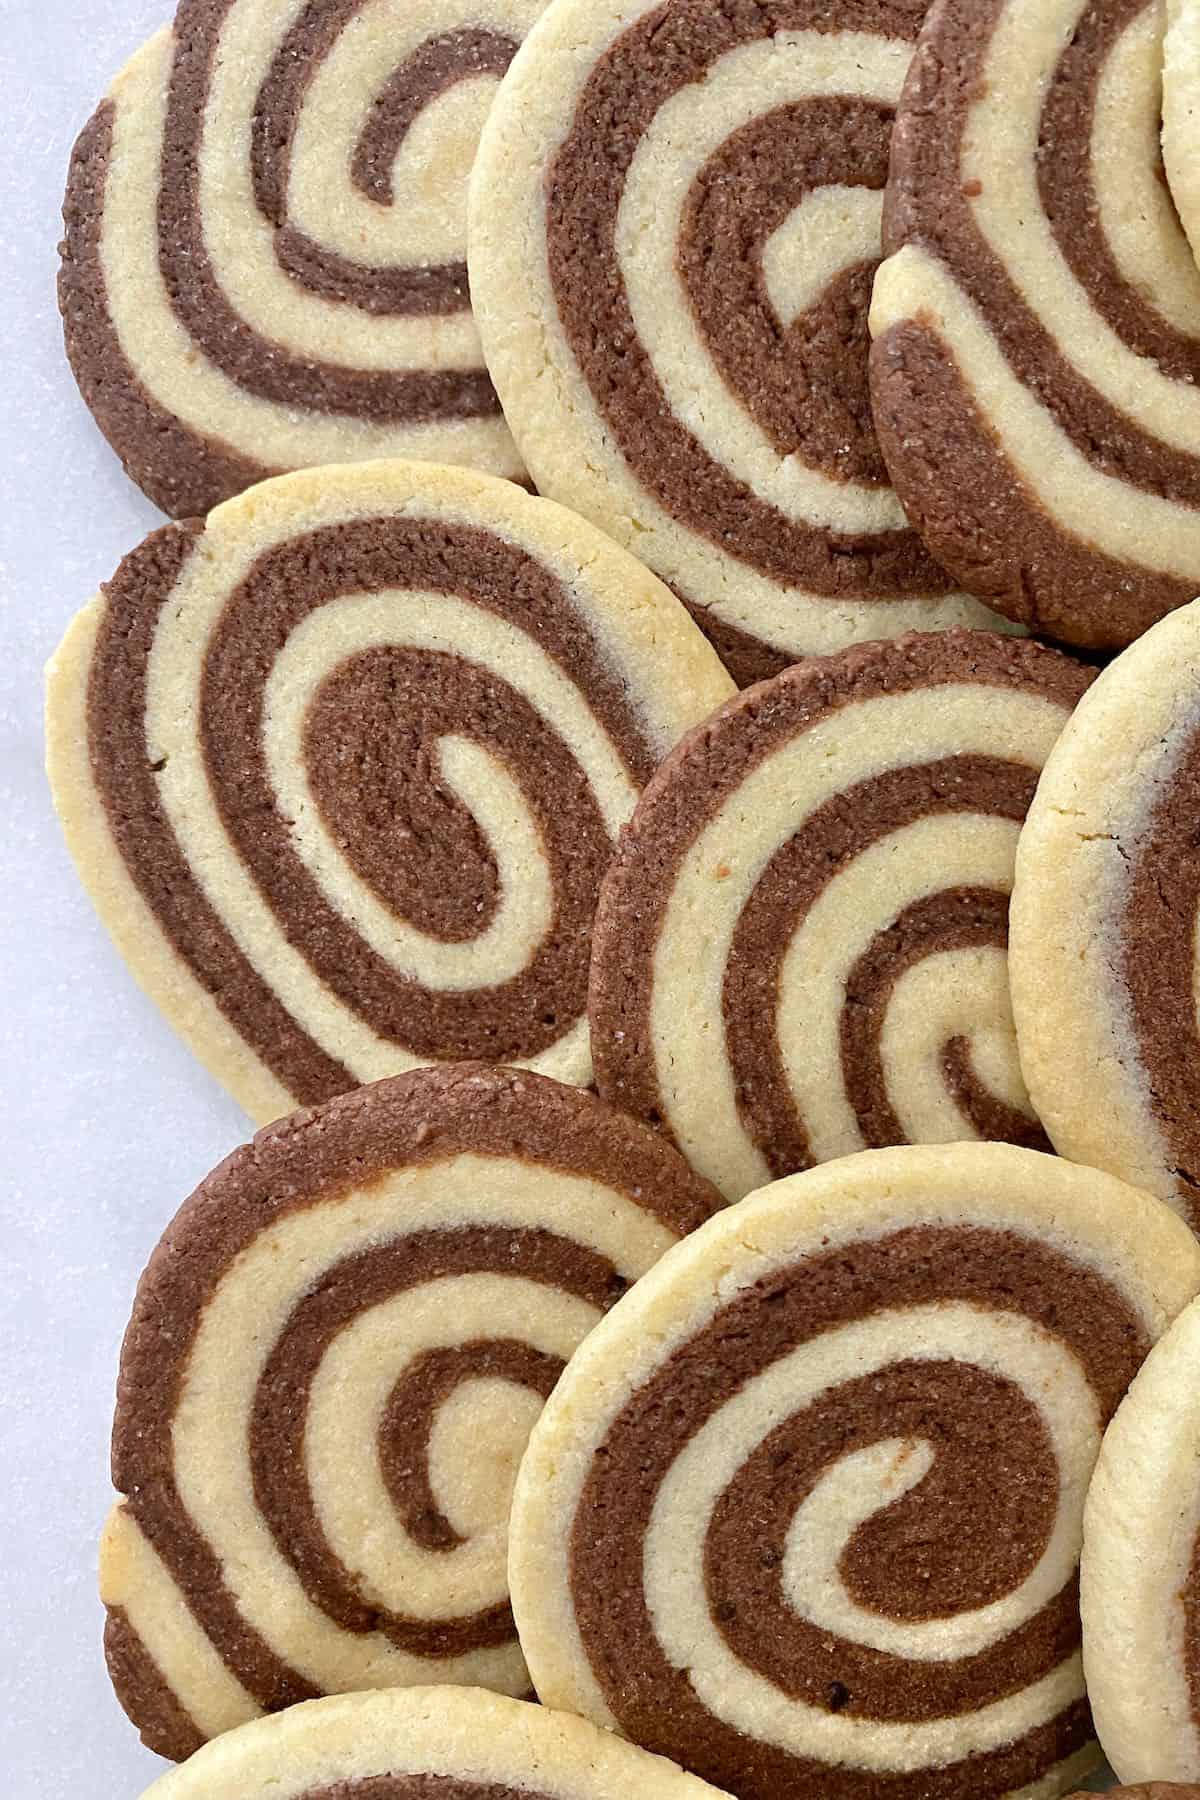
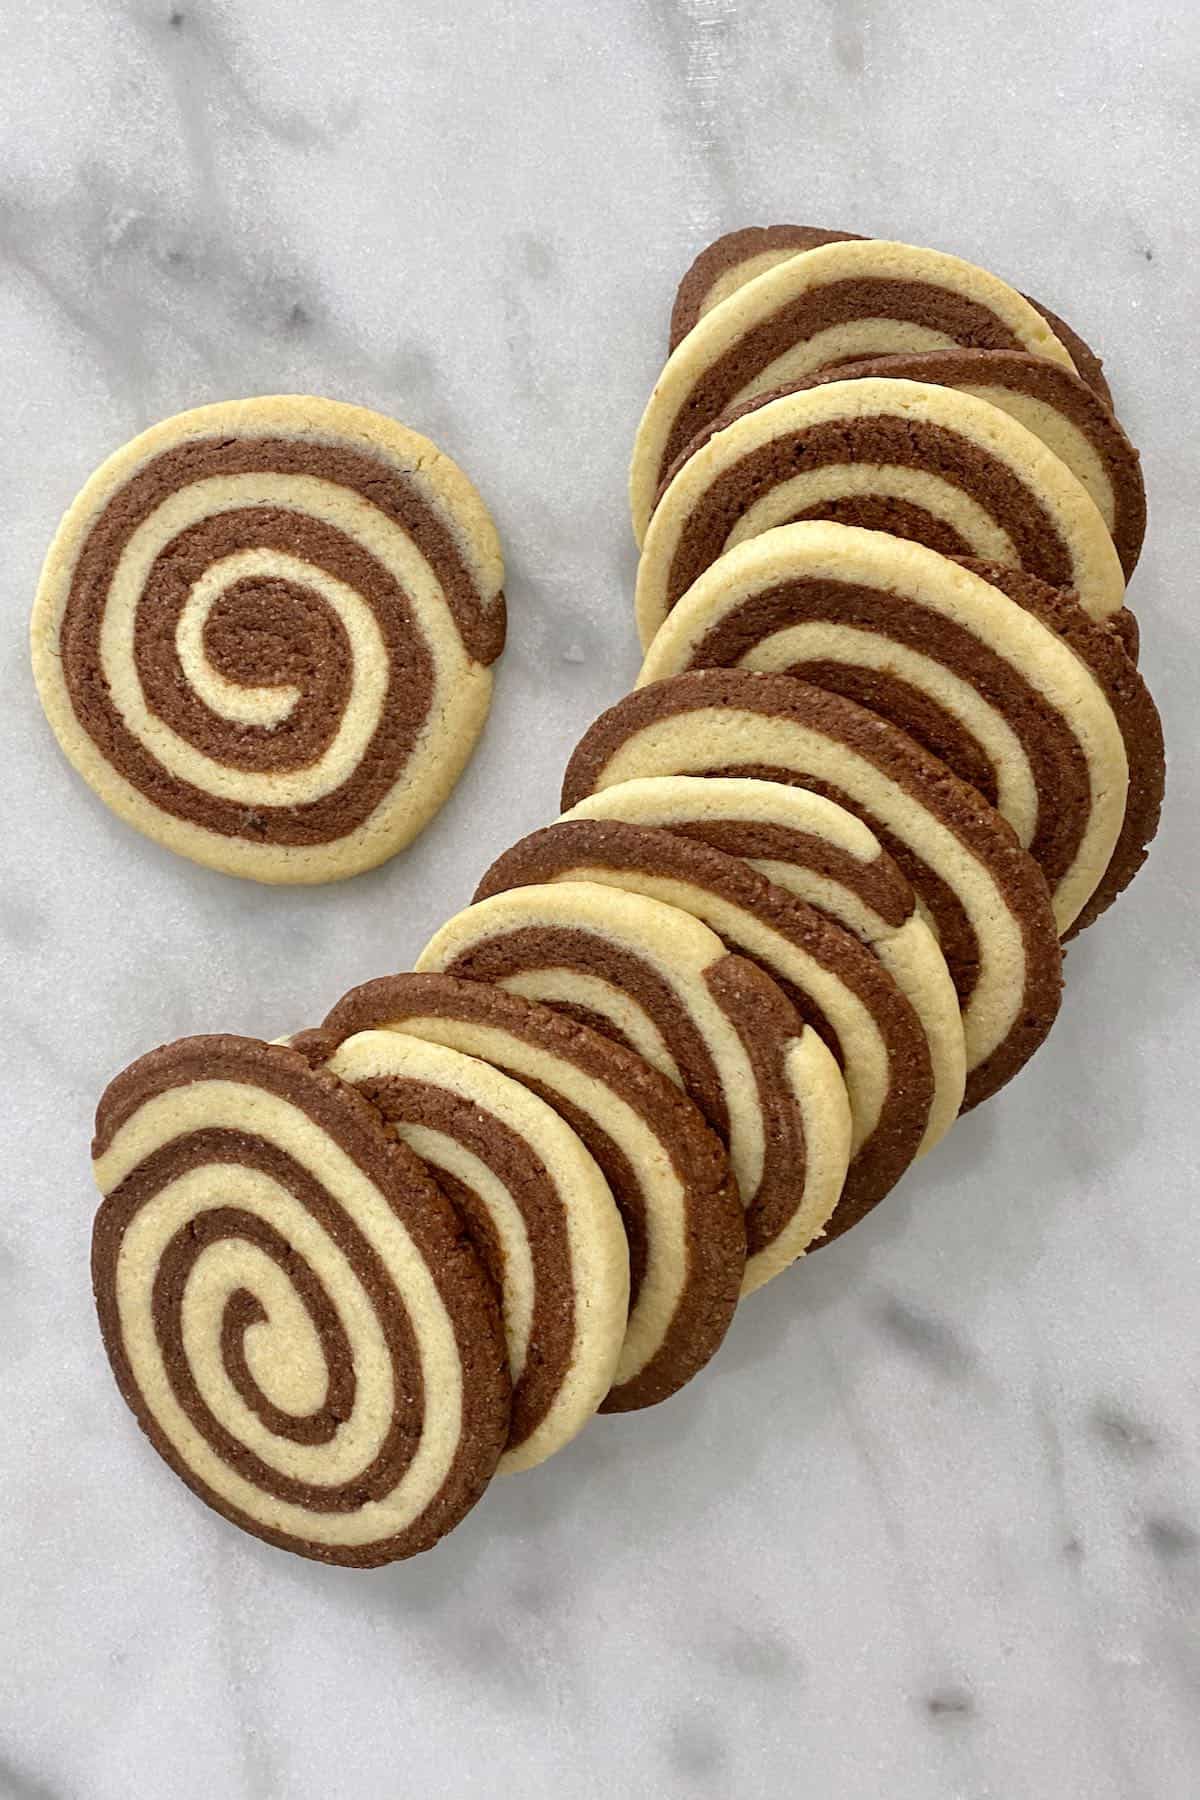
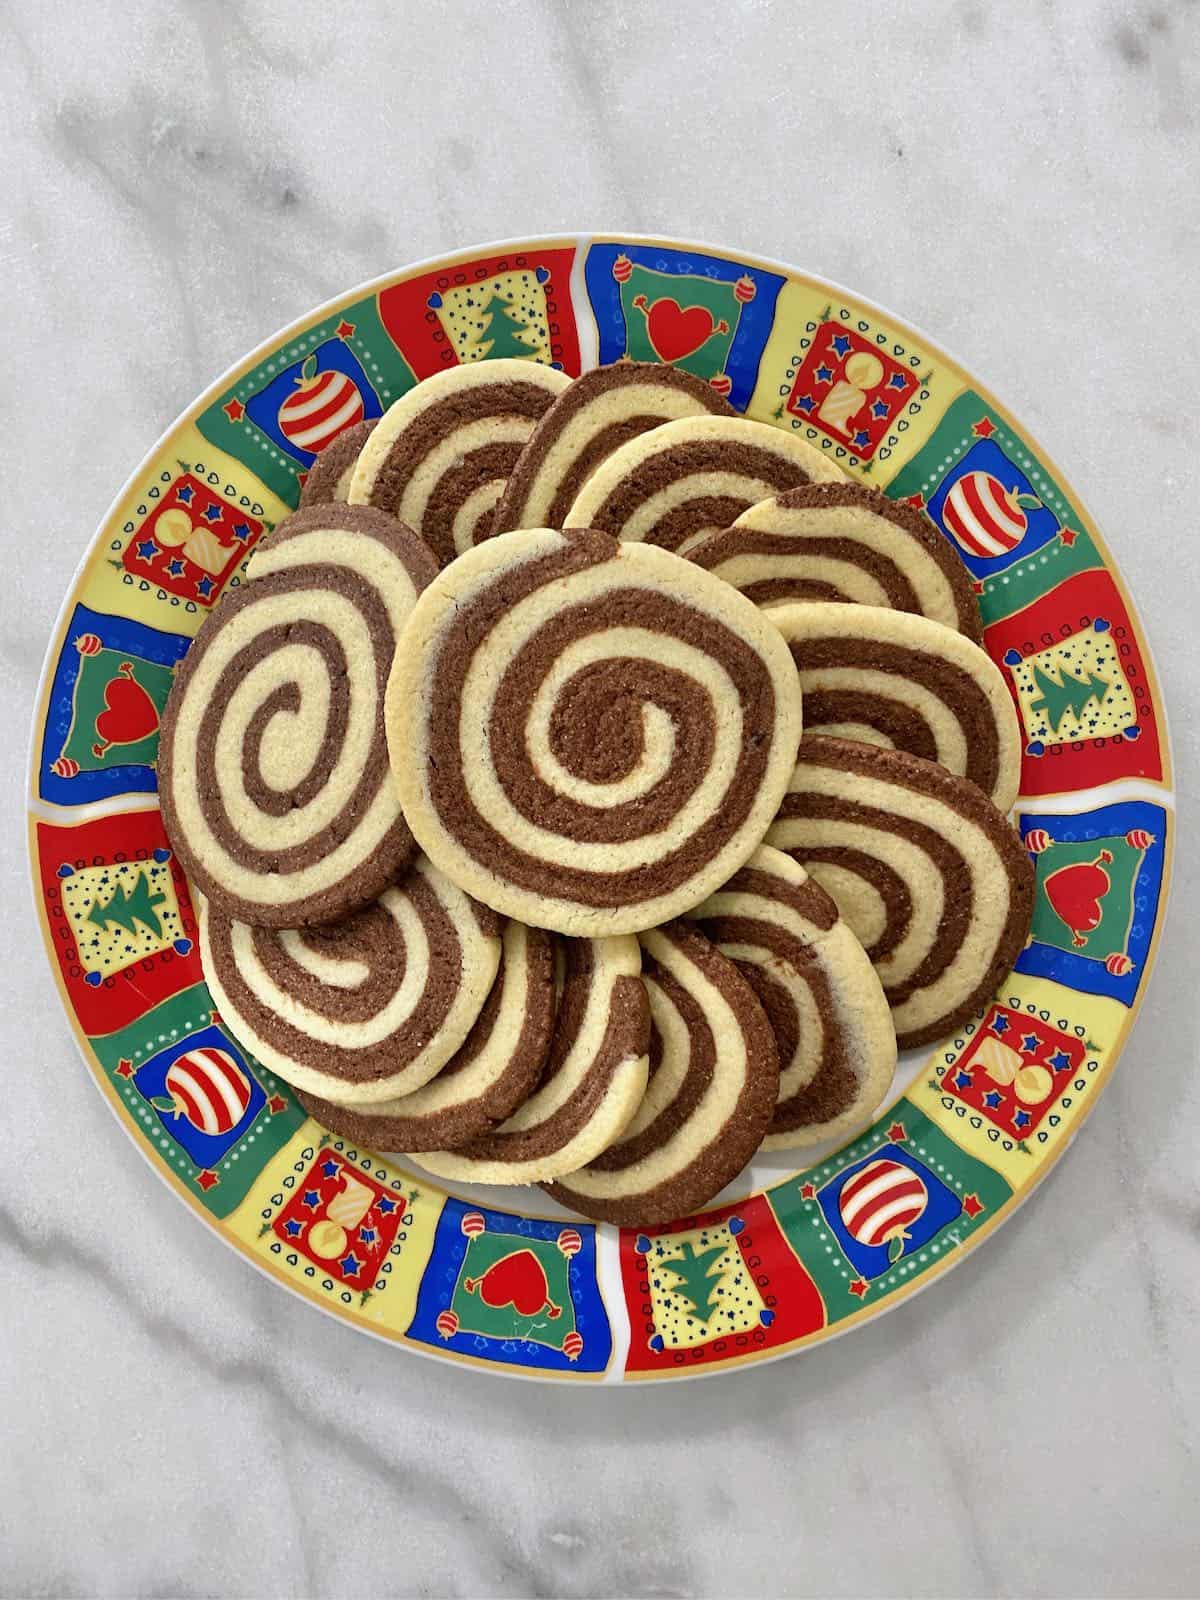
Soft, sweet, and beautiful old-fashioned chocolate vanilla pinwheel cookies use a simple sugar cookie dough flavored with vanilla and cacao powder to impress with looks and flavor! Even better, these chocolate swirl cookies are shockingly simple to prepare and make for a perfect addition to potlucks, parties, during the holidays (especially Christmas), and as gifts!
As much as I love a sweet treat, I’m not much of a cookie baker. I’ve shared a few of my tippy-top options, like ooey-gooey vegan chocolate chip cookies and these orange Christmas sugar cookies . But generally, you’ll see me digging into quick breads and cakes. So when I tell you that anyone can make and enjoy these chocolate pinwheel cookies, I’m not overstating it! Not only do these swirl sugar cookies look and taste great, but the process is actually surprisingly simple!
All you need is to create a single sugar cookie dough, add cacao to one half, layer to the two, roll (which is easier than it seems), slice, and bake. Okay, there’s quite a bit of chilling time in-between – but that’s a patience game (or you could even decide to make these cookies spread over several days). The chocolate pinwheels really are as simple as that, otherwise!
Plus, this dough is incredibly make-ahead and freezer-friendly. You can chill the prepared dough for several days or store it in the freezer for two months. You can also store it in several stages (unrolled dough, rolled cookie log, and even sliced cookies). That way, you always have some swirl cookies on hand whenever the cookie cravings hit!
Best of all, these slice-and-bake cookies (aka icebox cookies) require just a few simple ingredients – most of which are likely in your kitchen right now! With several ways to adapt the flavors of your old-fashioned pinwheel cookies, these make for a wonderful addition to your Christmas cookie/holiday cookie collection (along with almond pistachio thumbprint cookies and gingerbread cookies )!
Want to save this recipe?
- The Vanilla Chocolate Pinwheel Cookies Ingredients
- How to Make Old-Fashioned Chocolate Pinwheel Cookies?
- How to Store Chocolate Pinwheels?
- FAQs
- Recipe Top Tips and Notes
- More Christmas dessert recipes
- Chocolate Vanilla Pinwheel Cookies (Slice-and-Bake Swirl Cookies) Recipe
The Vanilla Chocolate Pinwheel Cookies Ingredients
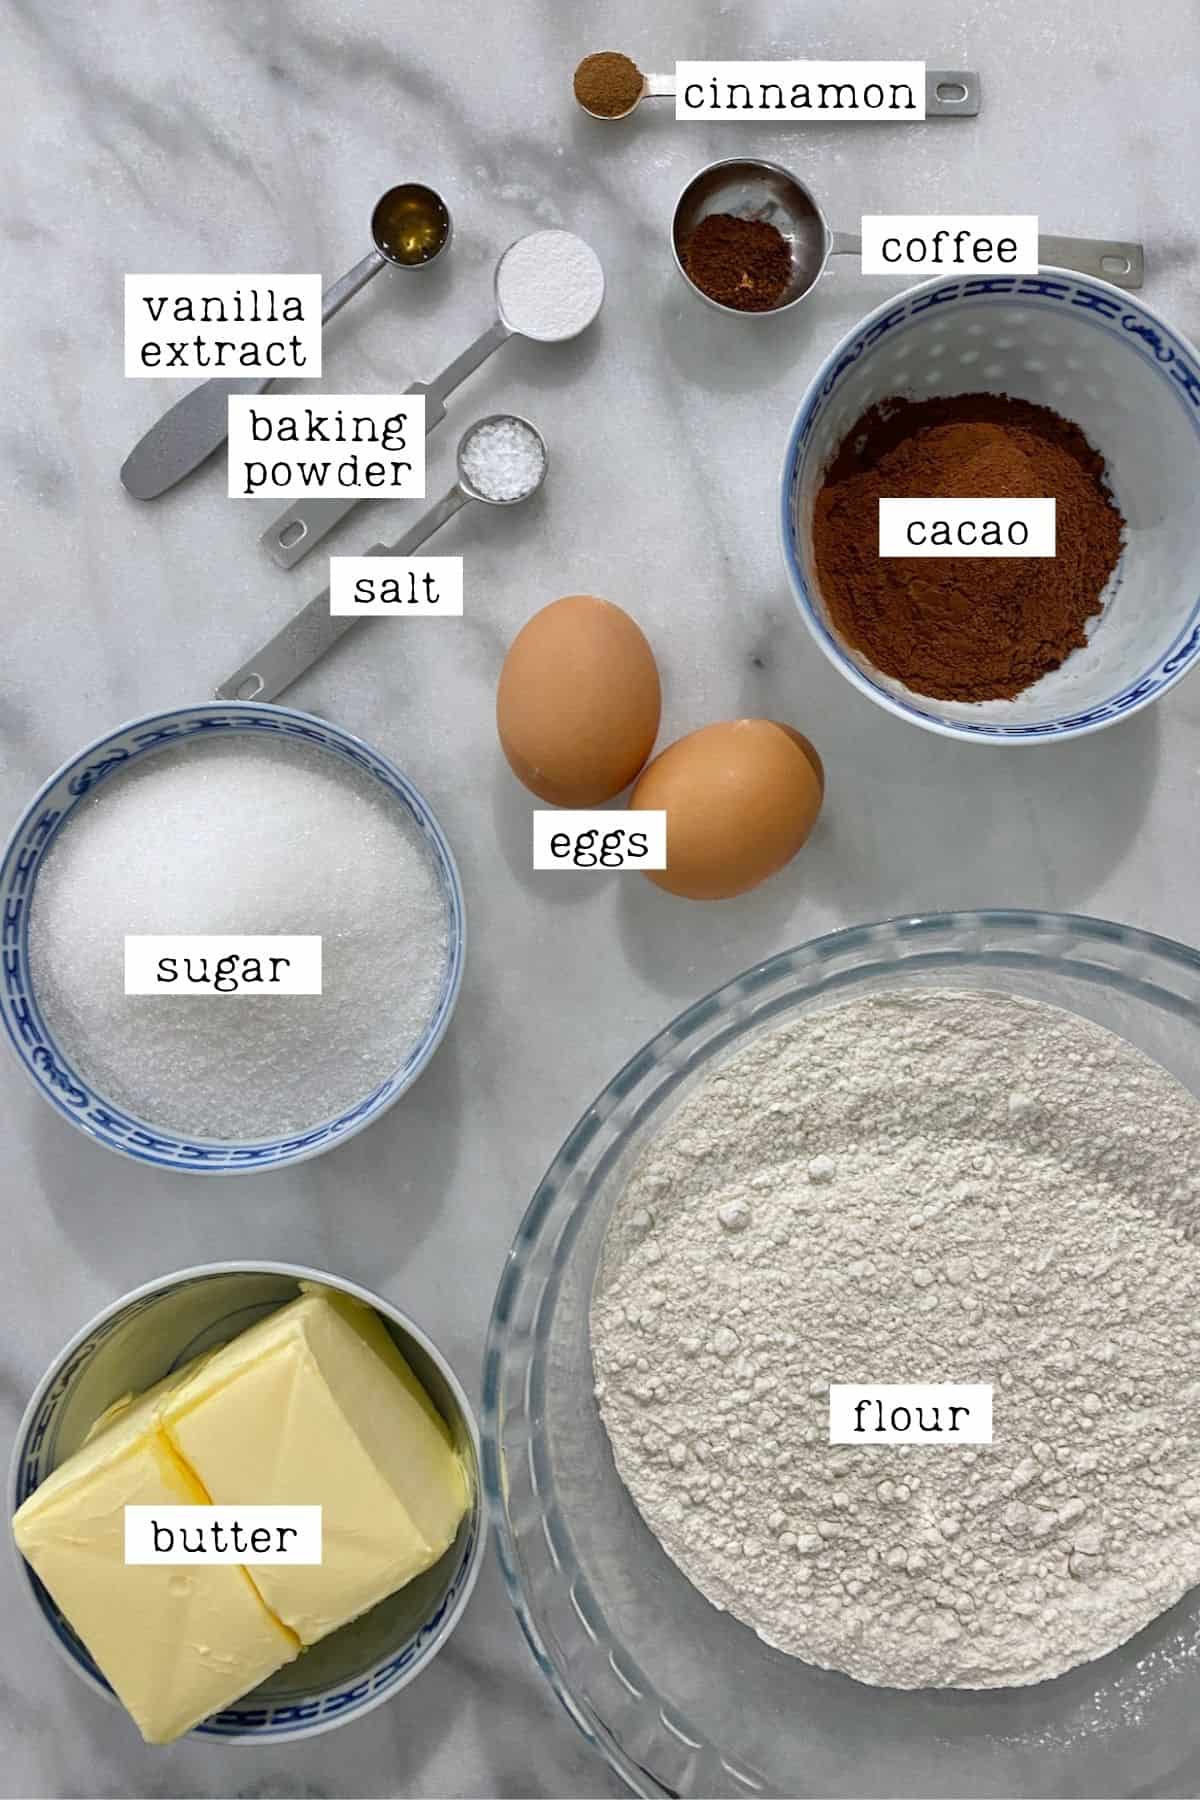
- All-purpose flour : I haven’t tried this recipe with any other type of flour.
- Baking powder: this will help leaven the chocolate pinwheel cookies and provide slight lift and better texture.
- Butter: use softened (not melted) unsalted butter. You can use salt in a pinch, but you should reduce the remaining salt in the recipe.
- Sugar: I recommend using regular white sugar. While cane sugar or light brown sugar can be used, they will affect the color of the vanilla layer, so I avoid them for this recipe.
- Eggs: use medium eggs. It’s best to use them at room temperature, though it doesn’t matter too much if they’re straight from the fridge.
- Salt: this will help enhance the flavors in these chocolate pinwheels.
- Cacao Powder: you can use cacao powder (less refined but slightly more bitter) or cocoa powder for these delicious chocolate vanilla cookies.
- Instant coffee: (optional) While this is technically optional, coffee helps enhance the cacao’s flavor for a richer chocolate flavor.
- Vanilla Extract: I use homemade vanilla extract . Pure vanilla extract is best for the best (and non-artificial) flavor.
- Cinnamon: this is optional, but a large pinch of cinnamon adds extra depth to the chocolate vanilla swirl cookies. At Christmas time, we increase the amount further, and they make for delicious Christmas pinwheel cookies.
Optional Add-ins and Variations
- Extracts: possibly the easiest way to add extra flavor to these old-fashioned pinwheel cookies is with extracts. I like to use options like peppermint, orange, almond, coffee, and coconut to add to the chocolate cookie dough. You’ll likely need ½-1 tsp of extract, but experiment as different flavors will vary.
- Coconut: along with coconut extract, you could also add some shredded coconut to the vanilla dough (or better yet, roll the outside of the cookie dough roll in shredded coconut before slicing and baking).
- Jam-filled : raspberry jam , strawberry jam , cherry, and even rose petal jam all pair well with these vanilla chocolate cookies. To create a jam “filling,” simply spread a thin layer of jam over the top of your stacked cookie dough before rolling it into a log. It’s best to use slightly “tart” jam/jelly since the chocolate swirl cookies are already so sweet.
- Chocolate orange : along with adding orange extract to the chocolate dough, add the zest of one small orange to the vanilla dough.
- Chocolate peppermint pinwheel cookies : add peppermint extract to the chocolate or both doughs and, optionally, roll the cookie dough logs in green and red sprinkles for wonderful Christmas peppermint pinwheel cookies.
- Demerara sugar : you can roll the cookie dough log in demerara sugar for crunchy (delicious) outer edges on the chocolate pinwheel cookies.
How to Make Old-Fashioned Chocolate Pinwheel Cookies?
Step 1: Prepare the Sugar Cookie Dough
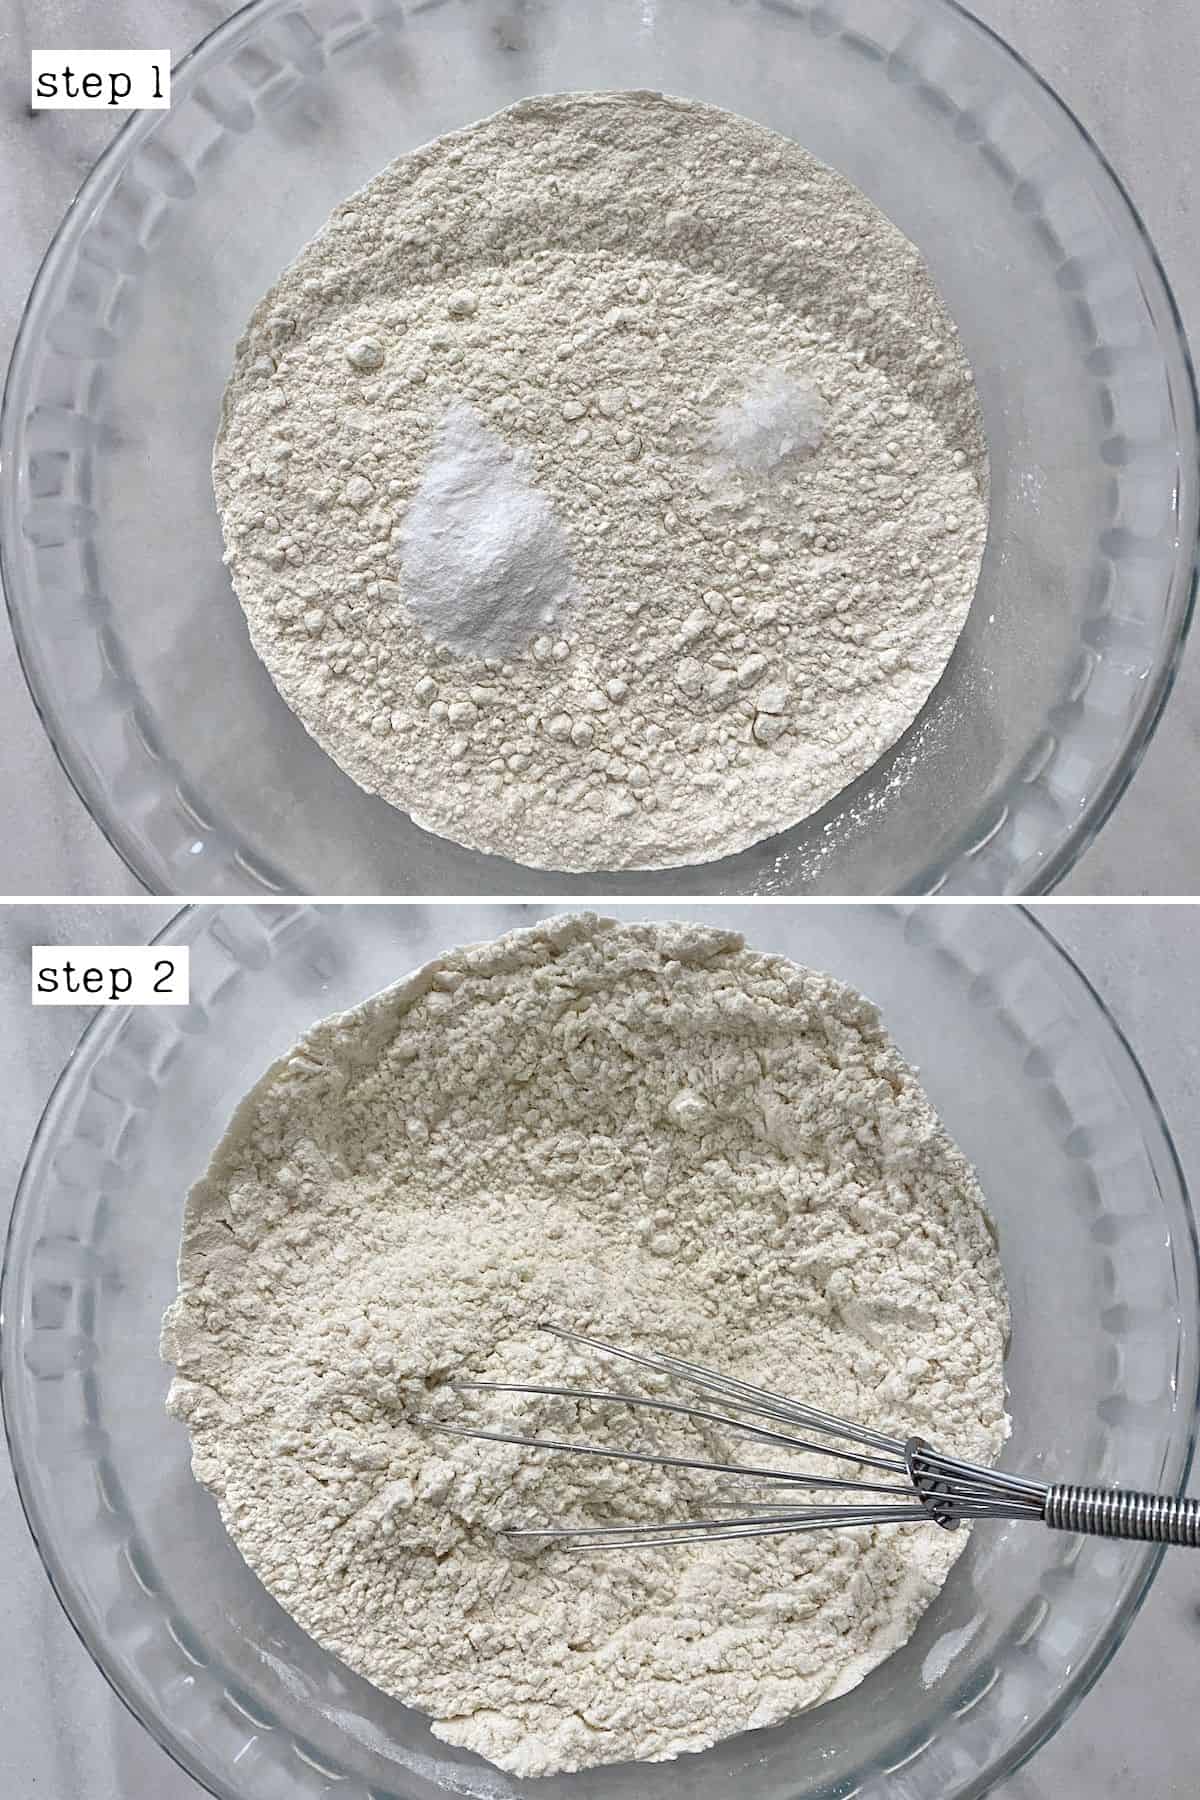
First, sift the flour, baking powder, and salt into a large mixing bowl and whisk to combine.
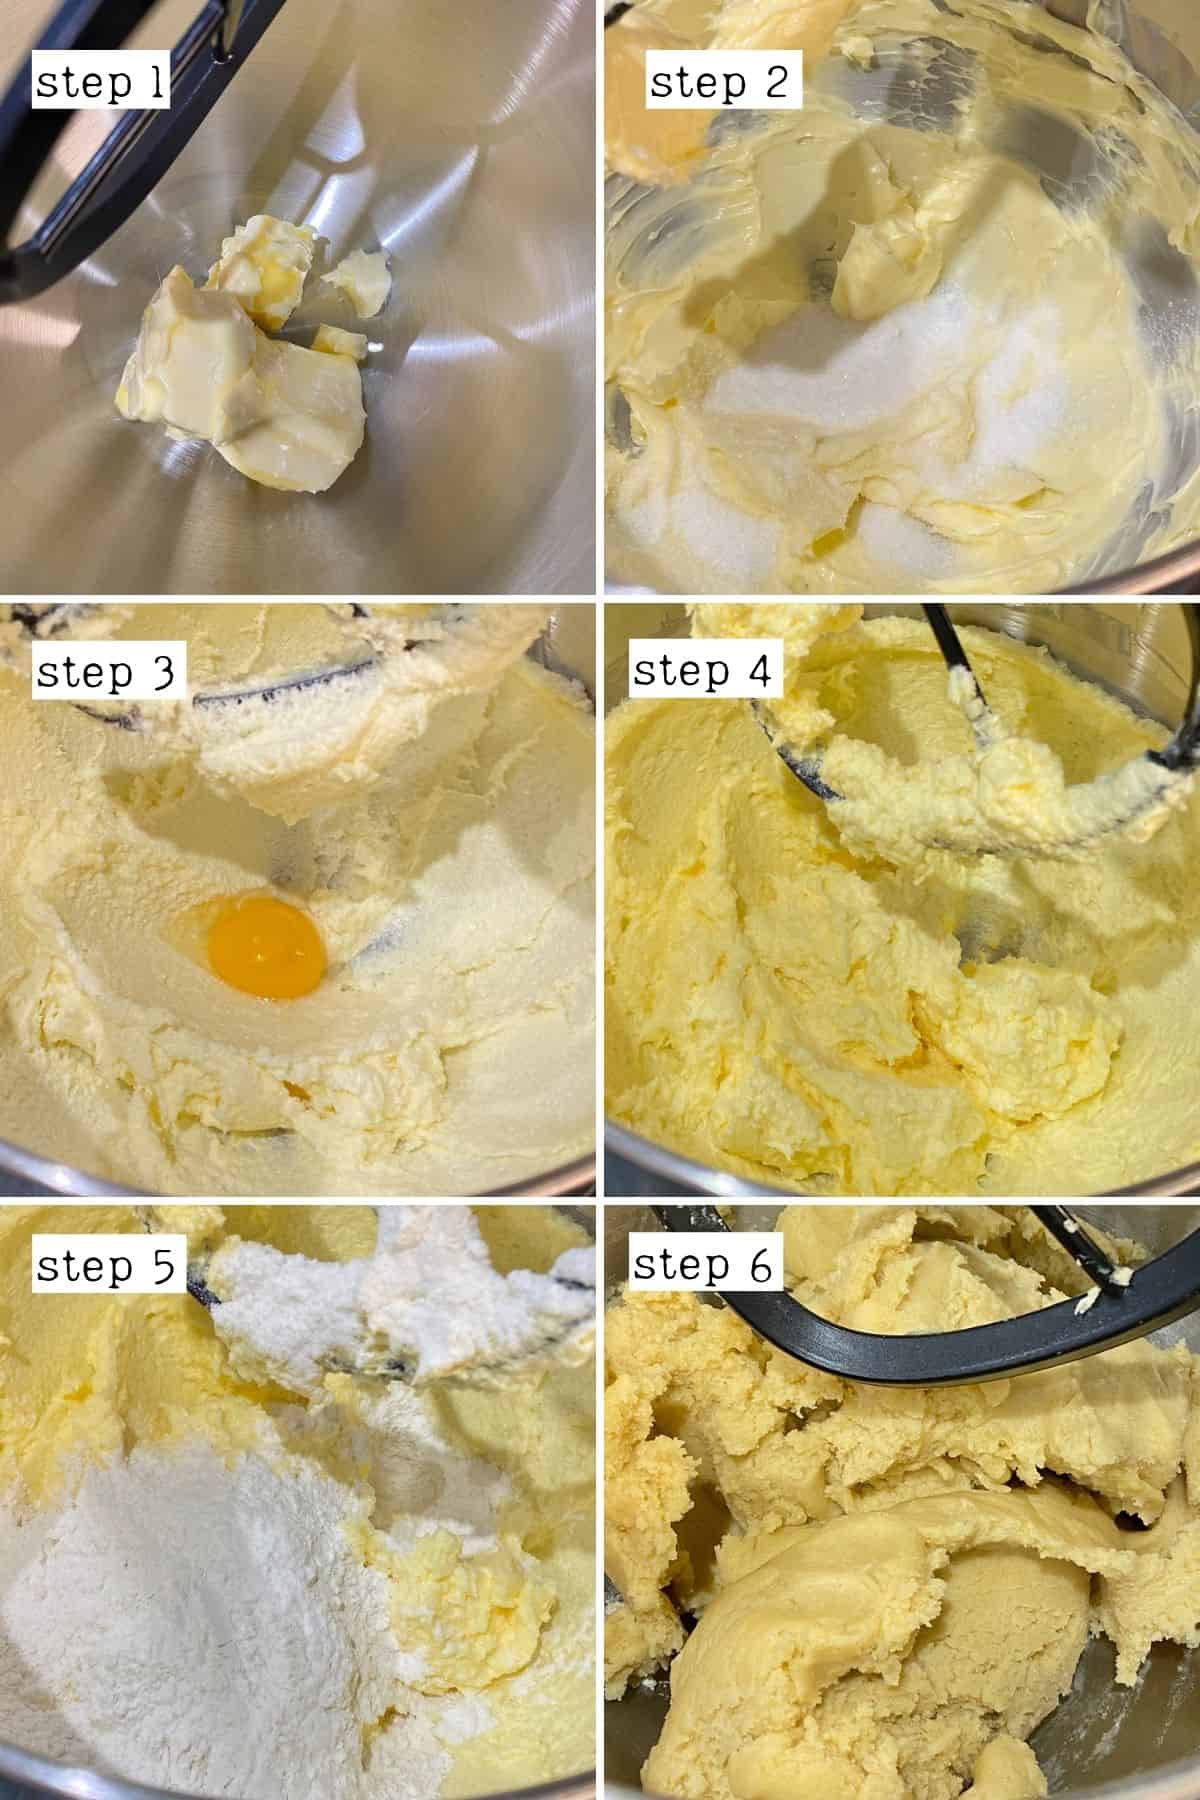
In a separate bowl (or in a stand mixer), add the softened butter and beat until creamy. Then, it’s time to cream the butter – gradually add the sugar, mixing constantly, until the mixture is a pale yellow and light and fluffy, with the sugar fully incorporated.
Next, add the eggs (one at a time) and the vanilla to the creamed butter, mixing well in between each addition.
Finally, add the flour mixture incrementally, mixing in between until a dough forms. It shouldn’t be sticky.
Step 2: Divide the Dough
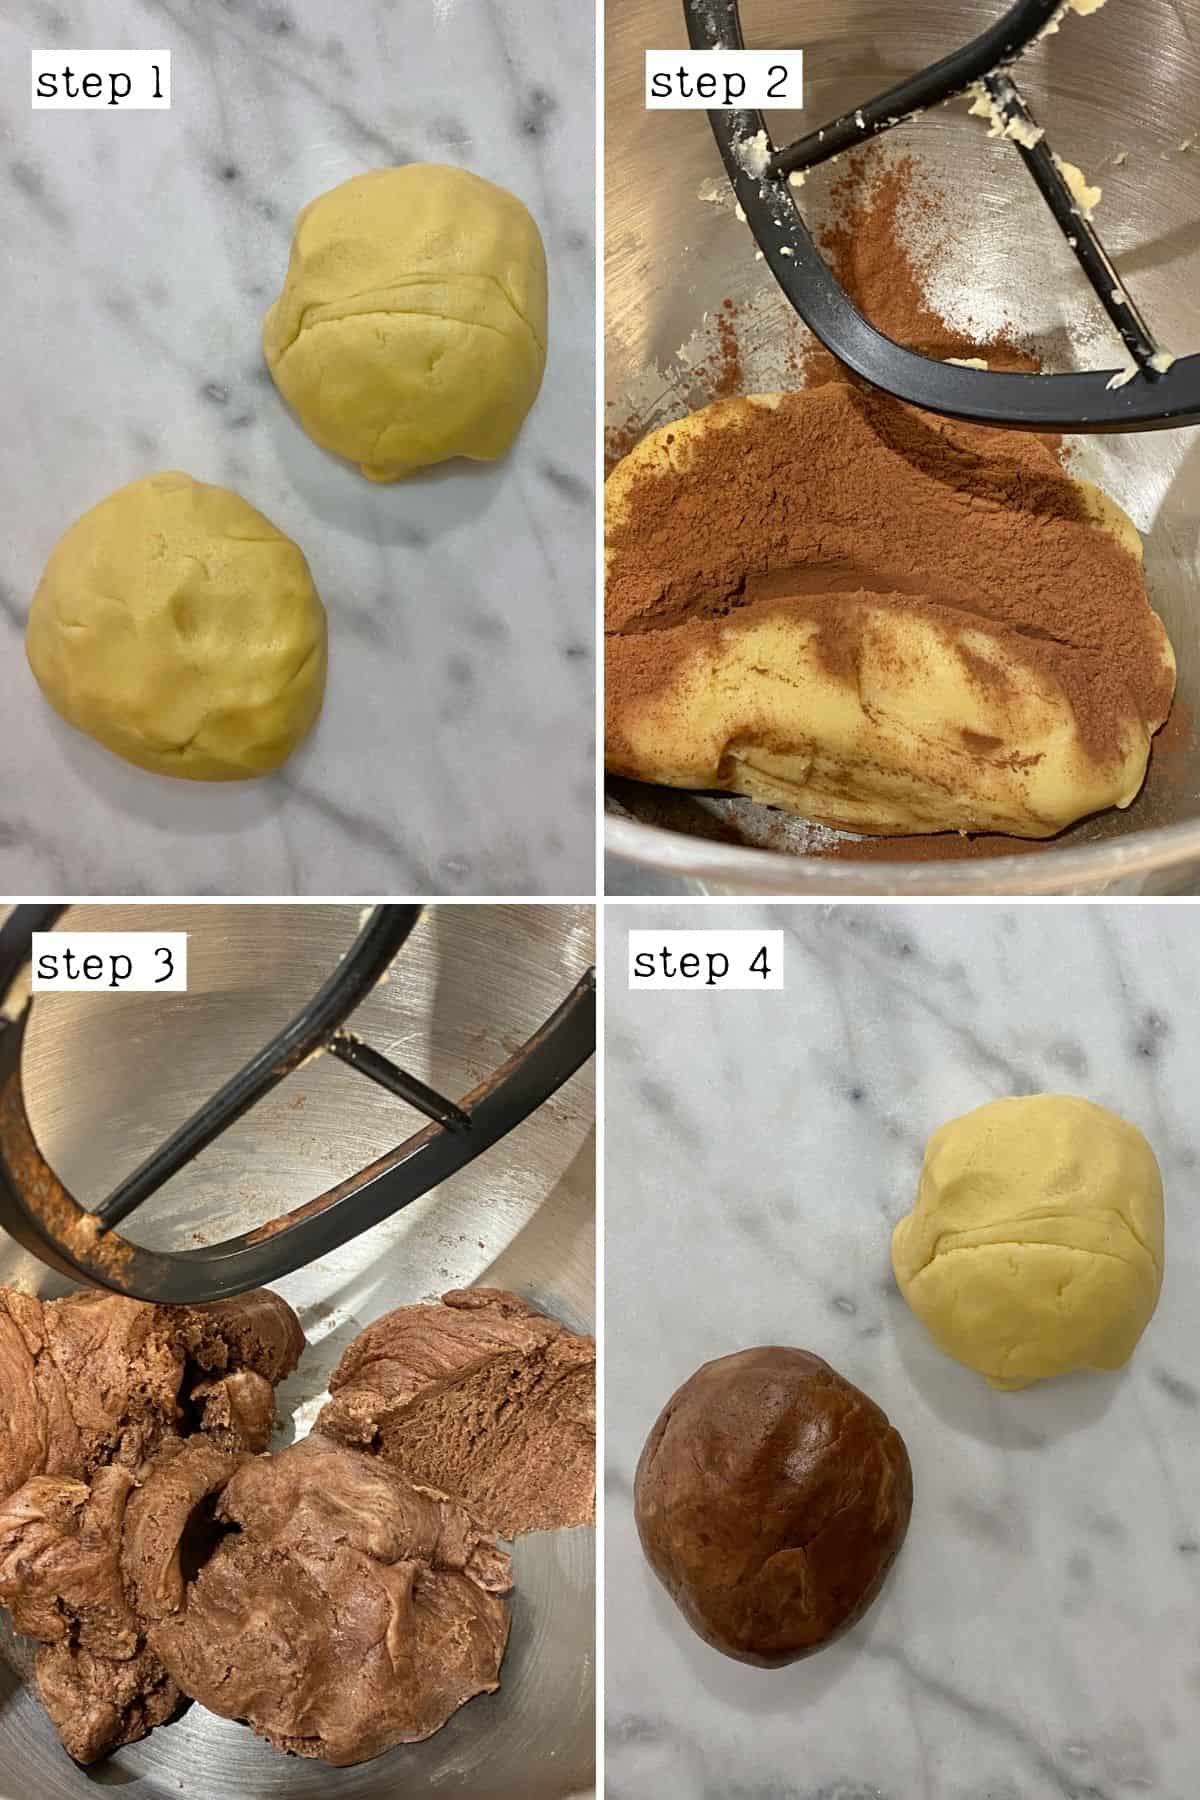
Weigh the biscuit dough and divide it into two even pieces. Wrap one in plastic wrap and return the other half to the mixer/bowl.
Add the cacao powder, instant coffee, and cinnamon (if using) to the dough and mix well until incorporated.
You can optionally chill the dough at this point for at least 30 minutes (up to a day) wrapped in plastic wrap in the refrigerator. However, I find it simpler to roll out into the rectangles first.
Step 3: Shape the Dough and Chill
When rolling out the chocolate and vanilla dough, the aim is to make them into equal-sized dough sheets (so they can be layered and rolled). Here is my preferred method:
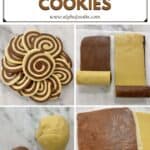
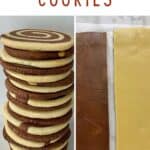
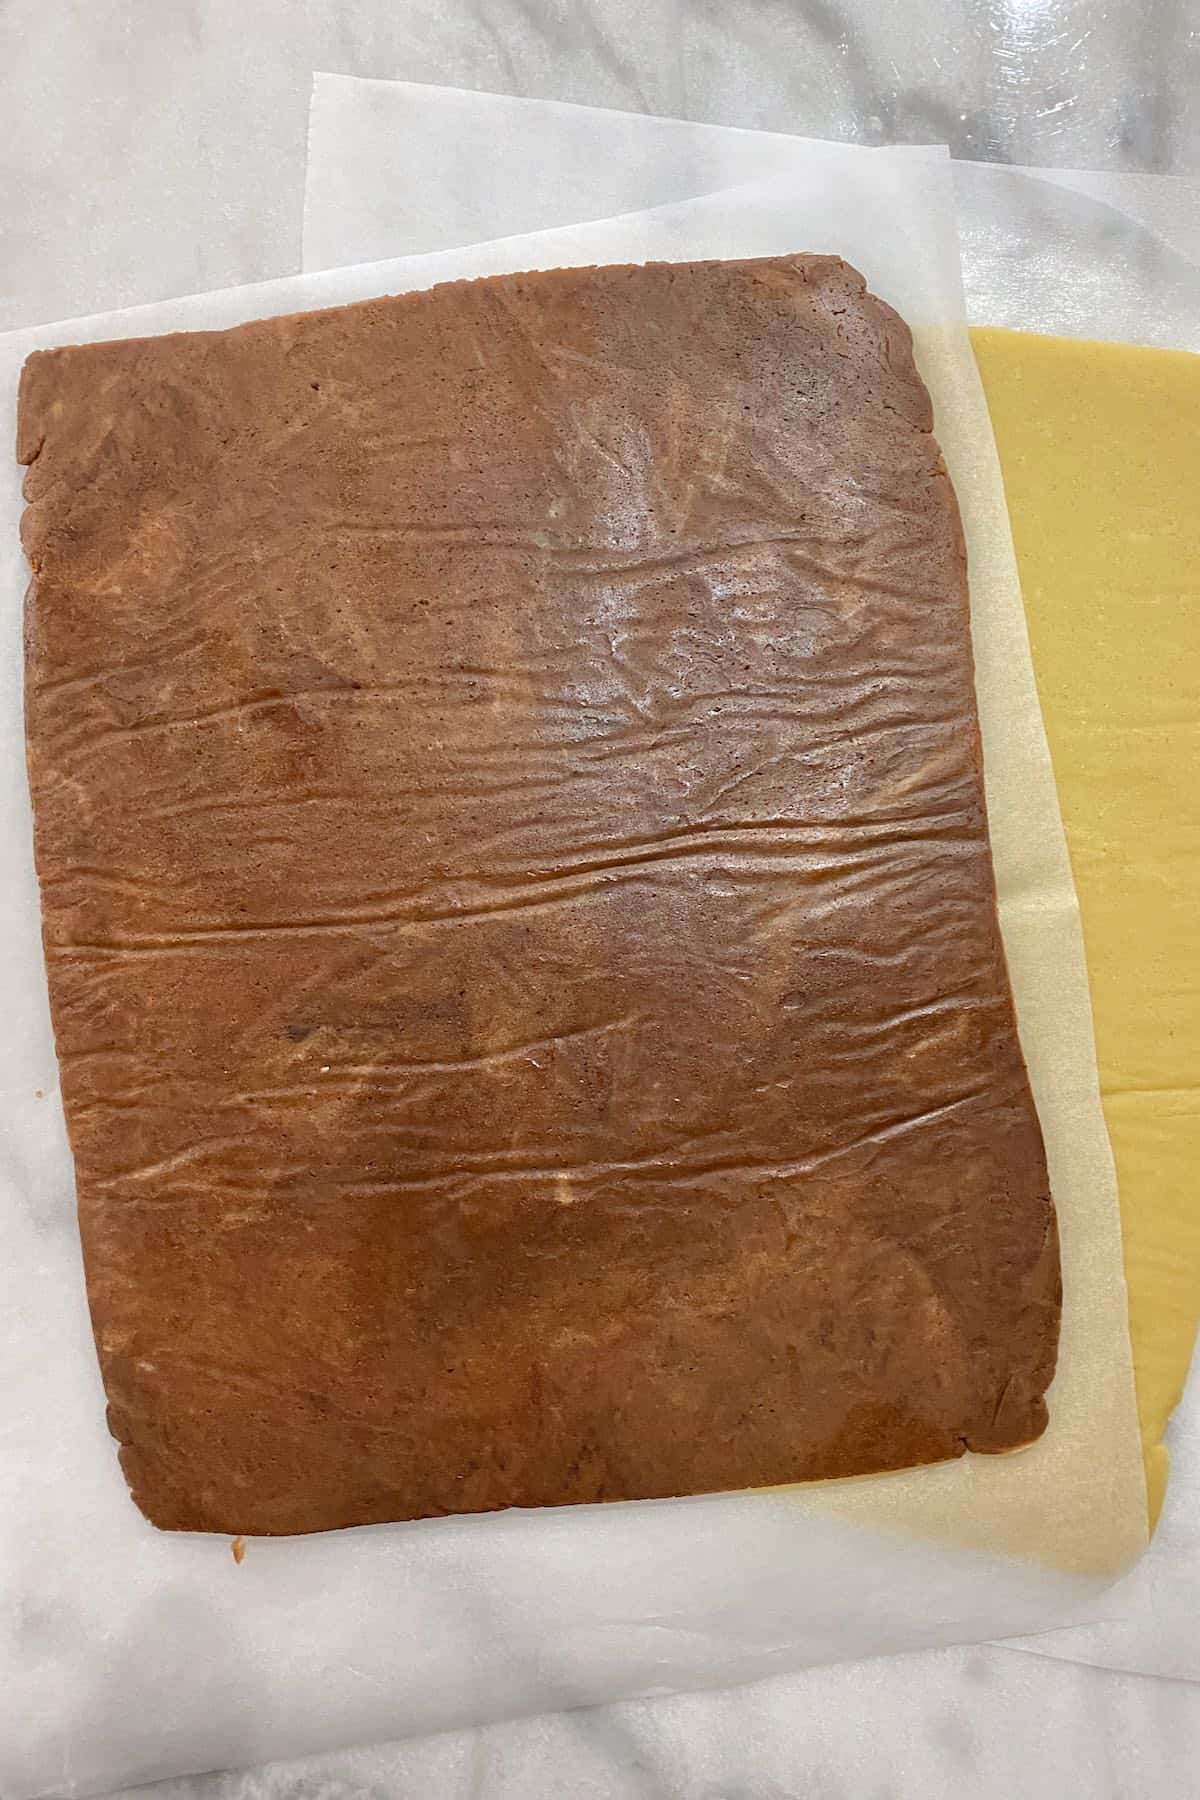
Place the first dough ball between two sheets of parchment paper or wax paper and roll into a rectangle that’s as close to 9×14 inches (23x35cm) and ¼-inch (0.6cm) thick. Cut away the excess to make it a neat rectangle (the scraps can make spare marbled chocolate vanilla cookies).
I like to measure the size on the parchment paper first , marking it with a pencil (on the side opposite the dough). That way, you can use it as a guideline while rolling.
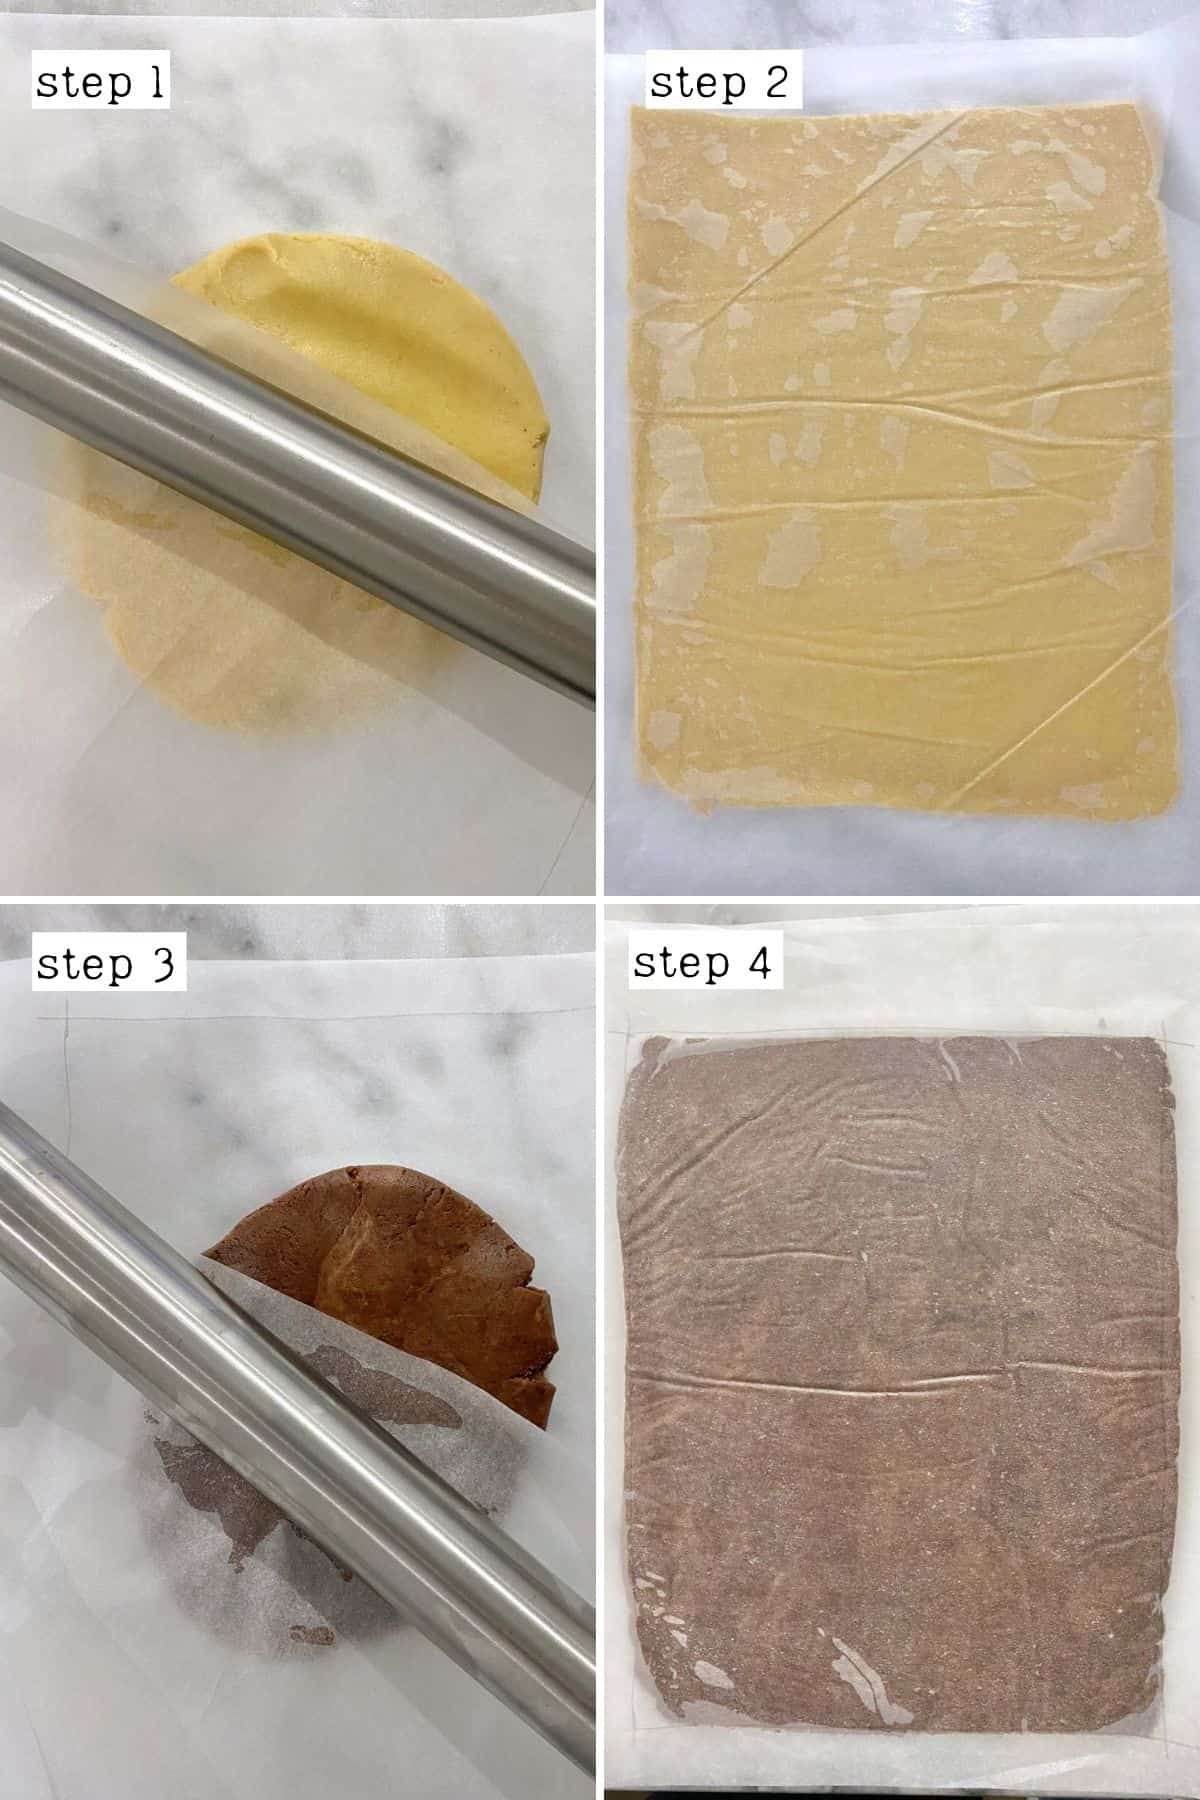
Repeat this step with the other dough ball. Then transfer both to the fridge for at least an hour to chill (or for up to a day).
Step 4: Roll the Pinwheel Cookies
It’s time for the fun part! First, decide which (chocolate or vanilla dough) you want to be the outer and inner swirl in the pinwheel cookies. OR, if you can’t decide, you can even do half and half, as I did.
Place the color you want to be the “outer” swirl on the counter first and peel away the top layer of parchment paper. Then, remove the parchment paper from the top of the other sheet and carefully flip it over, placing it on top of the first sheet (lining up the edges of the dough). Then gently roll or press just to make sure the two adhere slightly.
If you want half and half, now you can slice the sheets in half lengthwise and flip one over (so the color on the bottom is now on top).
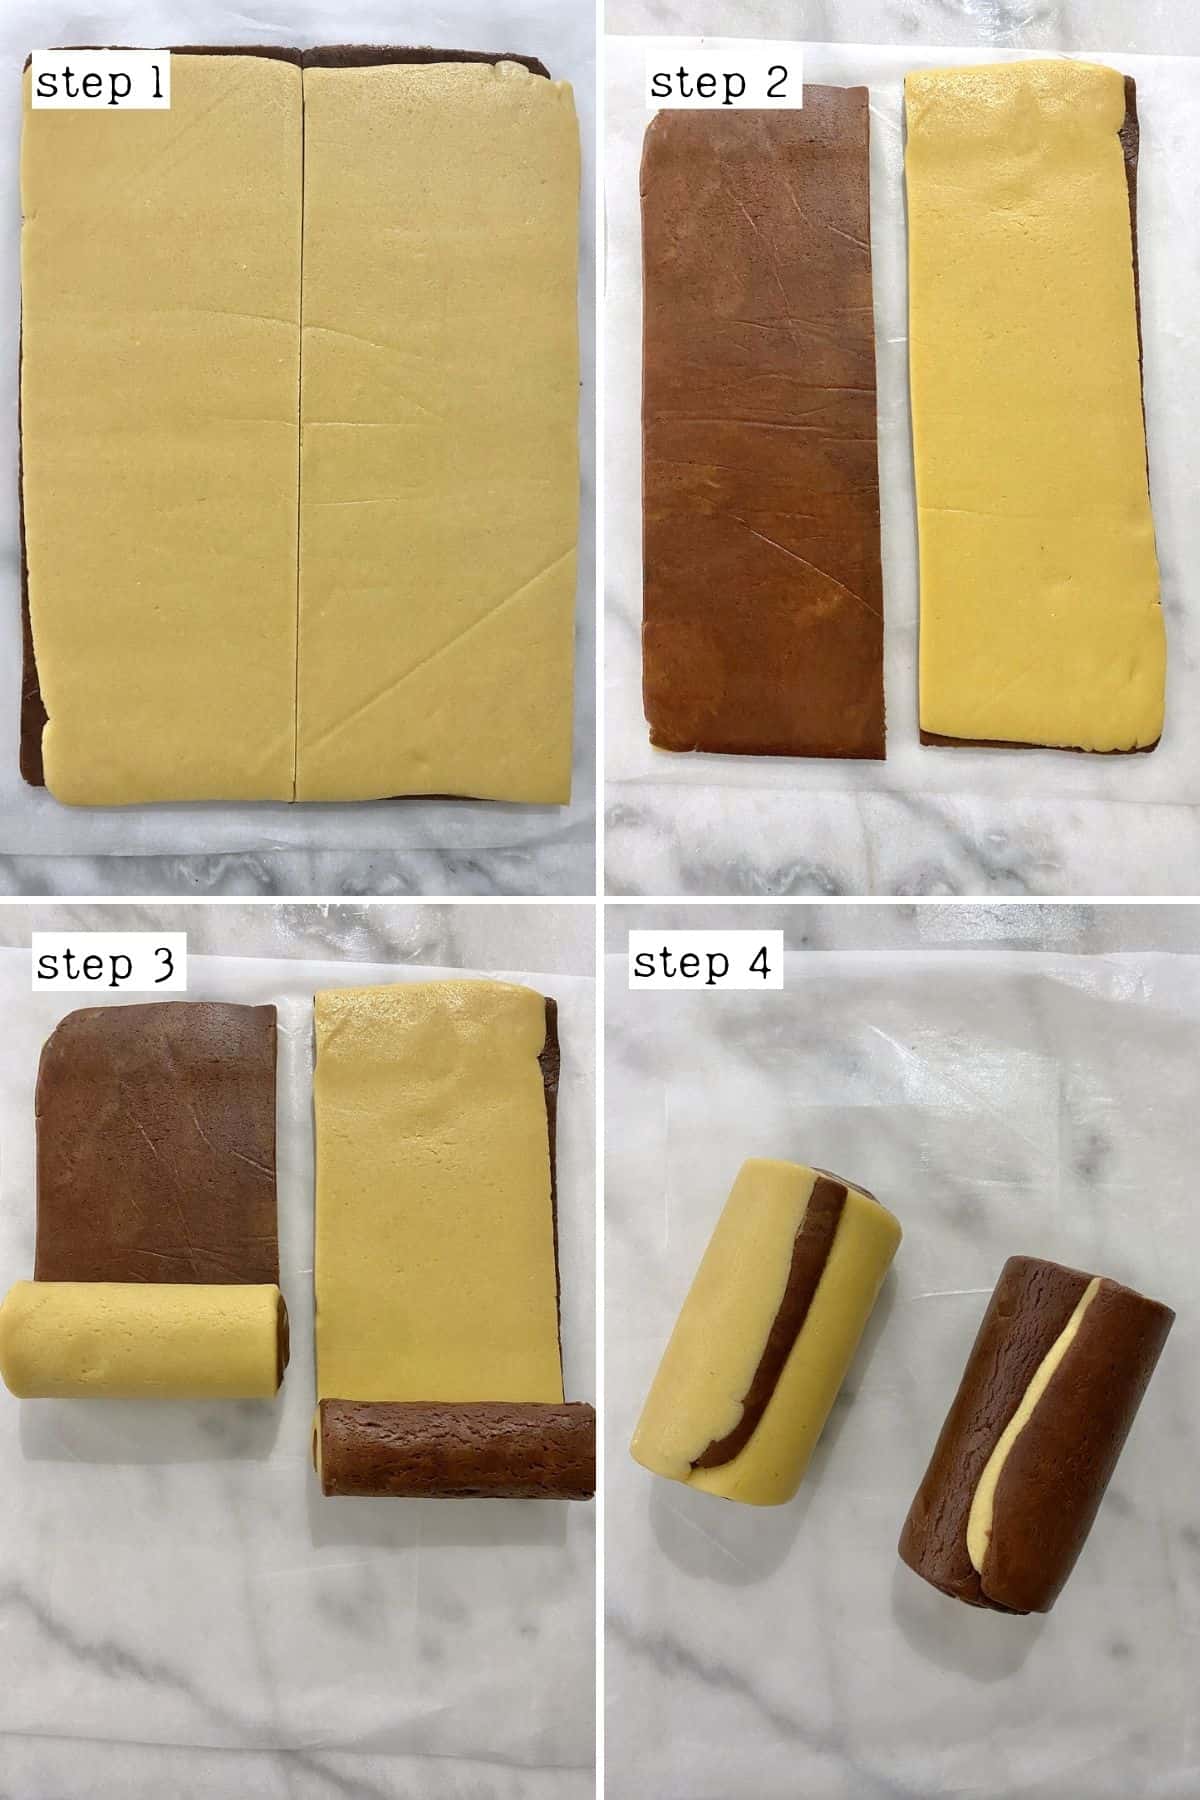
Now it’s time to gently roll the cookie dough into logs. You can use the parchment paper underneath to lift and help you create the first roll. Roll the first roll tightly to avoid gaps in the cookies.
If the dough cracks while rolling (more likely with the drier chocolate dough), just gently pinch it together and continue rolling. If there are cracks on the outer layer, roll it on the surface a little to smooth out the cracks.
TOP TIP: If you’re rolling a single log, I recommend rolling them from the longer side (for fewer swirls but a nice cookie size). If you roll from the short side, you’ll have tons of swirls and larger cookies – it’s up to you. If you’re creating two logs (as I did), I like to roll from the short side to create a nice swirl within.
Once rolled, re-wrap the roll/s in parchment paper. Then place back in the fridge to chill for an additional hour (or overnight). Alternatively, chill it in the freezer for 20-30 minutes.
Step 5: Slice and bake the pinwheel cookies
Preheat the oven to 350ºF/175ºC.
Then, remove the roll/s from the fridge. If the underside is slightly flat from resting in the fridge, lightly roll it on the surface to smooth it out. If you chilled the sugar cookie dough in the freezer, allow it a few minutes at room temperature before slicing.
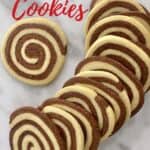
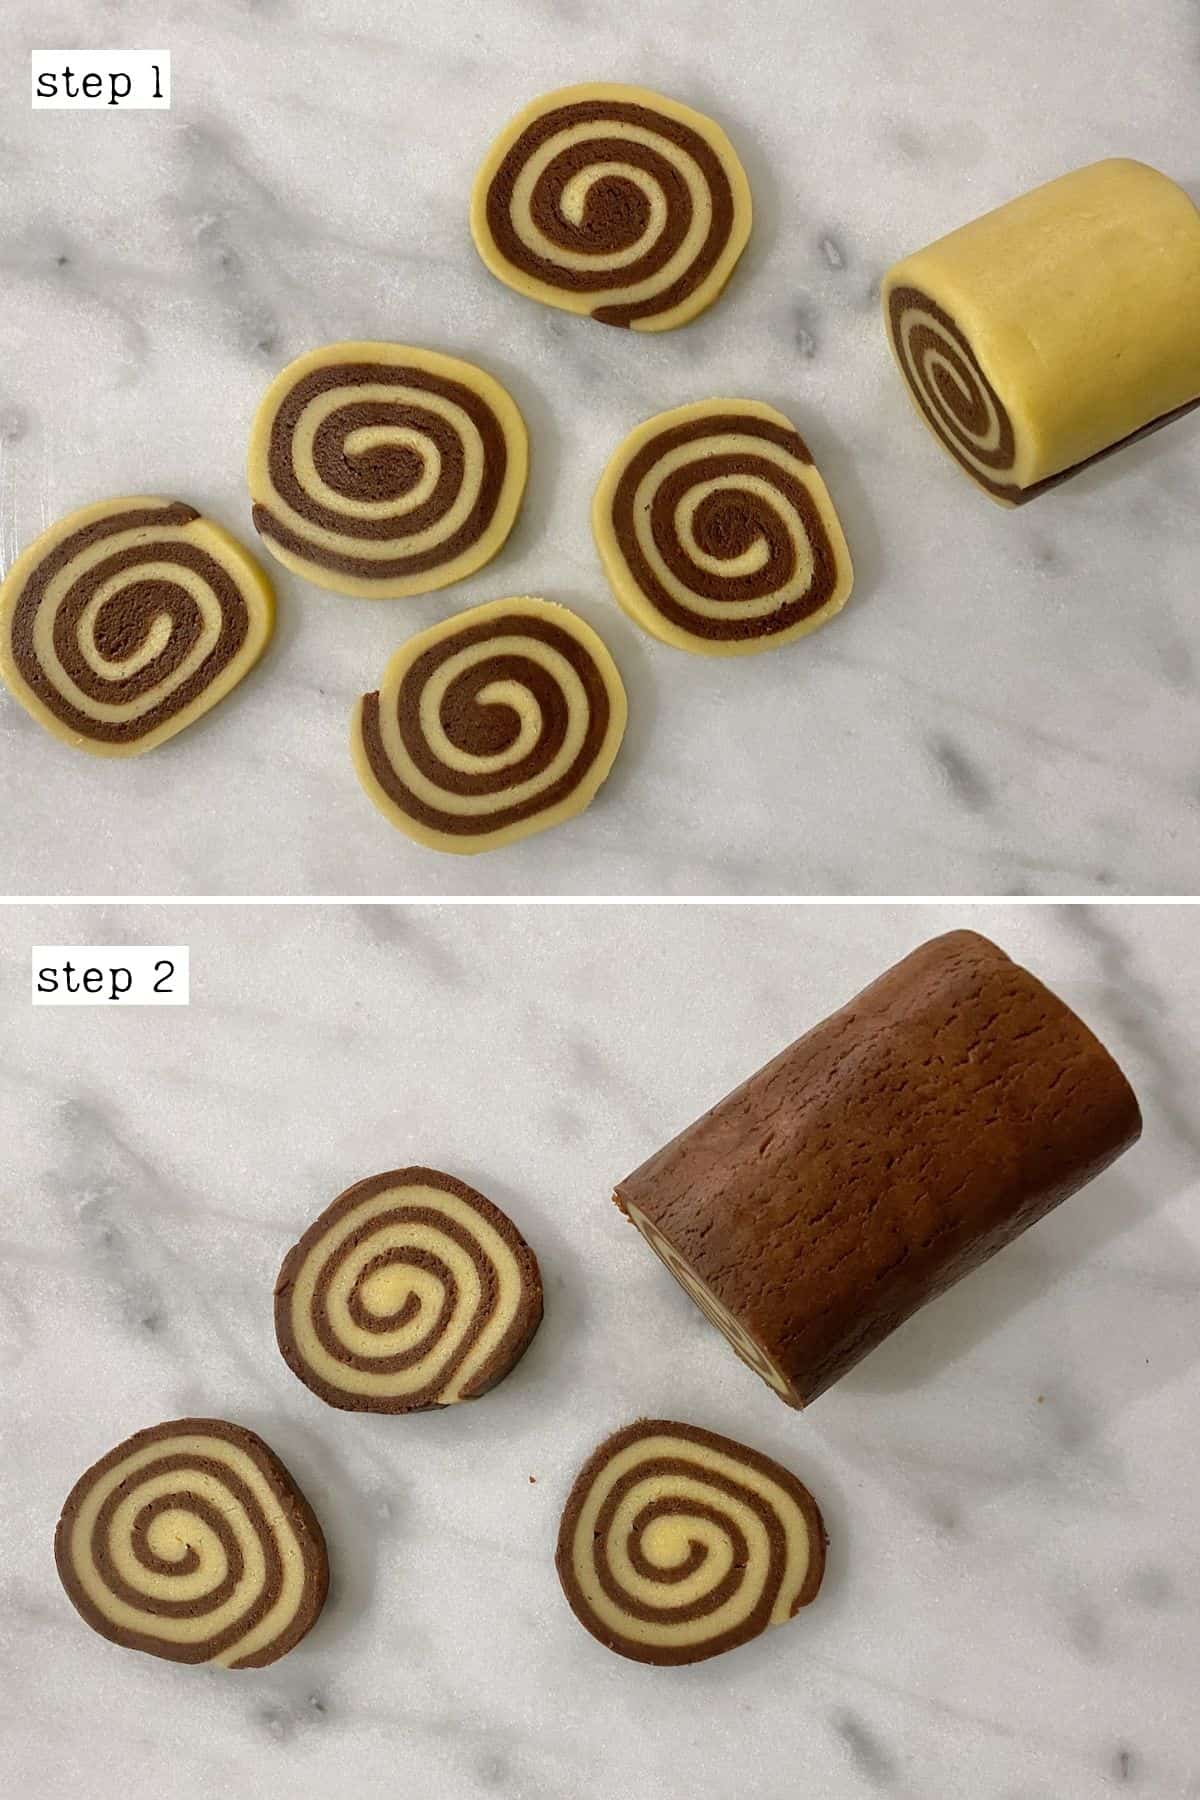
Then slice the log into ¼-inch cookies and place them on a parchment-lined baking sheet, separated by around 1 inch.
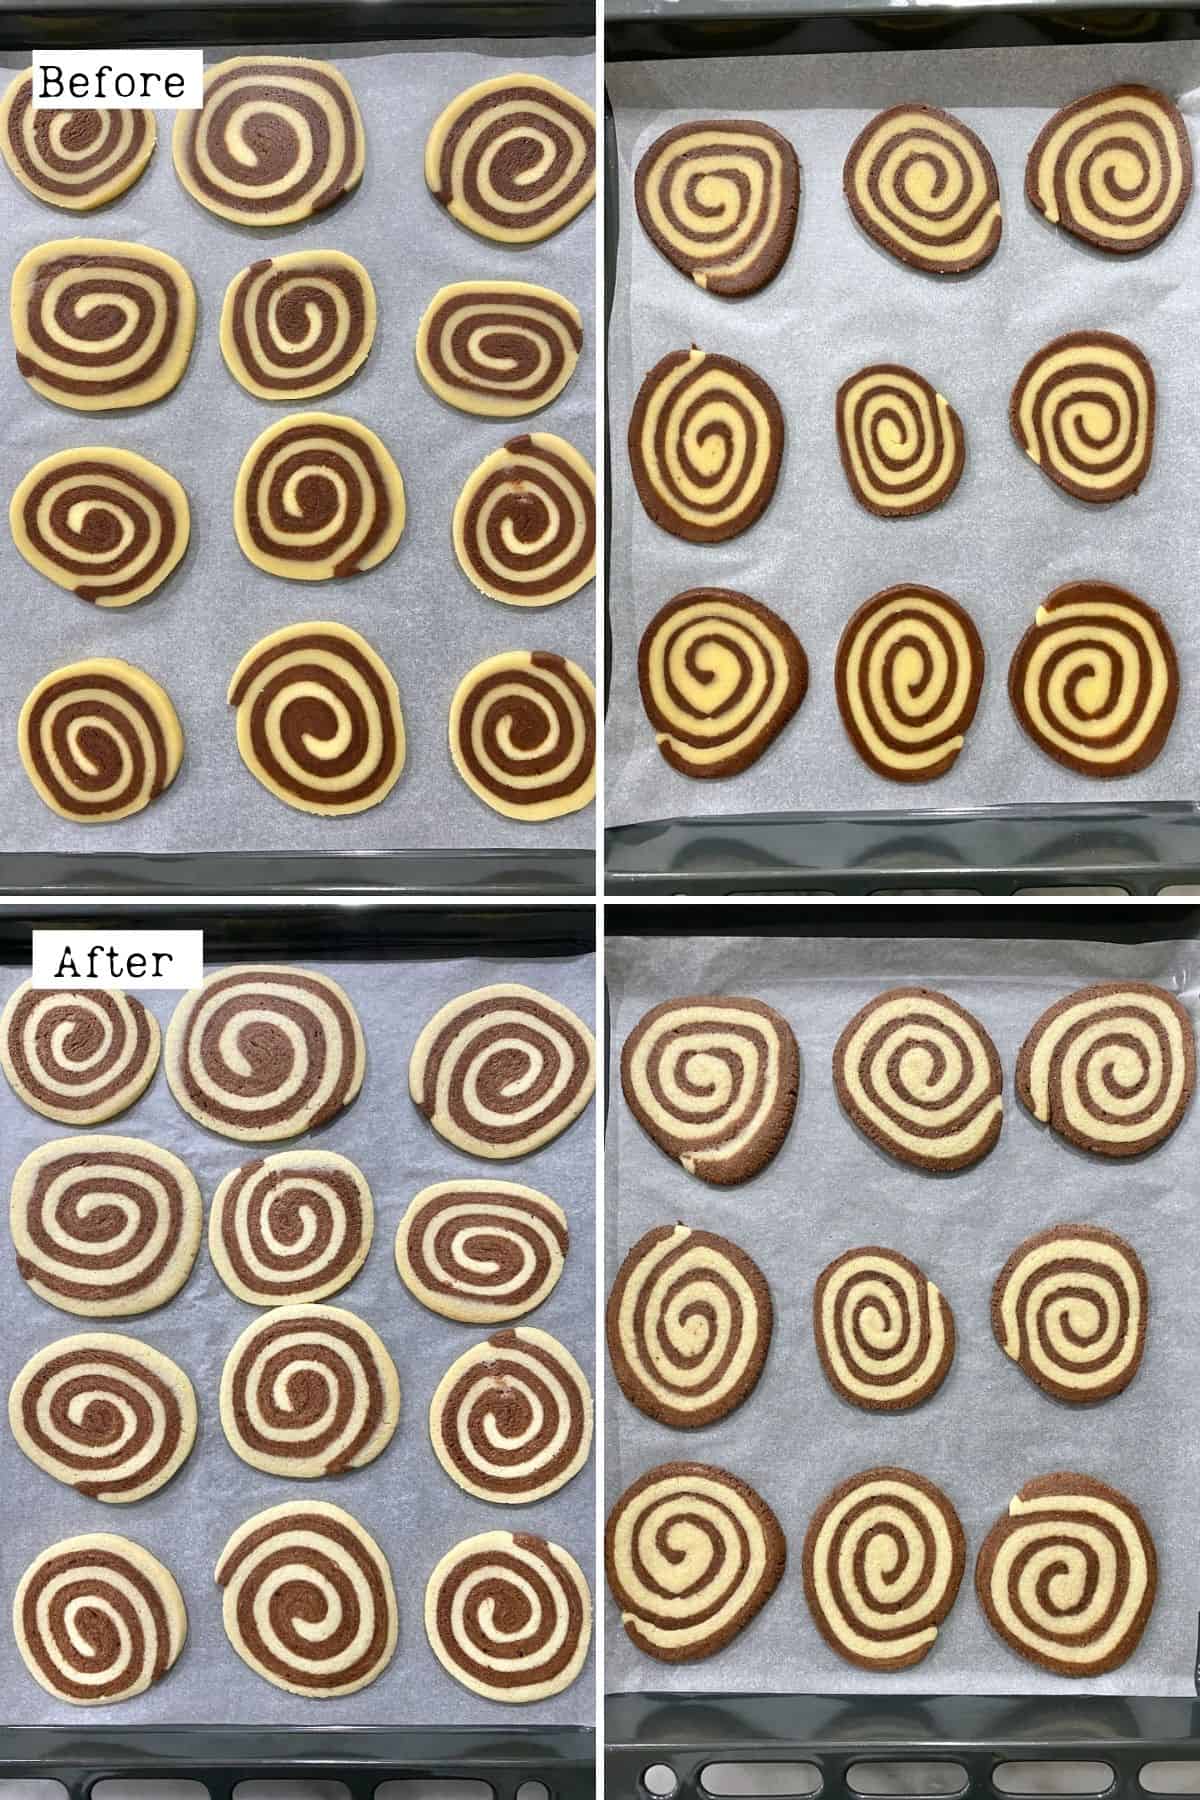
Then, place the cookie sheet on the middle shelf in the oven. Bake for between 10-12 minutes or until the edges are just becoming golden.
It’s best to bake one tray of cookies at a time (so it’s in the middle of the oven). While baking the first back, you can prepare and cut the cookies for the second. Alternatively, you can save the rest for later (read the storage section below for details).
Once baked, remove the cookies from the oven. Allow them to cool on the tray for a few minutes before transferring to a wire rack until fully cooled.
How to Store Chocolate Pinwheels?
- The mixed dough : wrap it in plastic wrap and store it in the fridge for 4-5 days or in the freezer for up to three months.
- The rolled cookie dough log : wrap tightly in plastic wrap and store in the freezer for up to three months. You can also gift the frozen logs to friends and family. That way, they can defrost (15-20 minutes at room temperature) and slice and bake the cookies when wanted.
- The sliced cookies : flash freeze the cookies spread out on a baking sheet (not touching) until solid. Then transfer to a freezer-safe container or Ziplock bag for 3 months.
Store : allow the chocolate pinwheel cookies to cool, and then store them in an airtight container on the counter for 3-5 days. You can also freeze the baked cookies for up to 3 months. Allow them to thaw on the counter before serving.
This is usually down to one of two things. First, the dough may be a little dry. In the case of the chocolate dough, it’s fairly dry and so is more prone to cracking unless you add a little more liquid or oil to the dough. The temperature of the dough can also affect how much it cracks. There is a delicate balance with these chocolate swirl cookies where we need the dough well-chilled, but when it’s cold, it tends to crack more.
I recommend slicing the chocolate pinwheels between ¼-inch and ½-inch. However, if you do the latter, you’ll need to increase the baking time, so monitor them.
Only slightly, not too much at all. The best way to decide how wide the cookies will be is to roll the dough lengthwise or widthwise.
First, I think it’s important to note that sugar does more than just flavor in baked goods. It can also affect the moisture, texture, and even “spread” of a baked good. For example, in cookie recipes, it can impact how much cookies spread and how dry/crumbly the cookies are. Having said that, if you want to reduce the sugar in this chocolate swirl cookie recipe, I recommend experimenting with reducing it by 25%.
Slice and bake cookies are exactly what they sound like. It’s cookie dough that you roll out into a log that can then be sliced and baked. No need for a cookie scoop, cookie cutter, etc. Like with these chocolate pinwheel cookies, you can keep the cookie dough log in the fridge or freezer (often referred to as icebox cookies) and simply slice off as many cookies as you want to bake in one go. Then return it to the fridge – easy peasy!
Icebox cookies refer to the fact that this “slice and bake” cookie dough can be stored in the refrigerator right until the moment of slicing and baking.
Make sure the cookie dough roll is well chilled (for at least an hour). Then remove it from the fridge, leave it for a minute, and use a sharp knife to slice in 1/4-1/2-inch slices. If the dough is still soft, return it to the fridge (or freeze for a few minutes). If it’s too firm, allow it to warm up at room temperature for a few minutes.
Recipe Top Tips and Notes
- Don’t skip the chilling : these chocolate swirl cookies are simple to prepare WHEN working with chilled dough. In fact, this recipe requires you to chill the dough at 2 stages. The second is particularly important as the chilled, firm dough allows you to easily slice it without squashing/misshaping the cookies.
- If you struggle to slice the cookies: (even after chilling the dough), you can slice pieces that are thicker and use a rolling pin to flatten them. Just note that they will obviously be larger, less-even shaped cookies, and you’ll be able to make less overall.
- If the dough is sticky: if you’ve added all the flour and the dough is still sticky, I recommend dividing the dough in half. Then add more flour, a teaspoon at a time, to one portion. The “stickier” dough should be the one you add the cacao powder to.
- It’s best to cook in batches: that way, you can use a single tray in the center of your oven so they cook evenly.
- Rolling the chocolate dough: as this dough is drier, it will be more prone to cracking, especially when chilled. I recommend removing it from the fridge a few minutes before the vanilla dough.
- If the chocolate dough is too dry : if you find the chocolate dough too dry or crumbly when rolling it out, add a little extra liquid to the dough. You can do this with water/milk or even a spoonful of oil. Add it one teaspoon at a time.
- To marble the chocolate vanilla cookies : simply divide the dough and take a ball of both the vanilla and chocolate, roll them together, and flatten. Each of the chocolate vanilla cookies will have a slightly different marble pattern.
More Christmas dessert recipes
- Orange Christmas Sugar Cookies
- Gingerbread cookies (and mug toppers)
- The ultimate guide to the best Christmas gingerbread house
- White Chocolate Peppermint Bark
If you try this old-fashioned chocolate pinwheel cookie recipe , I’d love to hear your thoughts/questions below. Also, I’d appreciate a recipe card rating below, and tag me in your recipe recreations on Instagram @Alphafoodie !
Equipment
- Stand mixer
- Balloon whisk
- Rolling Pin
- Parchment paper
IngredientsUS CustomaryMetric1x2x3x
- ▢ 16.75 oz all-purpose flour 3 cups
- ▢ 1 tsp baking powder
- ▢ 1/2 tsp salt
- ▢ 8.8 oz butter 1 cup, softened
- ▢ 8.1 oz white sugar 1 cup
- ▢ 2 eggs medium
- ▢ 1 tsp vanilla extract pure/natural is best
- ▢ 0.7 oz cacao powder 1/4 cup or cocoa powder
- ▢ 1 tsp instant coffee optional
- ▢ 1/4 tsp ground cinnamon powder or more to taste, optional
Check the Recipe Notes below for optional add-ins!
Instructions
Step 1: Prepare the Dough
- Sift the flour, baking powder, and salt into a large bowl and whisk to combine.
- In a separate bowl (or in a stand mixer), add the softened butter and beat until creamy. Then, gradually add the sugar, mixing constantly, until the mixture is a pale yellow and light and fluffy, with the sugar fully incorporated.
- Add the eggs (one at a time) and the vanilla to the creamed butter, mixing well in-between each addition.
- Finally, add the flour mixture incrementally, mixing in between, until a dough forms. It shouldn’t be sticky.
Step 2: Divide the Dough
- Weigh the biscuit dough and divide it into two even pieces. Wrap one in plastic wrap and return the other half to the mixer/bowl.
- Add the cacao powder, instant coffee, and cinnamon (if using) to the dough and mix well until incorporated. You can optionally chill the dough at this point for at least 30 minutes (up to a day) wrapped in plastic wrap in the refrigerator. However, I find it simpler to roll out into the rectangles first.
Step 3: Shape the Dough and Chill
- Place the first dough ball between two sheets of parchment paper and roll into a rectangle that’s as close to 9×14-inches (23x35cm) and ¼-inch (0.6cm) thick. Remove the excess to make it a neat rectangle (the scraps can make spare marbled chocolate vanilla cookies). I like to measure the size on the parchment paper first, marking it with a pencil (on the side opposite the dough). That way, you can use it as a guideline while rolling.
- Repeat this step with the other dough ball – make sure the dough sheets are equal in size. Then transfer both to the fridge for at least an hour to chill (or for up to a day).
Step 4: Roll the Pinwheel Cookies
- Decide which (chocolate or vanilla dough) you want to be the outer and inner swirl in the pinwheel cookies. OR, if you can’t decide, you can even do half and half, as I did.
- Place the color you want to be the “outer” swirl on the counter first and peel away the top layer of parchment paper. Then, remove the parchment paper from the top of the other sheet and carefully flip it over, placing it on top of the first sheet. Then gently roll or press just to make sure the two adhere slightly. If you want half and half, now you can slice the sheets in half lengthwise and flip one over (so the color on the bottom is now on top).
- Now it’s time to gently roll the cookie dough into logs. You can use the parchment paper underneath to lift and help you create the first roll. Roll the first roll tightly to avoid gaps in the cookies. If the dough cracks while rolling (more likely with the drier chocolate dough), just gently pinch it together and continue rolling. If there are cracks on the outer layer, roll it on the surface a little to smooth out the cracks. TOP TIP: If you’re rolling a single log, I recommend rolling them from the longer side (for fewer swirls but a nice cookie size). If you roll from the short side, you’ll have tons of swirls and larger cookies—it’s up to you. If you’re creating two logs (As I did), I like to roll from the short side to create a nice swirl within.
- Once rolled, re-wrap the roll/s in parchment paper. Then place back in the fridge to chill for an additional hour (or overnight). Alternatively, chill it in the freezer for 20-30 minutes.
Step 5: Slice and Bake the Pinwheel Cookies
- Preheat the oven to 350ºF/175ºC.
- Remove the roll/s from the fridge. If the underside is slightly flat from resting in the fridge, lightly roll it on the surface to smooth it out. If you chilled the sugar cookie dough in the freezer, allow it a few minutes at room temperature before slicing.
- Slice the log into ¼-inch cookies and place them on a parchment-lined baking sheet, separated by around 1 inch.
- Place the baking tray on the middle shelf in the oven. Bake for between 10-12 minutes, or until the edges are just becoming golden. It’s best to bake one tray of cookies at a time (so it’s in the middle of the oven). While baking the first back, you can prepare and cut the cookies for the second. Alternatively, you can save the rest for later (read the storage section below for details).
- Once baked, remove the cookies from the oven. Allow them to cool on the tray for a few minutes before transferring to a rack until fully cooled.
How to Store Chocolate Pinwheels?
- Make ahead : there are several ways you can make these old-fashioned pinwheel cookies ahead. The mixed dough: wrap it in plastic wrap and store in the fridge for 4-5 days or in the freezer for up to three months. The rolled cookie dough log : wrap tightly in plastic wrap and store in the freezer for up to three months. You can also gift the frozen logs to friends and family. That way, they can defrost (15-20 minutes at room temperature) and slice and bake the cookies when wanted. The sliced cookies : flash freeze the cookies spread out on a baking sheet (not touching) until solid. Then transfer to a freezer-safe container or Ziplock bag for 3 months. Store : allow the chocolate pinwheel cookies to cool and then store in an airtight container on the counter for 3-5 days. You can also freeze the baked cookies for up to 3 months. Allow them to thaw on the counter before serving.
Notes
- Don’t skip the chilling : these chocolate swirl cookies are simple to prepare WHEN working with chilled dough. In fact, this recipe requires you to chill the dough at 2 stages. The second is particularly important as the chilled, firm dough allows you to easily slice it without squashing/misshaping the cookies.
- If you struggle to slice the cookies: (even after chilling the dough), you can slice pieces that are thicker and use a rolling pin to flatten them. Just note that they will obviously be larger, less-even-shaped cookies, and you’ll be able to make less overall.
- If the dough is sticky: i f you’ve added all the flour and the dough is still sticky, I recommend dividing the dough in half. Then add more flour, a teaspoon at a time, to one portion. The “stickier” dough should be the one you add the cacao powder to.
- It’s best to cook in batches: that way, you can use a single tray in the center of your oven, so they cook evenly.
- Rolling the chocolate dough: as this dough is drier, it will be more prone to cracking, especially when chilled. I recommend removing it from the fridge a few minutes before the vanilla dough.
- If the chocolate dough is too dry : if you find the chocolate dough too dry or crumbly when rolling it out, add a little extra liquid to the dough. You can do this with water/milk or even a spoonful of oil. Add it one teaspoon at a time.
- To marble the chocolate vanilla cookies : Simply divide the dough and make a ball of both the vanilla and chocolate, roll them together, and flatten. Each of the chocolate vanilla cookies will have a slightly different marble pattern.
Nutrition
Nutrition information is automatically calculated, so should only be used as an approximation.
Recipes › Desserts
Almond Pistachio Thumbprint Cookies Recipe
By Samira Kazan
updated September 21, 2020

Delicious gluten-free, vegan bite-size almond & pistachio thumbprint cookies. Not only are they easy to make- they can either be baked or kept as a no-bake cookie recipe!
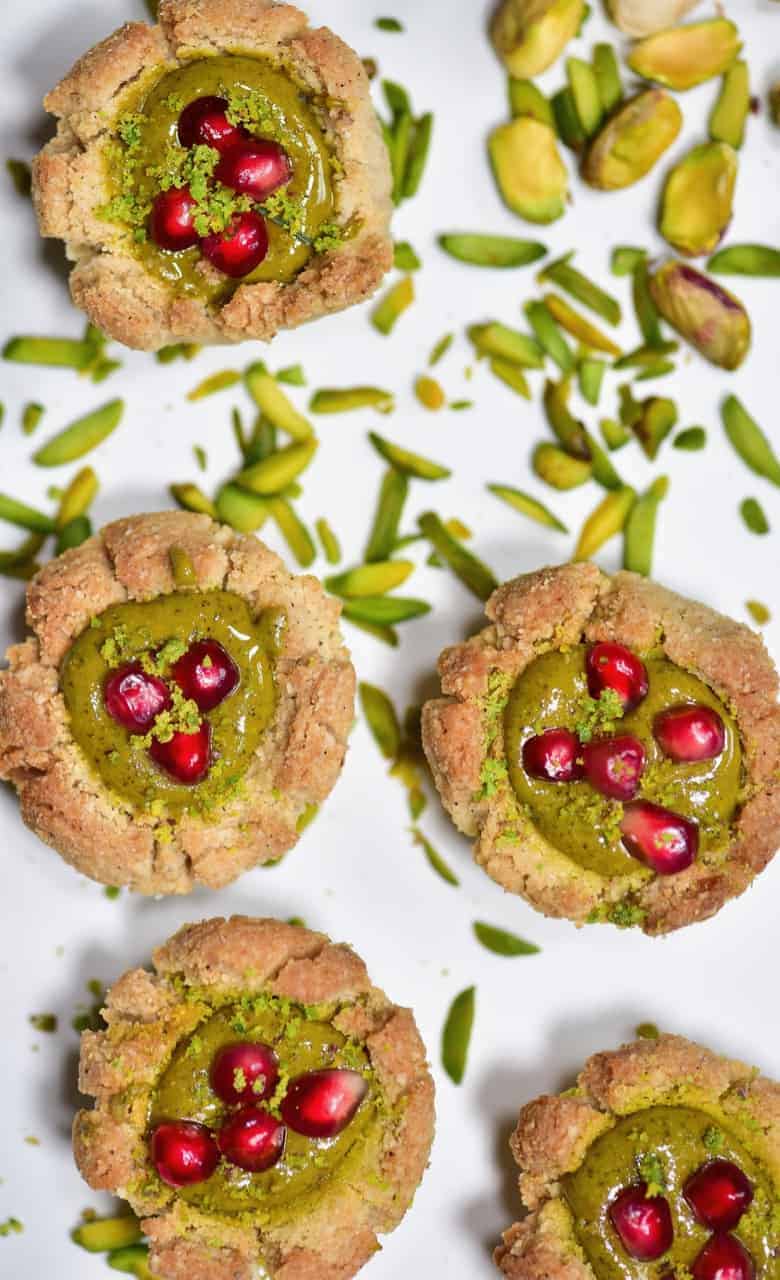
These almond pistachio thumbprint cookies are a delicious vegan and gluten-free cookies recipe using almond flour and pistachio butter. Unlike your generic shortbread thumbprint cookies, these vegan bite-size snacks have a delightful crumbly almond base and can be cooked or kept as a no-bake cookie recipe.
Depending on whether you want these as raw snacks or baked cookies, they are delicious. However, it’s worth noting that there will be some textural difference.
For the raw version, these pistachio thumbprint cookies are a little more gooey and moist. In comparison, when baked, these cookies are more crumbly.
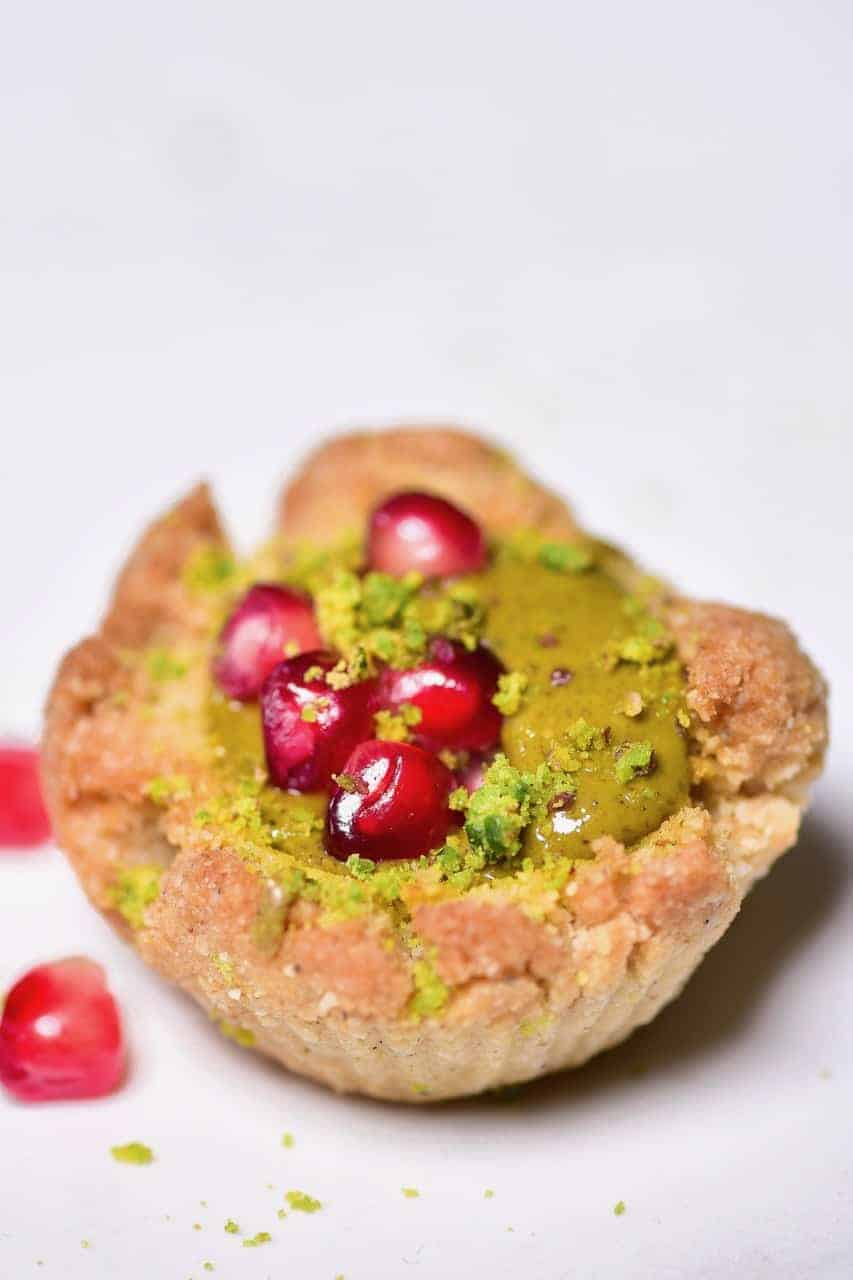
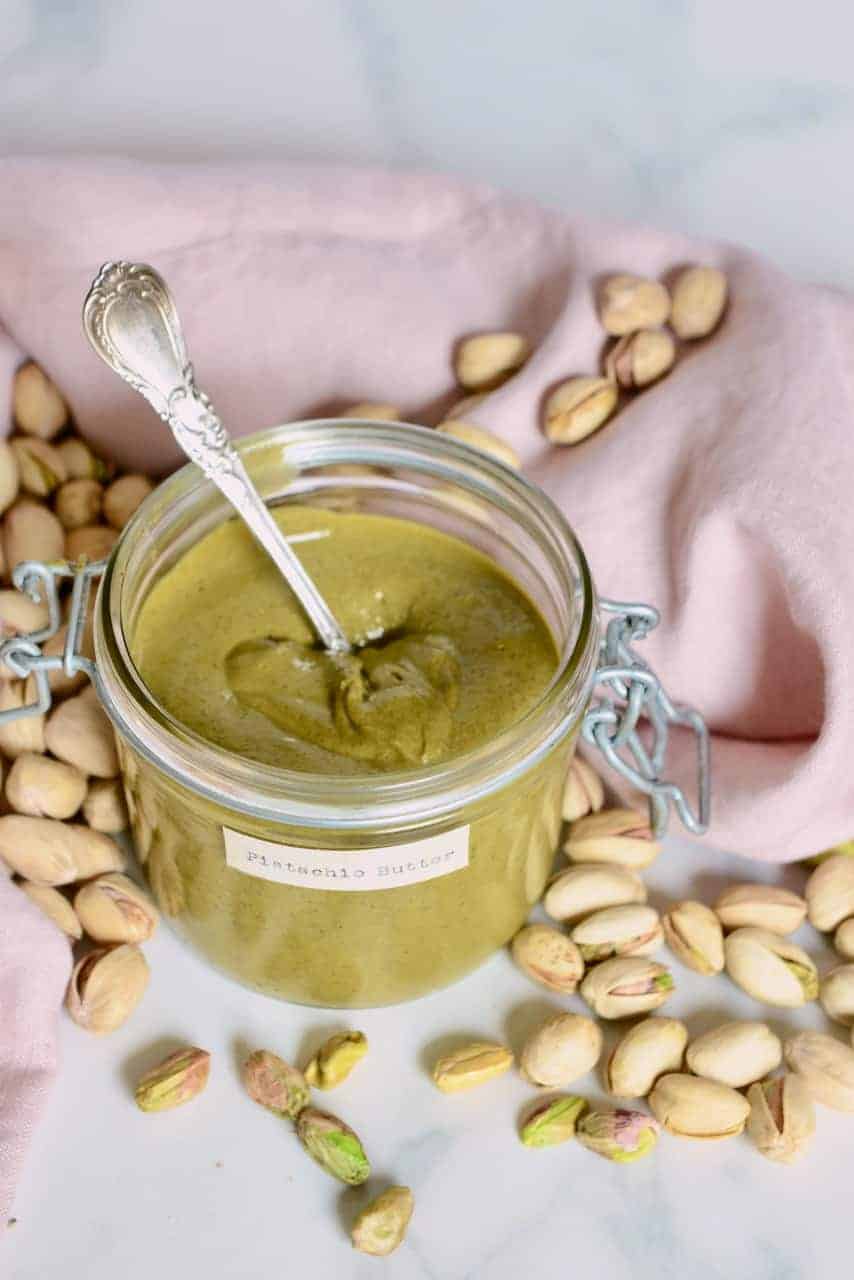
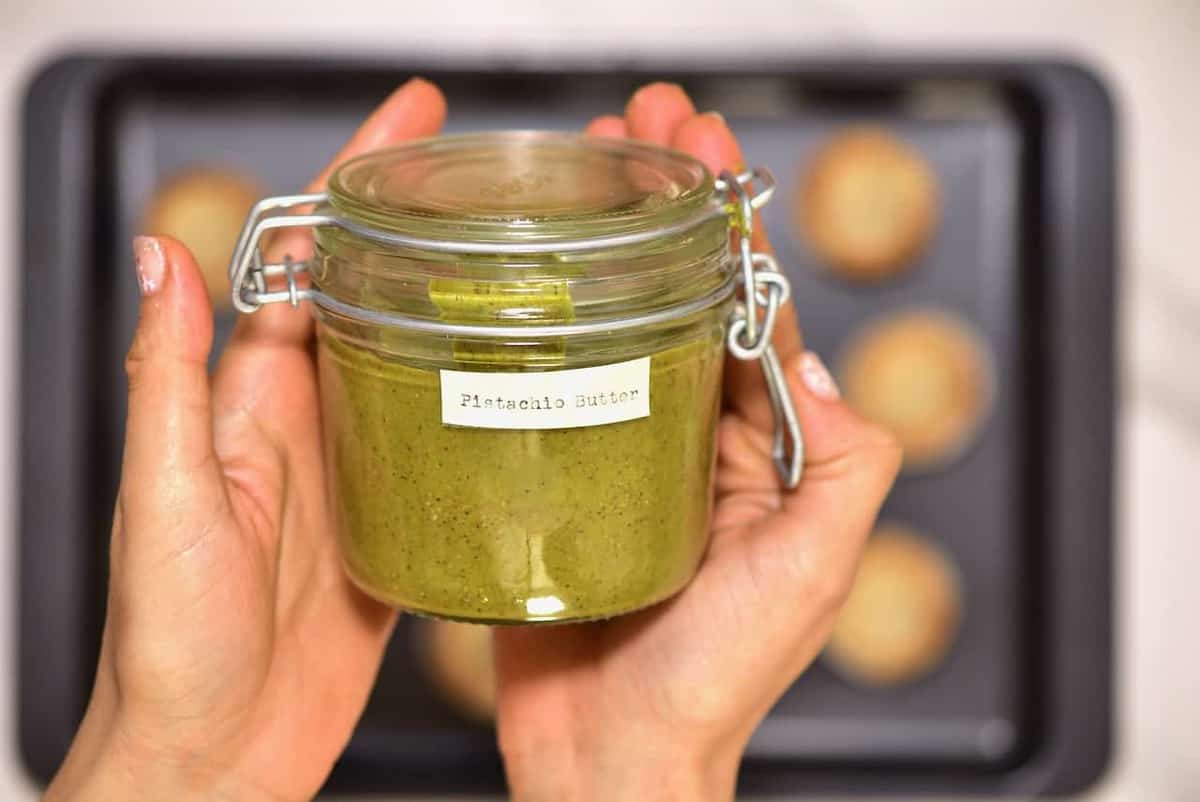
I always love to switch up classic recipes and decided that rather than using the usual choice of jam filling for this thumbprint cookie recipe, I used some homemade pistachio butter .
Pistachio butter is one of the most delicious, decadent version of all nut butters and yet can be made at home with just pistachios, salt and a blender or food processor. Plus the pistachio flavour compliments the flavour of the gluten-free almond cookies.
These cookies are then an excellent healthier cookie snack option. They can also be displayed in mini cupcake cakes, in a gift box, for a delicious homemade edible gift at Christmas (or any time of the year!).
If you’ve been following me on Instagram, you’ll know that I’ve been cooking up a storm this festive period, with a new recipe posted every day. Honestly, I couldn’t wait for the day to share these pistachio thumbprint cookies though because they are one of my favourite treats so far.
I’ve very recently compiled a post for the ultimate guide to homemade nut & seed butters, so I have spent a LOT of time this year in the kitchen blending up delicious nut butters and nut butter recipes. As much as I have a soft spot for good old almond butter, pistachio butter has taken my heart.
While it’s not a nut butter you’d want to eat by the spoonful every day (or rather you would – but your hips wouldn’t like it!), pistachio butter has an incredible luxury element that works well in so many different recipes. Check out my pistachio butter post for some inspiration.
Want to save this recipe?
- Variations on these thumbprint cookies
- How To Make The Thumbprint Cookies
- Other great snack recipes you may like
- Pistachio Almond Cookies Recipe
Variations on these thumbprint cookies
Obviously, my filling of choice is my homemade pistachio butter. However, you can experiment with various fillings including a delicious vegan homemade Nutella , the classic choice of jam, or even some vegan chocolate chips (that will melt from the heat and be heavenly!).
For a sweeter pistachio creme style filling, melt some white chocolate in a heatproof bowl then mix in some pistachio butter with a dash of homemade vanilla powder .
You can also make a delicious chocolate version of these pistachio thumbprint cookies by adding some cocoa powder into the base almond cookies recipe. If the biscuit mix feels too crumbly after adding the powder, add another tsp of coconut oil to offset the powder.
Plus, you can experiment with additional toppings for the pistachio thumbprint cookies. For example, a drizzle of melted white chocolate is a lovely dessert-like touch.
Note* For vegan cookies use dairy-free white chocolate and chocolate chips.
How To Make The Thumbprint Cookies
This pistachio thumbprint cookies recipe is super simple and can be made in just five minutes if you’re keeping them raw. Or around 20 minutes, if baking- which means they’re an excellent option for a last-minute edible gift idea or to whip up on busy days when you don’t have much time to spare.
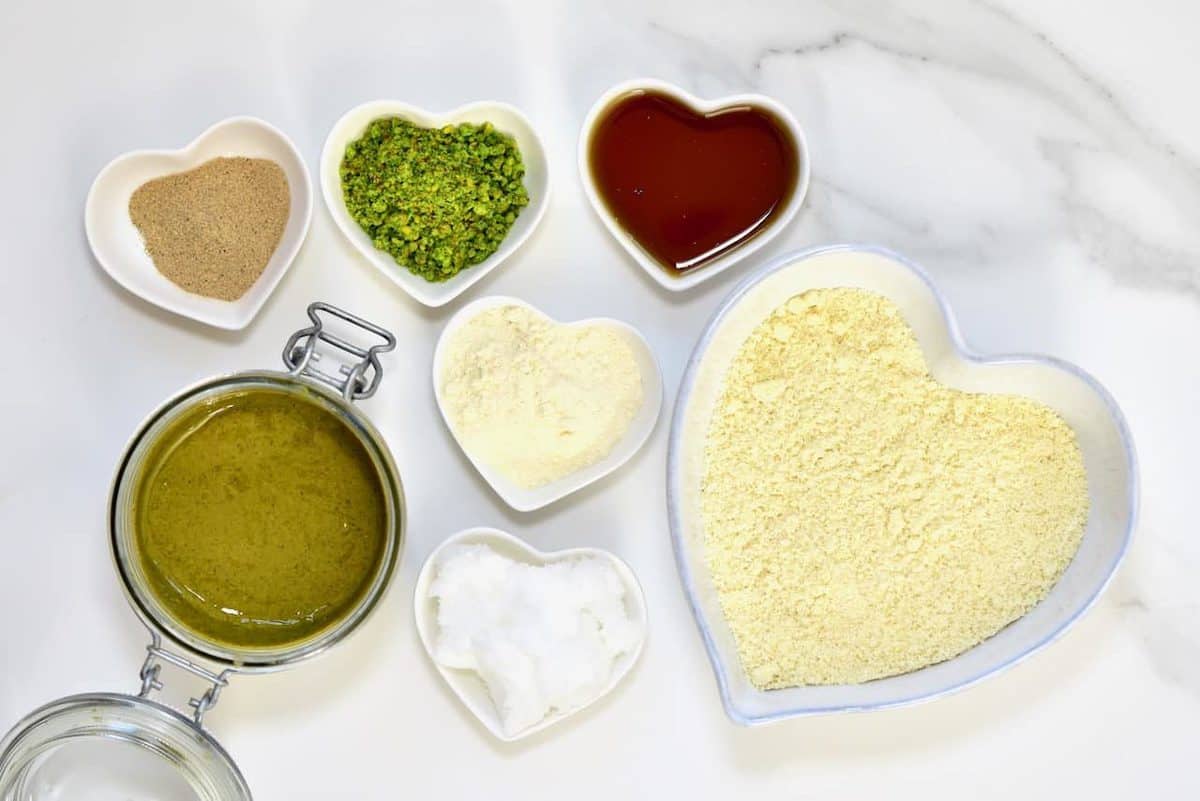
The almond cookies base is made up of almond flour, coconut oil, maple syrup, coconut flour and cardamon.
Don’t fret if you don’t have almond flour to hand though as this can be whizzed up in a couple of minutes. Blitz some raw almonds in a high-speed food processor for a couple of minutes and you’ll get homemade almond flour, which is a great gluten-free flour to have to hand at all times.
This recipe is also a great way to use leftover almond pulp after making homemade almond milk . Simply allow the pulp to dry out, and it’s ready to use as almond flour.
Note* For this particular recipe the ground almonds don’t have to be too fine, which is why any of the above options will work fine for the almond cookies recipe.
The method
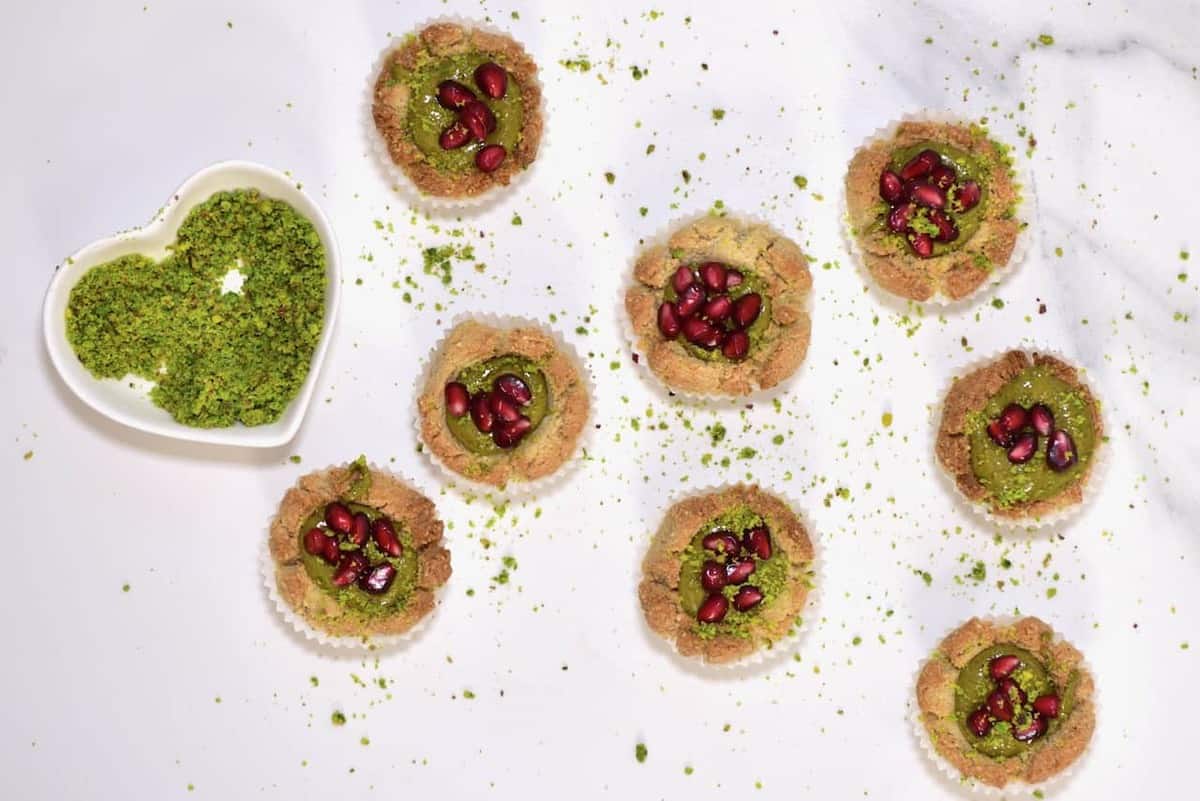
To begin, mix the almond flour with the other base ingredients and then form small, one bite-sized cookies. If you want you can measure these out and use around 1tbsp per cookie. However, I eyeballed it and made 14 of them.
To make them into thumbprint cookies, the process is precisely what it says. Roll each piece of dough into a ball, and then you can use a finger/ thumb to make the indentations. You could also use the rounded back of a spoon. In fact, I used a small 1/2 tsp measuring spoon for an even indentation in each cookie.
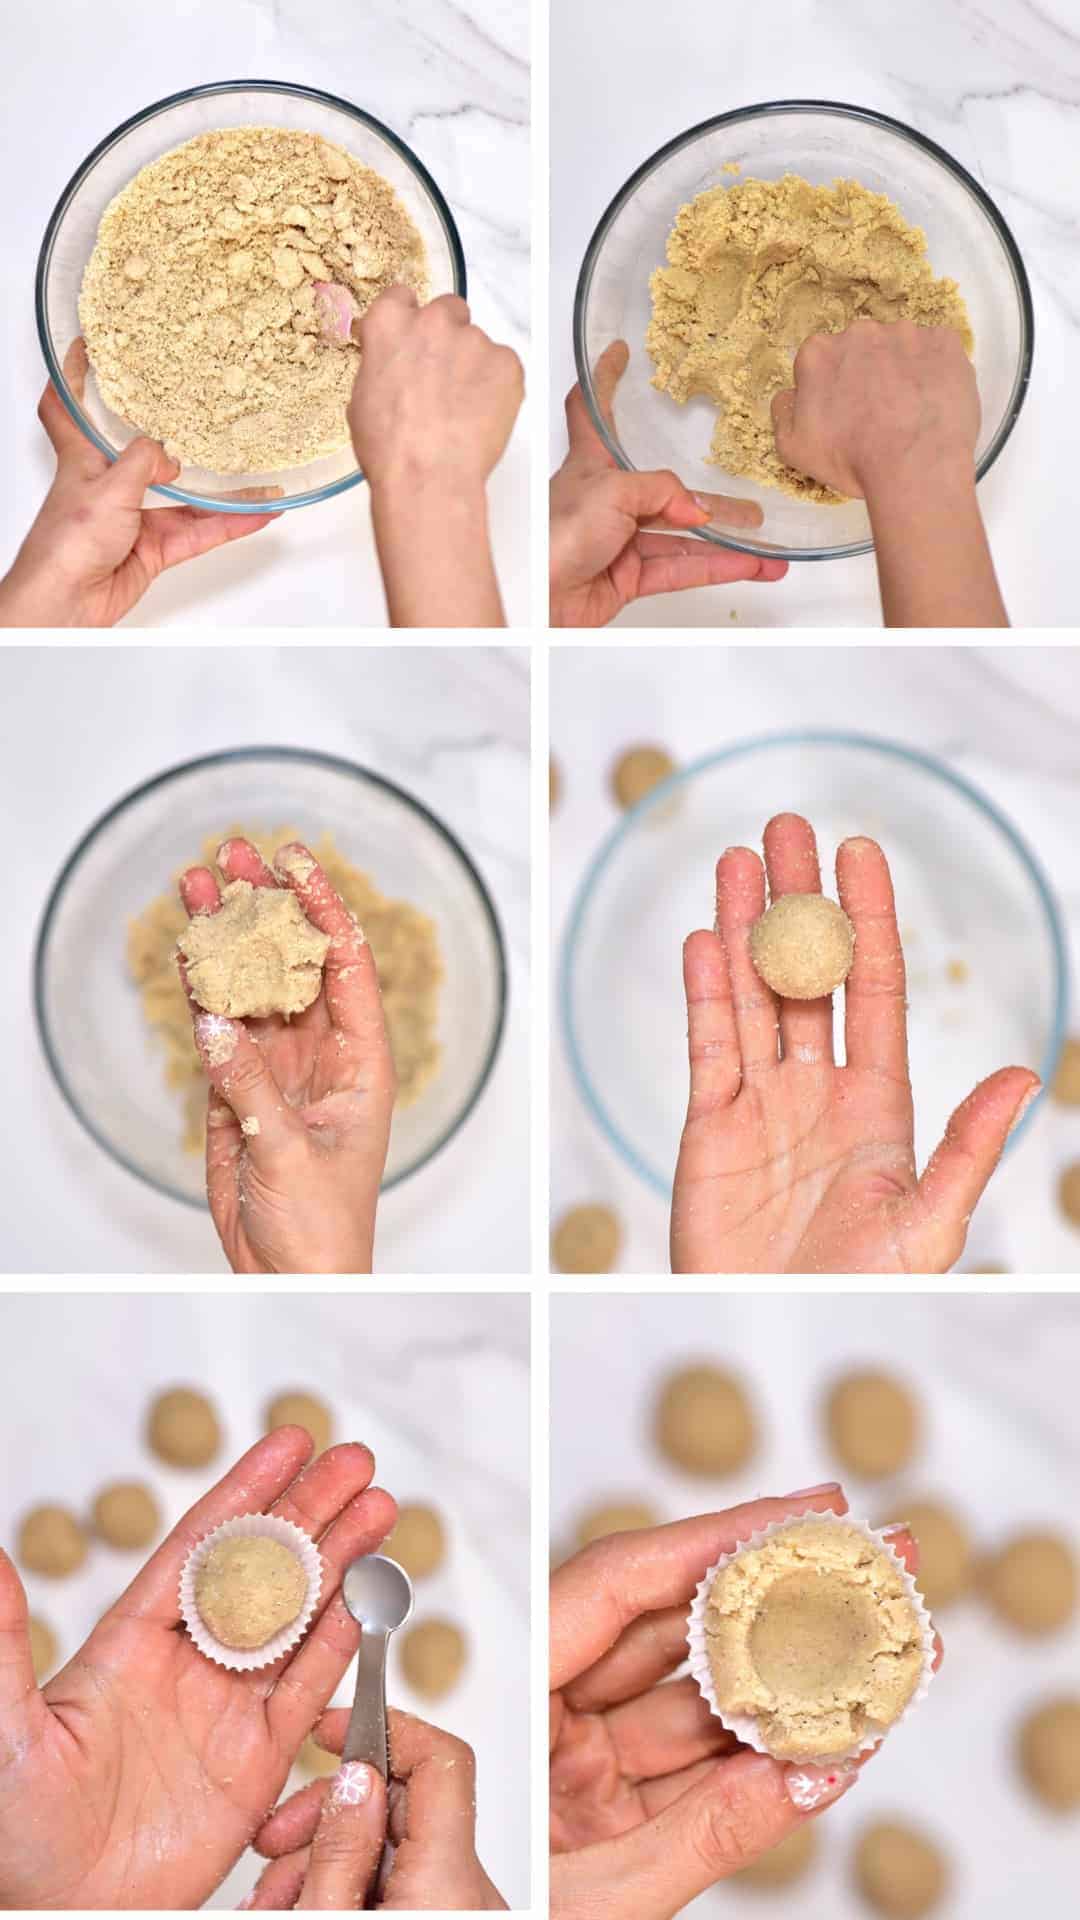
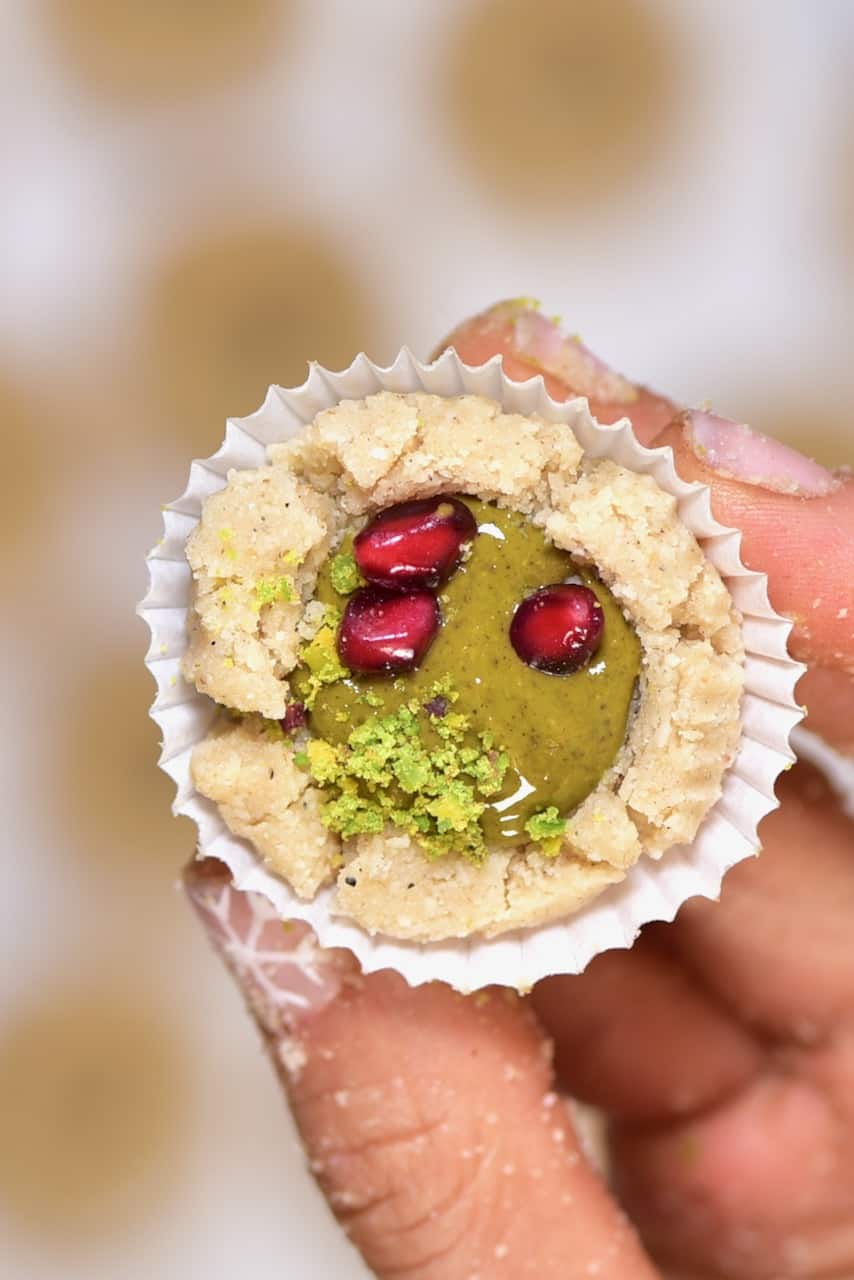
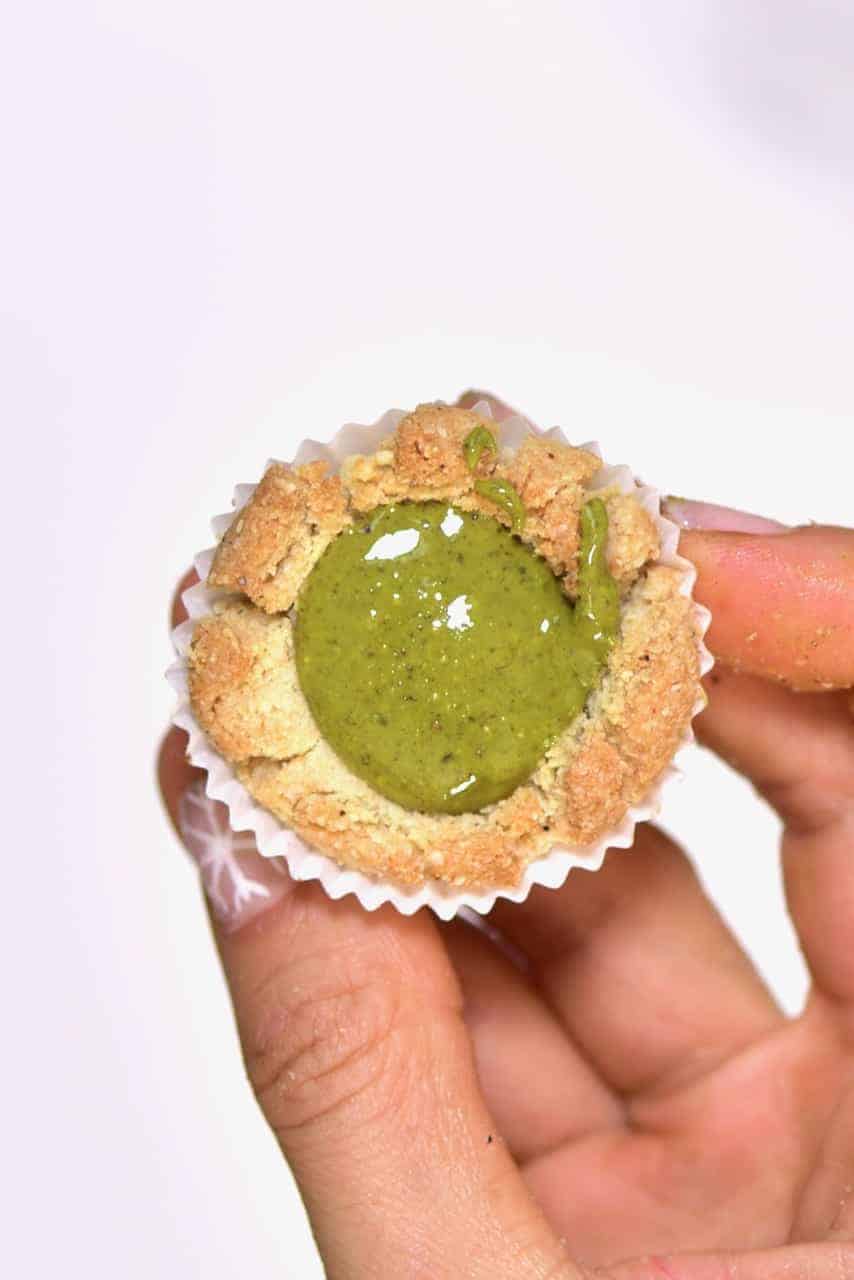
If you’re in a hurry to enjoy these delicious cookies, then you can have these as a no-bake cookie recipe by simply adding some pistachio butter to them now and decorating with some pomegranate seeds and chopped pistachios.
Note* Due to the gluten-free nature of these cookies and the lack of dairy, these cookies are more crumbly than general cookie dough so cracking around the edges when pressing your indentation is perfectly normal.
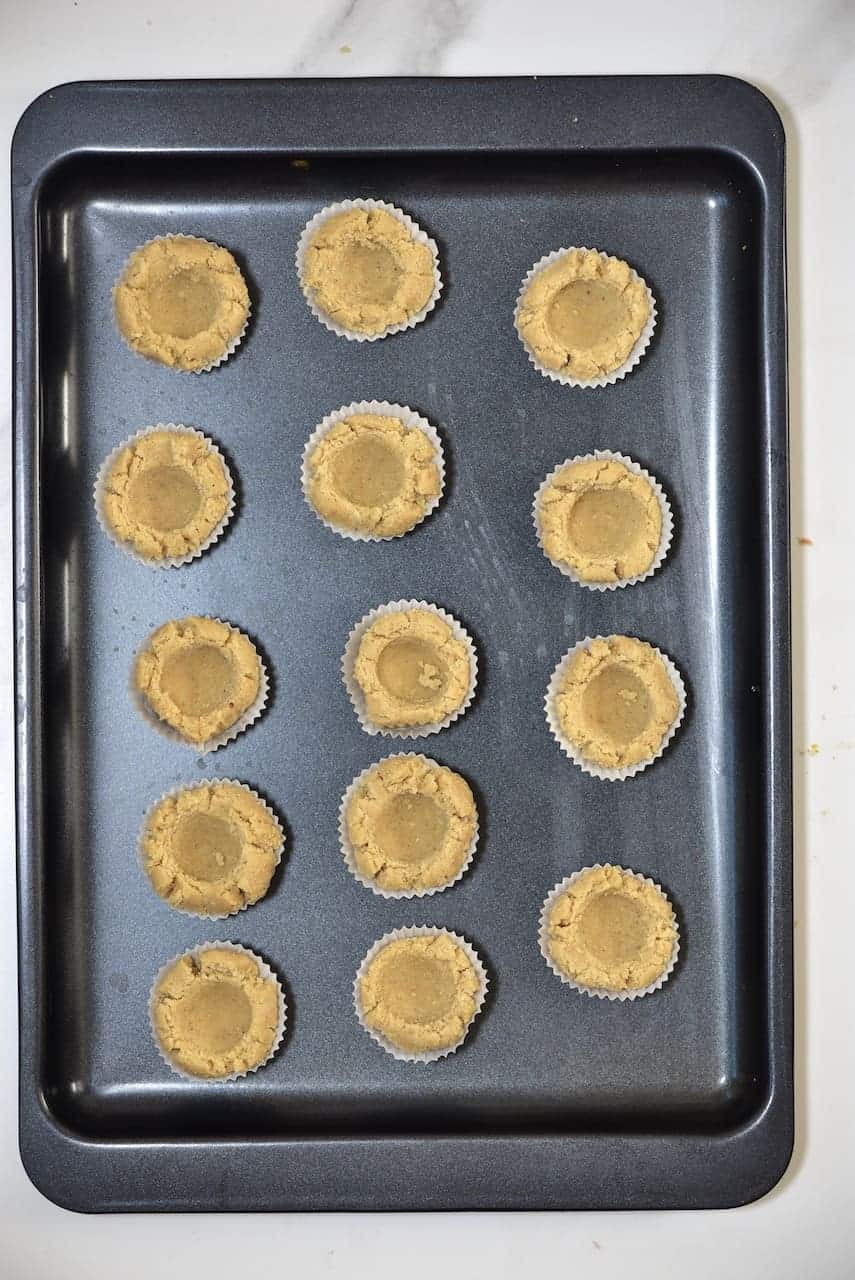
However, if you want to bake the cookies, then you can now bake them in the oven either in mini cupcake cups or on a baking tray lined with parchment paper.
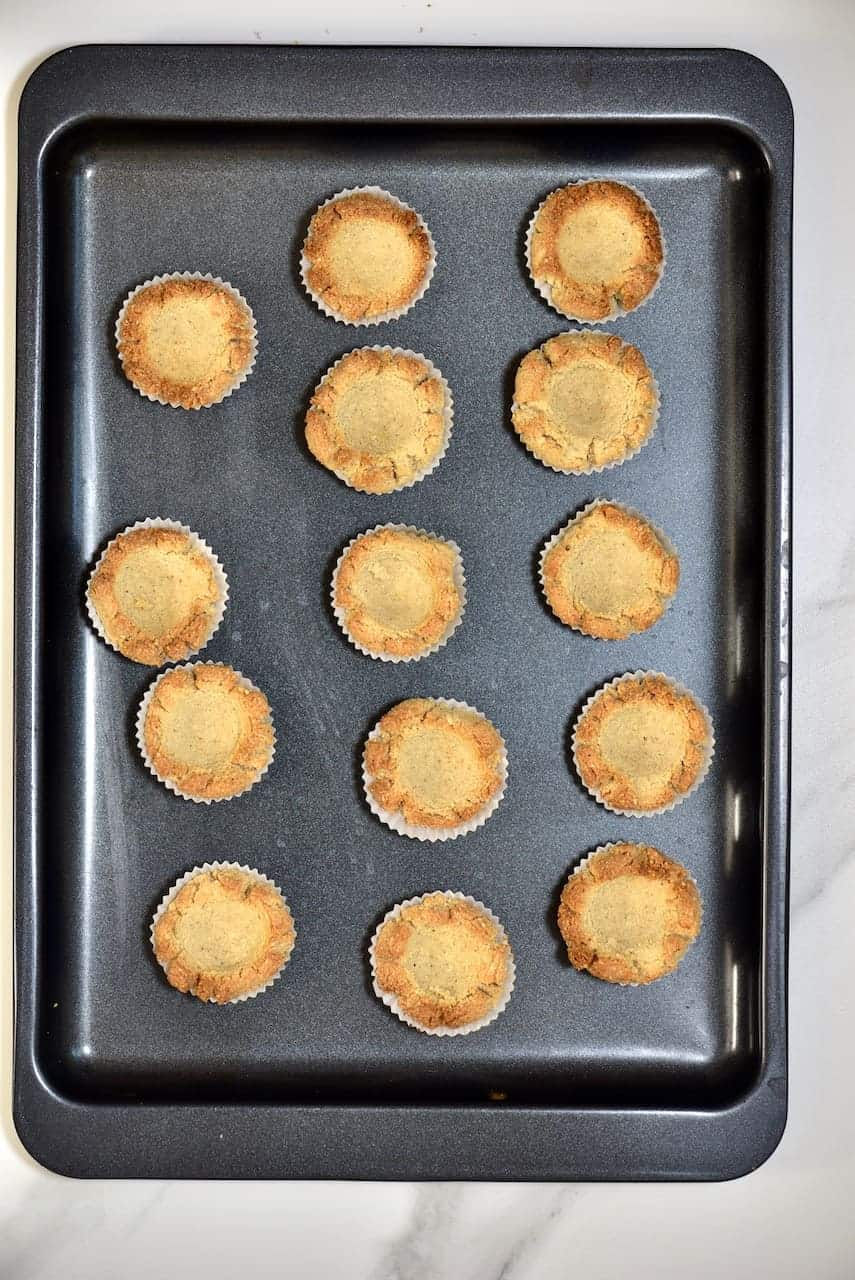
These only take ten minutes to bake in the oven and will turn a lovely golden colour around the edges.
If you want to use some chocolate chips as a filling, you’ll want to add these to the cookies while they’re still warm, so they melt into the thumbprint.
For the pistachio butter-filled cookies, allow the cookies to cool down a bit before filling them.
Again you can decorate the pistachio cookies with pomegranate seeds and ground pistachios or even a sprinkle of desiccated coconut. Also, feel free to experiment with other fillings and toppings of your choice.
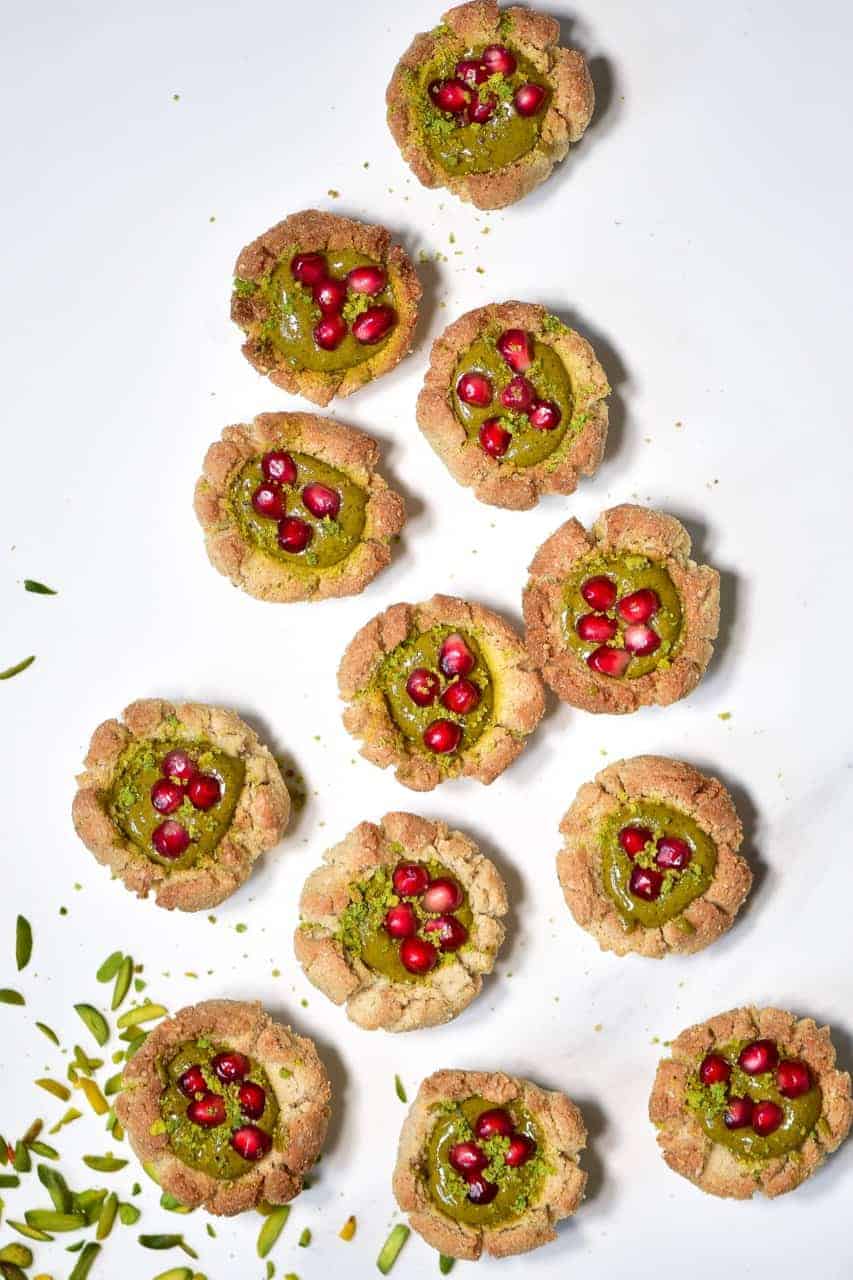
For a sweeter, dessert-like version you can drizzle some white chocolate over the cookies at the end. Or, for a chocolate thumbprint cookie version, you can add some cocoa powder into the base almond cookie recipe.
Other great snack recipes you may like
For another delicious no-bake snack recipe, you may like these healthy cacao & almond protein balls or these coconut bliss balls . These 4-Ingredient Stuffed Dates: with home-made almond butter & Chocolate are always a winner too!
IngredientsUS CustomaryMetric1x2x3x
- ▢ 2 cups almond flour
- ▢ 3 tBsp coconut oil
- ▢ 1 tsp ground cardamom powder
- ▢ 2 tBsp maple syrup
- ▢ 2 tBsp coconut flour
- ▢ 1/4 cup pistachio butter
Toppings (optional)
- ▢ ground pistachios
- ▢ pomegranate seeds
Instructions
- To begin, mix the almond flour* with the other base ingredients and then form small, one bite-sized cookies. If you want you can measure these out and use around 1tbsp per cookie. However, I eyeballed it and made 14 of them.
- To make them into thumbprint cookies, the process is precisely what it says. Roll each piece of dough into a ball, and then you can use a finger/ thumb to make the indentations. You could also use the rounded back of a spoon. In fact, I used a small 1/2 tsp measuring spoon for an even indentation in each cookie.**
- If you’re in a hurry to enjoy these delicious cookies, then you can have these as a no-bake cookie recipe by simply adding some pistachio butter to them now and decorating with some pomegranate seeds and chopped pistachios.
- However, if you want to bake the cookies, then you can now bake them in the oven either in mini cupcake cups or on a baking tray lined with parchment paper.
- These only take ten minutes to bake in the oven at 160ºC (fan-assisted) and will turn a lovely golden colour around the edges.
- Once cooled down, add the pistachio butter and decorate.***
Video
Notes
Nutrition
Nutrition information is automatically calculated, so should only be used as an approximation.
Chocolate Vanilla Pinwheel Cookies (Slice-and-Bake Swirl Cookies)
Equipment
- Stand mixer
- Balloon whisk
- Rolling Pin
- Parchment paper
Ingredients
- 16.75 oz all-purpose flour 3 cups
- 1 tsp baking powder
- 1/2 tsp salt
- 8.8 oz butter 1 cup, softened
- 8.1 oz white sugar 1 cup
- 2 eggs medium
- 1 tsp vanilla extract pure/natural is best
- 0.7 oz cacao powder 1/4 cup or cocoa powder
- 1 tsp instant coffee optional
- 1/4 tsp ground cinnamon powder or more to taste, optional
Check the Recipe Notes below for optional add-ins!
Instructions
Step 1: Prepare the Dough
- Sift the flour, baking powder, and salt into a large bowl and whisk to combine.
- In a separate bowl (or in a stand mixer), add the softened butter and beat until creamy. Then, gradually add the sugar, mixing constantly, until the mixture is a pale yellow and light and fluffy, with the sugar fully incorporated.
- Add the eggs (one at a time) and the vanilla to the creamed butter, mixing well in-between each addition.
- Finally, add the flour mixture incrementally, mixing in between, until a dough forms. It shouldn’t be sticky.
Step 2: Divide the Dough
- Weigh the biscuit dough and divide it into two even pieces. Wrap one in plastic wrap and return the other half to the mixer/bowl.
- Add the cacao powder, instant coffee, and cinnamon (if using) to the dough and mix well until incorporated. You can optionally chill the dough at this point for at least 30 minutes (up to a day) wrapped in plastic wrap in the refrigerator. However, I find it simpler to roll out into the rectangles first.
Step 3: Shape the Dough and Chill
- Place the first dough ball between two sheets of parchment paper and roll into a rectangle that’s as close to 9x14-inches (23x35cm) and ¼-inch (0.6cm) thick. Remove the excess to make it a neat rectangle (the scraps can make spare marbled chocolate vanilla cookies). I like to measure the size on the parchment paper first, marking it with a pencil (on the side opposite the dough). That way, you can use it as a guideline while rolling.
- Repeat this step with the other dough ball - make sure the dough sheets are equal in size. Then transfer both to the fridge for at least an hour to chill (or for up to a day).
Step 4: Roll the Pinwheel Cookies
- Decide which (chocolate or vanilla dough) you want to be the outer and inner swirl in the pinwheel cookies. OR, if you can’t decide, you can even do half and half, as I did.
- Place the color you want to be the “outer” swirl on the counter first and peel away the top layer of parchment paper. Then, remove the parchment paper from the top of the other sheet and carefully flip it over, placing it on top of the first sheet. Then gently roll or press just to make sure the two adhere slightly. If you want half and half, now you can slice the sheets in half lengthwise and flip one over (so the color on the bottom is now on top).
- Now it’s time to gently roll the cookie dough into logs. You can use the parchment paper underneath to lift and help you create the first roll. Roll the first roll tightly to avoid gaps in the cookies. If the dough cracks while rolling (more likely with the drier chocolate dough), just gently pinch it together and continue rolling. If there are cracks on the outer layer, roll it on the surface a little to smooth out the cracks. TOP TIP: If you’re rolling a single log, I recommend rolling them from the longer side (for fewer swirls but a nice cookie size). If you roll from the short side, you’ll have tons of swirls and larger cookies—it’s up to you. If you’re creating two logs (As I did), I like to roll from the short side to create a nice swirl within.
- Once rolled, re-wrap the roll/s in parchment paper. Then place back in the fridge to chill for an additional hour (or overnight). Alternatively, chill it in the freezer for 20-30 minutes.
Step 5: Slice and Bake the Pinwheel Cookies
- Preheat the oven to 350ºF/175ºC.
- Remove the roll/s from the fridge. If the underside is slightly flat from resting in the fridge, lightly roll it on the surface to smooth it out. If you chilled the sugar cookie dough in the freezer, allow it a few minutes at room temperature before slicing.
- Slice the log into ¼-inch cookies and place them on a parchment-lined baking sheet, separated by around 1 inch.
- Place the baking tray on the middle shelf in the oven. Bake for between 10-12 minutes, or until the edges are just becoming golden. It’s best to bake one tray of cookies at a time (so it’s in the middle of the oven). While baking the first back, you can prepare and cut the cookies for the second. Alternatively, you can save the rest for later (read the storage section below for details).
- Once baked, remove the cookies from the oven. Allow them to cool on the tray for a few minutes before transferring to a rack until fully cooled.
How to Store Chocolate Pinwheels?
- Make ahead : there are several ways you can make these old-fashioned pinwheel cookies ahead. The mixed dough: wrap it in plastic wrap and store in the fridge for 4-5 days or in the freezer for up to three months. The rolled cookie dough log : wrap tightly in plastic wrap and store in the freezer for up to three months. You can also gift the frozen logs to friends and family. That way, they can defrost (15-20 minutes at room temperature) and slice and bake the cookies when wanted. The sliced cookies : flash freeze the cookies spread out on a baking sheet (not touching) until solid. Then transfer to a freezer-safe container or Ziplock bag for 3 months. Store : allow the chocolate pinwheel cookies to cool and then store in an airtight container on the counter for 3-5 days. You can also freeze the baked cookies for up to 3 months. Allow them to thaw on the counter before serving.
Notes
- Don’t skip the chilling : these chocolate swirl cookies are simple to prepare WHEN working with chilled dough. In fact, this recipe requires you to chill the dough at 2 stages. The second is particularly important as the chilled, firm dough allows you to easily slice it without squashing/misshaping the cookies.
- If you struggle to slice the cookies: (even after chilling the dough), you can slice pieces that are thicker and use a rolling pin to flatten them. Just note that they will obviously be larger, less-even-shaped cookies, and you’ll be able to make less overall.
- If the dough is sticky: i f you’ve added all the flour and the dough is still sticky, I recommend dividing the dough in half. Then add more flour, a teaspoon at a time, to one portion. The “stickier” dough should be the one you add the cacao powder to.
- It’s best to cook in batches: that way, you can use a single tray in the center of your oven, so they cook evenly.
- Rolling the chocolate dough: as this dough is drier, it will be more prone to cracking, especially when chilled. I recommend removing it from the fridge a few minutes before the vanilla dough.
- If the chocolate dough is too dry : if you find the chocolate dough too dry or crumbly when rolling it out, add a little extra liquid to the dough. You can do this with water/milk or even a spoonful of oil. Add it one teaspoon at a time.
- To marble the chocolate vanilla cookies : Simply divide the dough and make a ball of both the vanilla and chocolate, roll them together, and flatten. Each of the chocolate vanilla cookies will have a slightly different marble pattern.
Nutrition
Recipe on Alphafoodie: https://www.alphafoodie.com/chocolate-vanilla-pinwheel-cookies/
