Condiments
Date Paste (One Ingredient)
By Samira Kazan
published February 28, 2025
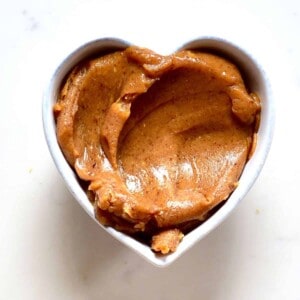
Make the best date paste at home with just one ingredient, a blender, and a few minutes. This natural sweetener is a must-try alternative to processed sugar.

Using dates is one of my favorite ways to naturally sweeten baked goods, healthy smoothy recipes , and more. However, adding the dates directly into the recipe always results in chunky bits, or it takes forever to blend them with the rest of the ingredients. So, to make my life easier (and tastier), I turn to this date paste recipe and to homemade date syrup .
If you are wondering what exactly date paste is, it is just that—whole dates blended into a smooth, homogeneous puree with a rich flavor. The paste is a popular unrefined sweetener thanks to its impressive combination of vitamins, minerals, antioxidants, and fiber. Plus, you can store it for a long time and use it in various ways. I’m sure you’ll enjoy this easy recipe and its natural sweetness as much as I do!

Want to save this recipe?
- Recipe video tutorial
- What you’ll need
- How to make date paste
- How to use it
- FAQs
- You may also like
- Date Paste (One Ingredient) Recipe
Recipe video tutorial
What you’ll need

- Dates : You can use any type of date—it all works! I love using Medjool dates; they’re large, soft, sweet, and super delicious. Just make sure the dates are fresh, not dry. Inspect each date for any sandy texture or tiny creatures inside, and discard any that don’t look good. Just give each date a quick check to keep things smooth and tasty—no surprises!
You will also need a blender or food processor . It’s better if your machine is powerful so it can blend the dates alone. Otherwise, if your machine is not too strong, you can soak the dates in hot water in advance or add a bit of hot water when blending them. Note that adding water will shorten the shelf life.
See the printable recipe card below for full information on ingredients and quantities.
How to make date paste
Prepare the dates : If you are using whole dates, first remove the pits. To do so, pull the date in half by hand and release the pits. Alternatively, slice them lengthwise with a knife before popping out the pits.
Don’t throw away the date pits. Instead, you can use them to make date-seed coffee . You could also add them to your compost, plant them, or grind them down into a body scrub!
Optional step: If the dates are too dry or your machine is not very strong, soak the dates in hot water for about 30 minutes. This will soften them, and they will become easier to blend.
Blend into paste: Then, place all the pitted dates into your high-speed blender or food processor and process until smooth and paste-like. Scrape down the sides as needed to ensure everything is blended.
Depending on your machine, this can take some time. Give it a break every few minutes to avoid overheating. Only if you’re struggling to blend it into a paste, add some hot water to your machine, one tablespoon at a time.
The date paste recipe is ready when you achieve a smooth, homogenous, lump-free mixture. Transfer it to an airtight container and store it for later, or enjoy it right away!

How to use it
There are a lot of ways you can use date paste. Here are some of my favorites:
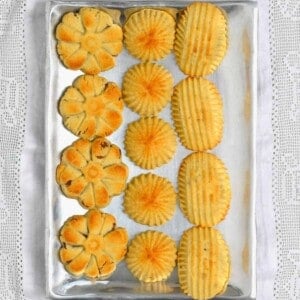
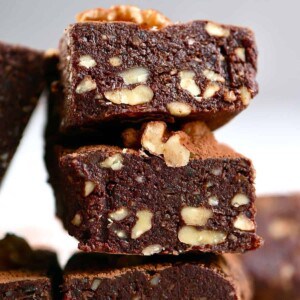
- A filling for desserts: You can use it to fill this Maamoul (Middle Eastern cookies with dates or nuts) or these thumbprint cookies .
- Natural sweetener for drinks: Add it to smoothies or hot drinks like date seed coffee , tea, and hot cocoa .
- As a spread: Spread on toast, bagel, or simit. You can also stir a little into your breakfast oats, oatmeal, or yogurt parfait.
- Instead of whole dates: You can use the paste instead of dates in baked goods and desserts. The puree will be incorporated faster and more easily into your recipes. Try it in these Magnum Ice Creams , date Snickers , or use it with the base ingredients for tarts.
- Instead of sugar: I recommend using a 1:1 ratio of paste instead of refined sugars (one cup of date paste instead of one cup of sugar).
- Instead of honey/maple syrup: When replacing liquid sweeteners like honey/syrup, I tend to use a slightly bigger amount of the paste – either 4:3 (2/3 cup paste for 1/2 cup liquid sweetener) or 2:1 (1 cup date paste for 1/2 cup maple syrup).

While this is possible, it definitely won’t be as smooth and will take a bit of arm power. Here are two ways: – Soak the dates in hot water overnight. Then, mash them with a fork in a bowl until you have a smooth(-ish) consistency. – After you soak the dates overnight, use a mortar and pestle to “grind” the dates into a paste. For both, add a little of the soaking water if needed to help you achieve the correct consistency. It can also help to microwave it in 40-second increments between mashing to make the process easier and quicker.
Date paste, when made only with dates, can be kept in an airtight container in the refrigerator for up to 3-4 months or in the freezer for 12+ months. If water was added, I recommend keeping the paste in an airtight container in the fridge for up to a month or in the freezer for up to 6 months.
This will vary based on the date variety and their freshness. However, I’ve found that around 1 heaped cup of pitted dates (6 oz/170 g) = 1/2 cup of date paste .

Equipment
- Blender/Food processor
IngredientsUS CustomaryMetric1x2x3x
- ▢ 1 lb dates any type, fresh. I used Medjool dates, pitted (about 26 dates)
This will yield about1.5cups.
Instructions
- If needed, remove the date pits. To do so, you can cut or pull apart the date to release the pit.
- Optional: Soak the dates in hot water for 30 minutes to soften them. This is only necessary if the dates are too dry or your machine is not very strong.
- Place the pitted dates into the blender or food processor and process until smooth and paste-like. Depending on your machine, this can take some time. Give it a break every few minutes to avoid overheating. If you’re struggling to blend it into a paste, add some hot water to your machine, one tablespoon at a time.
- When the mixture is smooth, homogenous, and lump-free, the date paste is ready. You can then use it or transfer it to an airtight container and store it for later.
Video
Notes
Nutrition
Nutrition information is automatically calculated, so should only be used as an approximation.
Recipes › Desserts
Almond Pistachio Thumbprint Cookies Recipe
By Samira Kazan
updated September 21, 2020

Delicious gluten-free, vegan bite-size almond & pistachio thumbprint cookies. Not only are they easy to make- they can either be baked or kept as a no-bake cookie recipe!
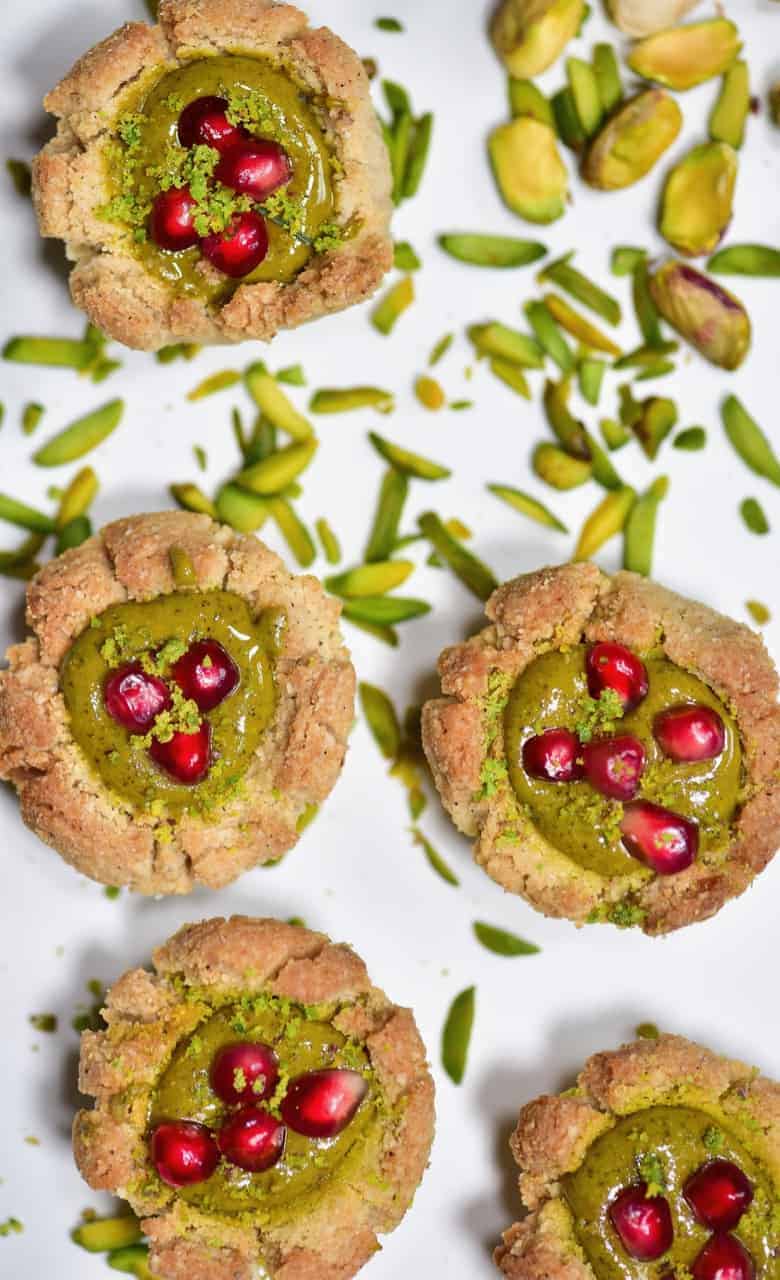
These almond pistachio thumbprint cookies are a delicious vegan and gluten-free cookies recipe using almond flour and pistachio butter. Unlike your generic shortbread thumbprint cookies, these vegan bite-size snacks have a delightful crumbly almond base and can be cooked or kept as a no-bake cookie recipe.
Depending on whether you want these as raw snacks or baked cookies, they are delicious. However, it’s worth noting that there will be some textural difference.
For the raw version, these pistachio thumbprint cookies are a little more gooey and moist. In comparison, when baked, these cookies are more crumbly.
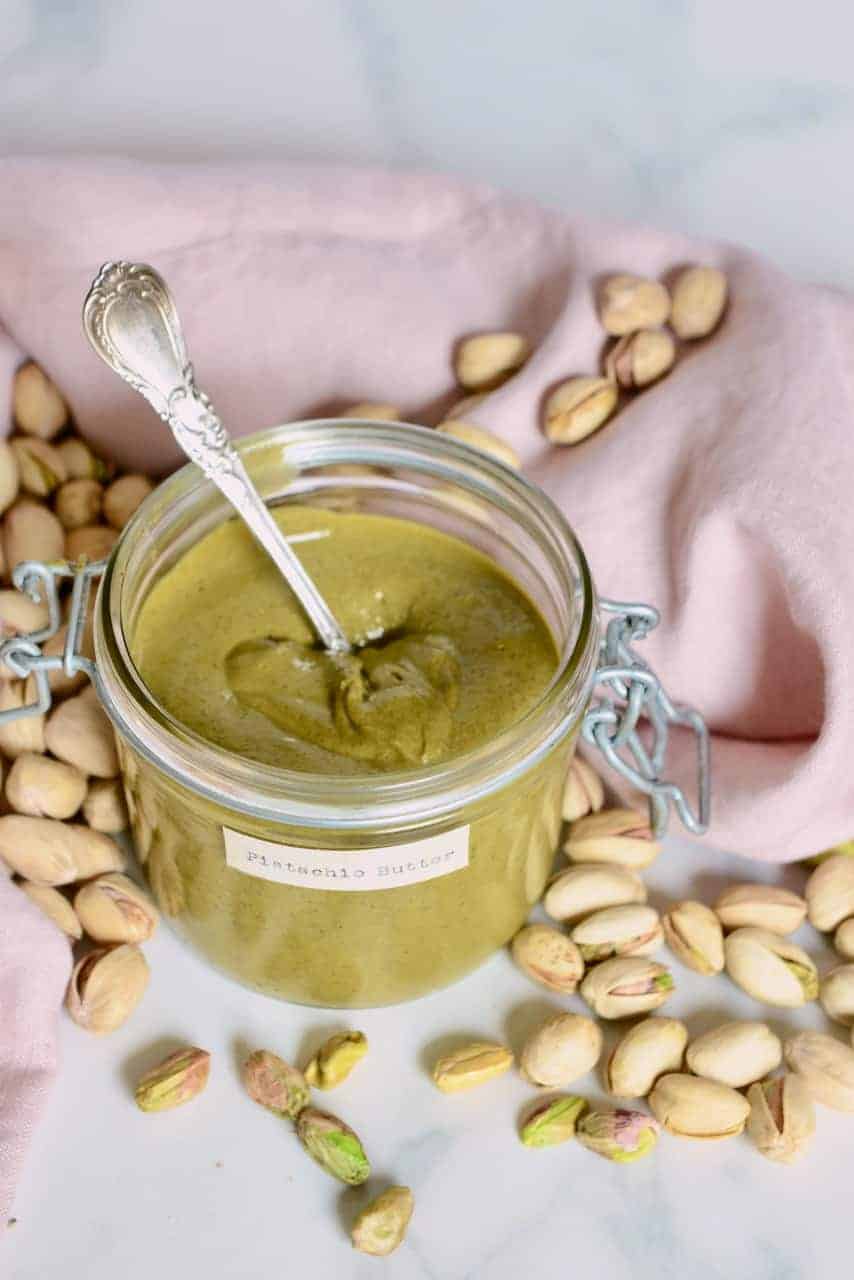
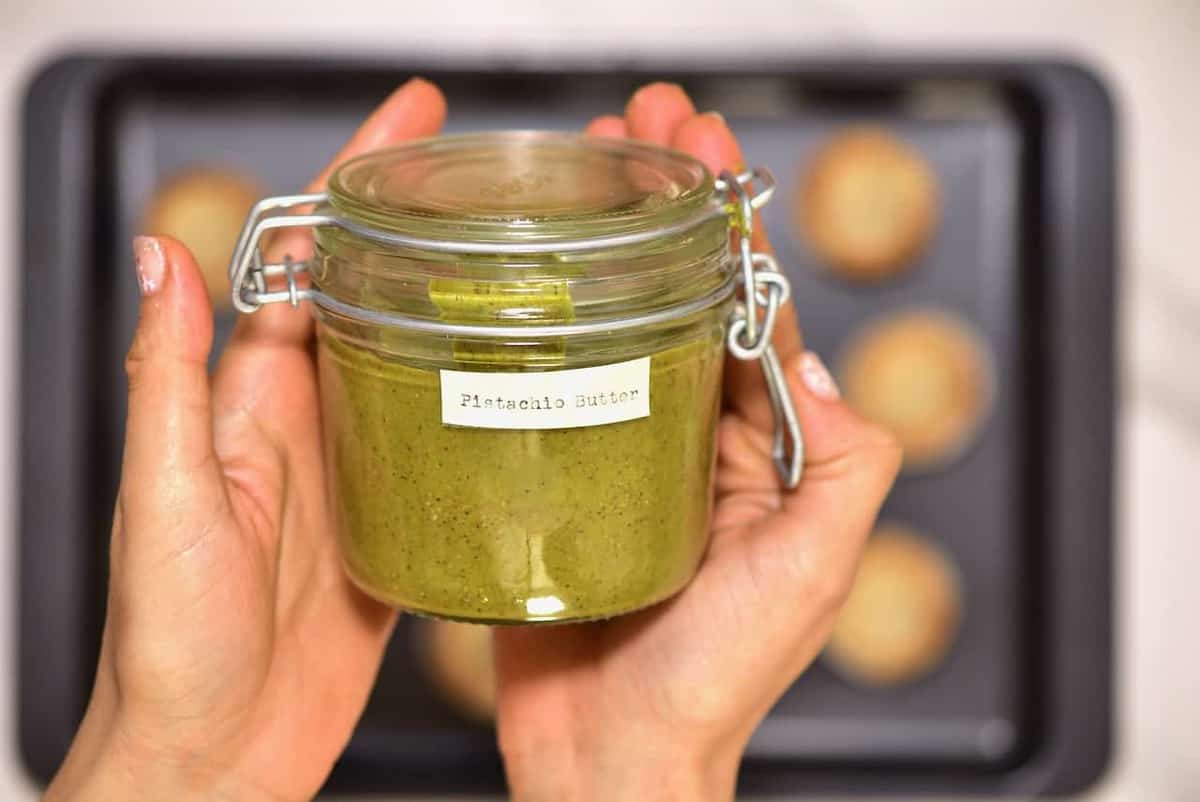
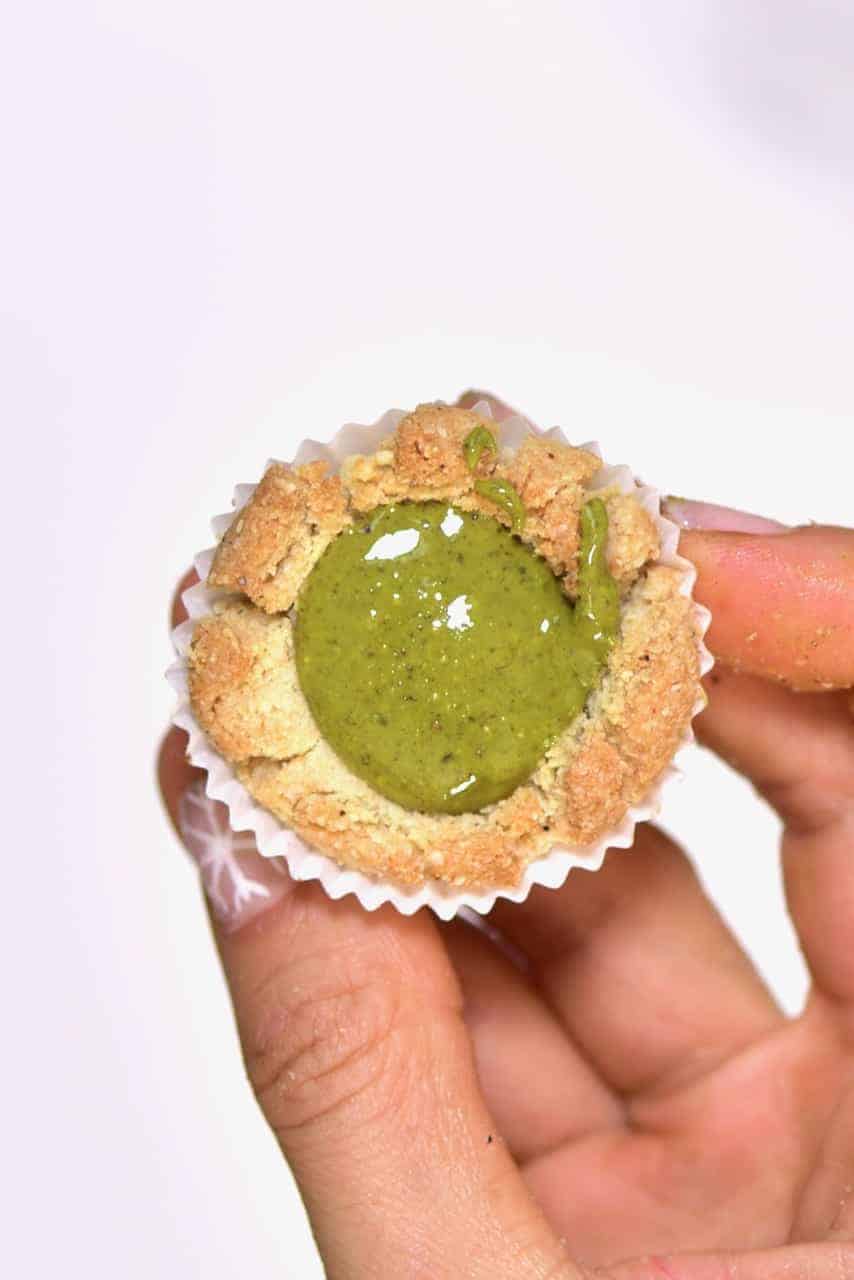
I always love to switch up classic recipes and decided that rather than using the usual choice of jam filling for this thumbprint cookie recipe, I used some homemade pistachio butter .
Pistachio butter is one of the most delicious, decadent version of all nut butters and yet can be made at home with just pistachios, salt and a blender or food processor. Plus the pistachio flavour compliments the flavour of the gluten-free almond cookies.
These cookies are then an excellent healthier cookie snack option. They can also be displayed in mini cupcake cakes, in a gift box, for a delicious homemade edible gift at Christmas (or any time of the year!).
If you’ve been following me on Instagram, you’ll know that I’ve been cooking up a storm this festive period, with a new recipe posted every day. Honestly, I couldn’t wait for the day to share these pistachio thumbprint cookies though because they are one of my favourite treats so far.
I’ve very recently compiled a post for the ultimate guide to homemade nut & seed butters, so I have spent a LOT of time this year in the kitchen blending up delicious nut butters and nut butter recipes. As much as I have a soft spot for good old almond butter, pistachio butter has taken my heart.
While it’s not a nut butter you’d want to eat by the spoonful every day (or rather you would – but your hips wouldn’t like it!), pistachio butter has an incredible luxury element that works well in so many different recipes. Check out my pistachio butter post for some inspiration.
Want to save this recipe?
- Variations on these thumbprint cookies
- How To Make The Thumbprint Cookies
- Other great snack recipes you may like
- Pistachio Almond Cookies Recipe
Variations on these thumbprint cookies
Obviously, my filling of choice is my homemade pistachio butter. However, you can experiment with various fillings including a delicious vegan homemade Nutella , the classic choice of jam, or even some vegan chocolate chips (that will melt from the heat and be heavenly!).
For a sweeter pistachio creme style filling, melt some white chocolate in a heatproof bowl then mix in some pistachio butter with a dash of homemade vanilla powder .
You can also make a delicious chocolate version of these pistachio thumbprint cookies by adding some cocoa powder into the base almond cookies recipe. If the biscuit mix feels too crumbly after adding the powder, add another tsp of coconut oil to offset the powder.
Plus, you can experiment with additional toppings for the pistachio thumbprint cookies. For example, a drizzle of melted white chocolate is a lovely dessert-like touch.
Note* For vegan cookies use dairy-free white chocolate and chocolate chips.
How To Make The Thumbprint Cookies
This pistachio thumbprint cookies recipe is super simple and can be made in just five minutes if you’re keeping them raw. Or around 20 minutes, if baking- which means they’re an excellent option for a last-minute edible gift idea or to whip up on busy days when you don’t have much time to spare.
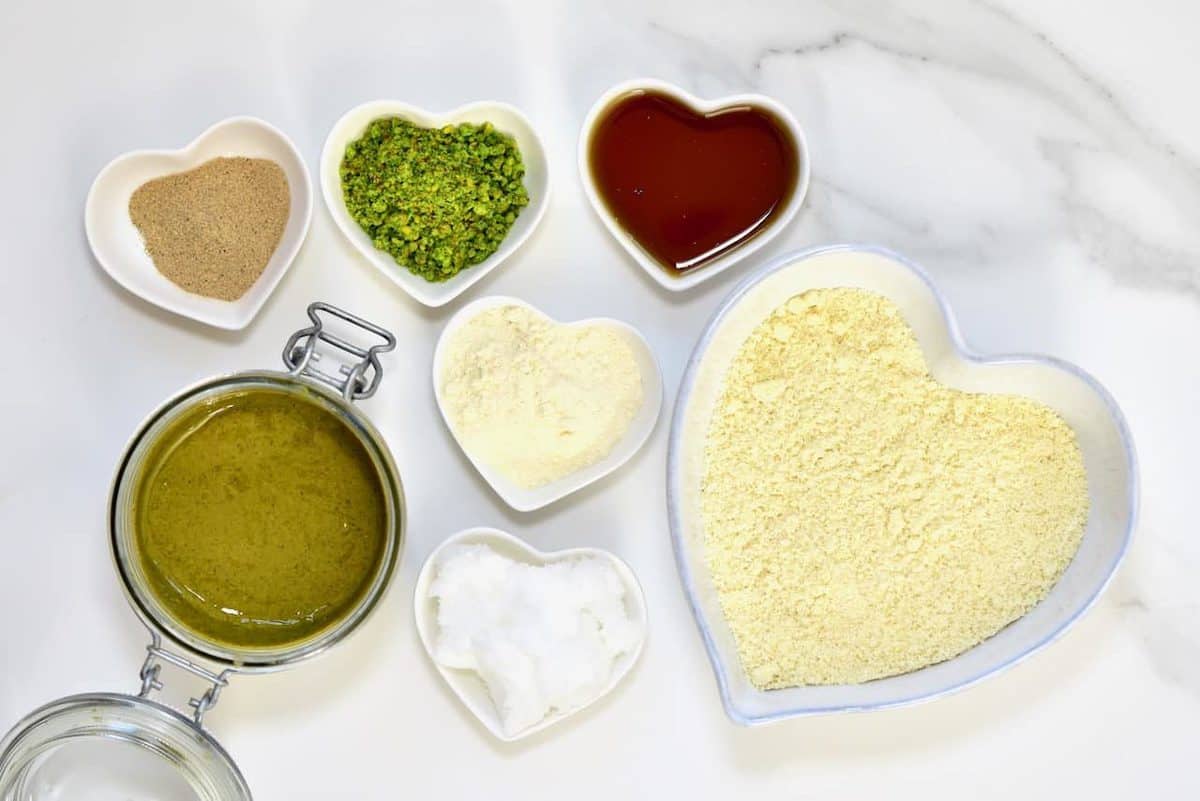
The almond cookies base is made up of almond flour, coconut oil, maple syrup, coconut flour and cardamon.
Don’t fret if you don’t have almond flour to hand though as this can be whizzed up in a couple of minutes. Blitz some raw almonds in a high-speed food processor for a couple of minutes and you’ll get homemade almond flour, which is a great gluten-free flour to have to hand at all times.
This recipe is also a great way to use leftover almond pulp after making homemade almond milk . Simply allow the pulp to dry out, and it’s ready to use as almond flour.
Note* For this particular recipe the ground almonds don’t have to be too fine, which is why any of the above options will work fine for the almond cookies recipe.
The method
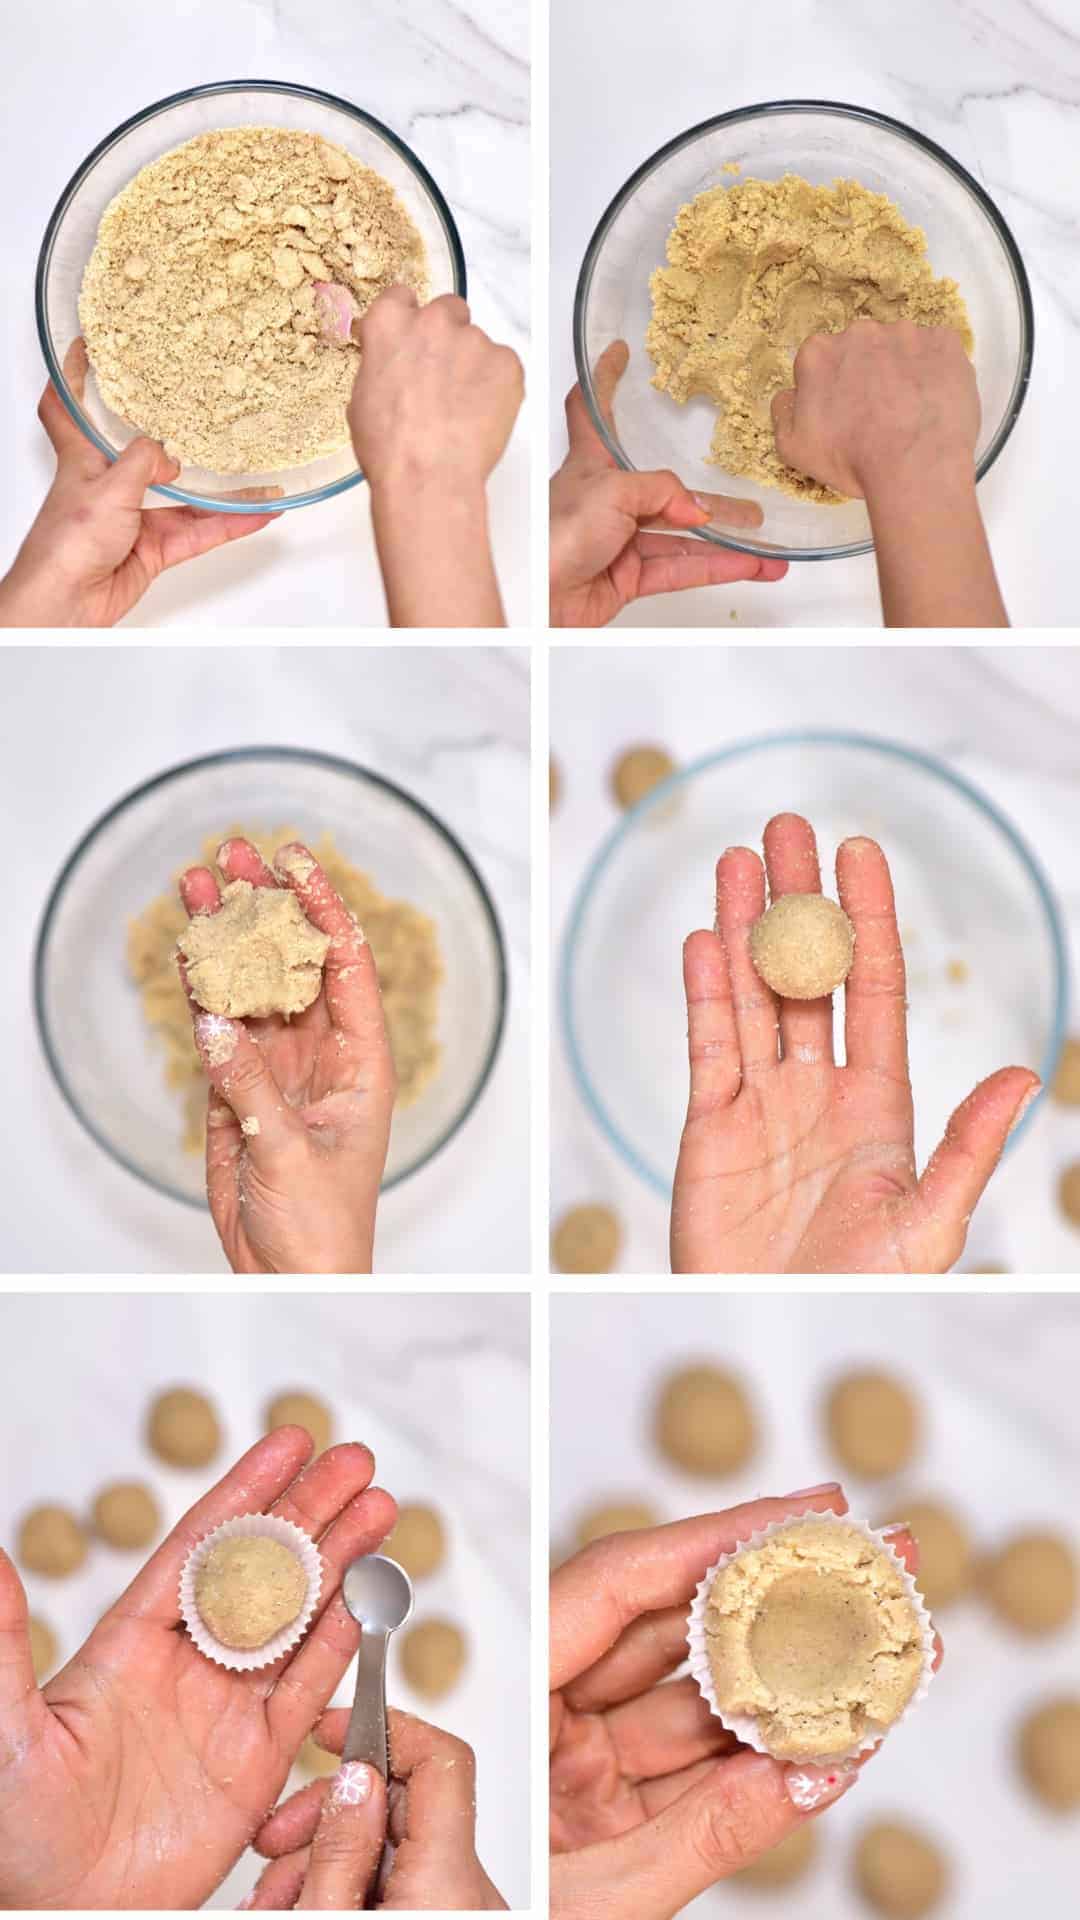
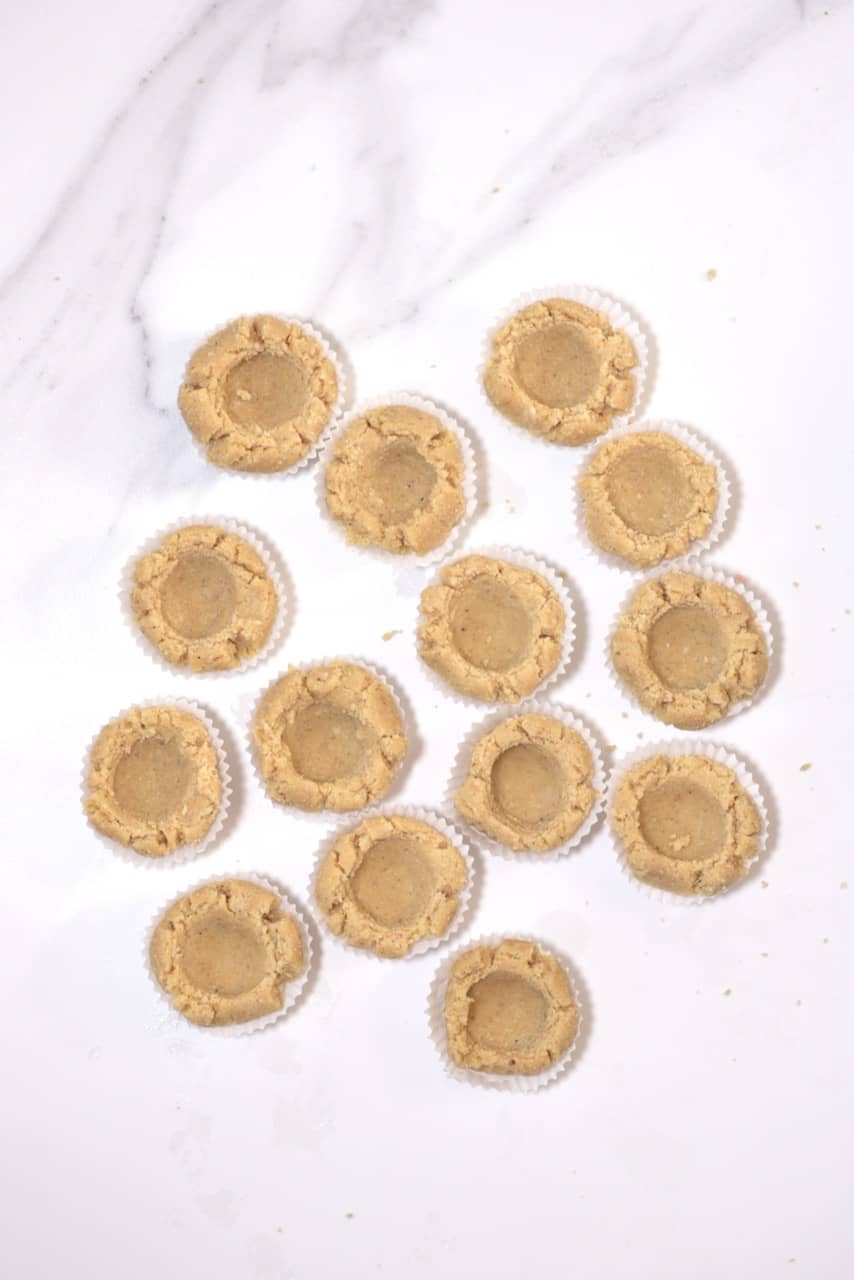
To begin, mix the almond flour with the other base ingredients and then form small, one bite-sized cookies. If you want you can measure these out and use around 1tbsp per cookie. However, I eyeballed it and made 14 of them.
To make them into thumbprint cookies, the process is precisely what it says. Roll each piece of dough into a ball, and then you can use a finger/ thumb to make the indentations. You could also use the rounded back of a spoon. In fact, I used a small 1/2 tsp measuring spoon for an even indentation in each cookie.
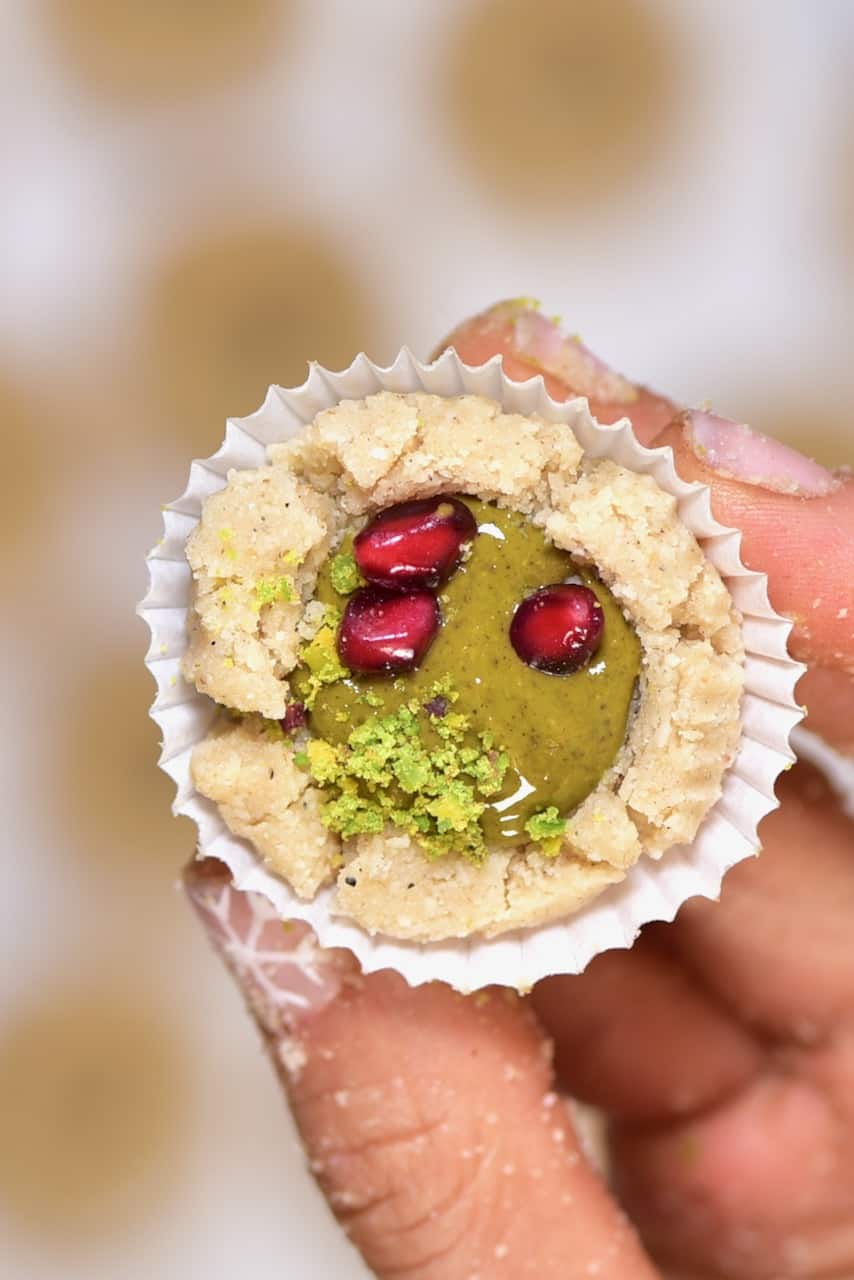
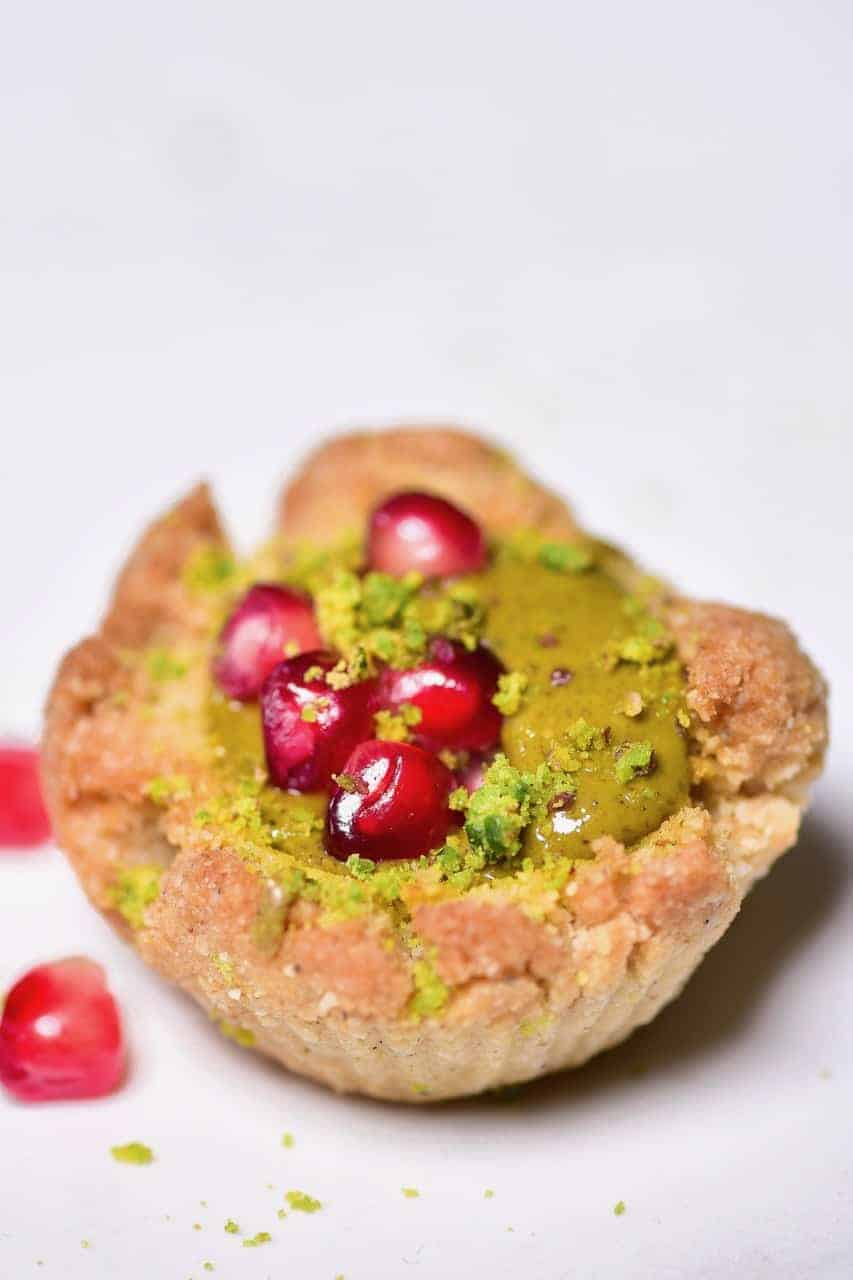
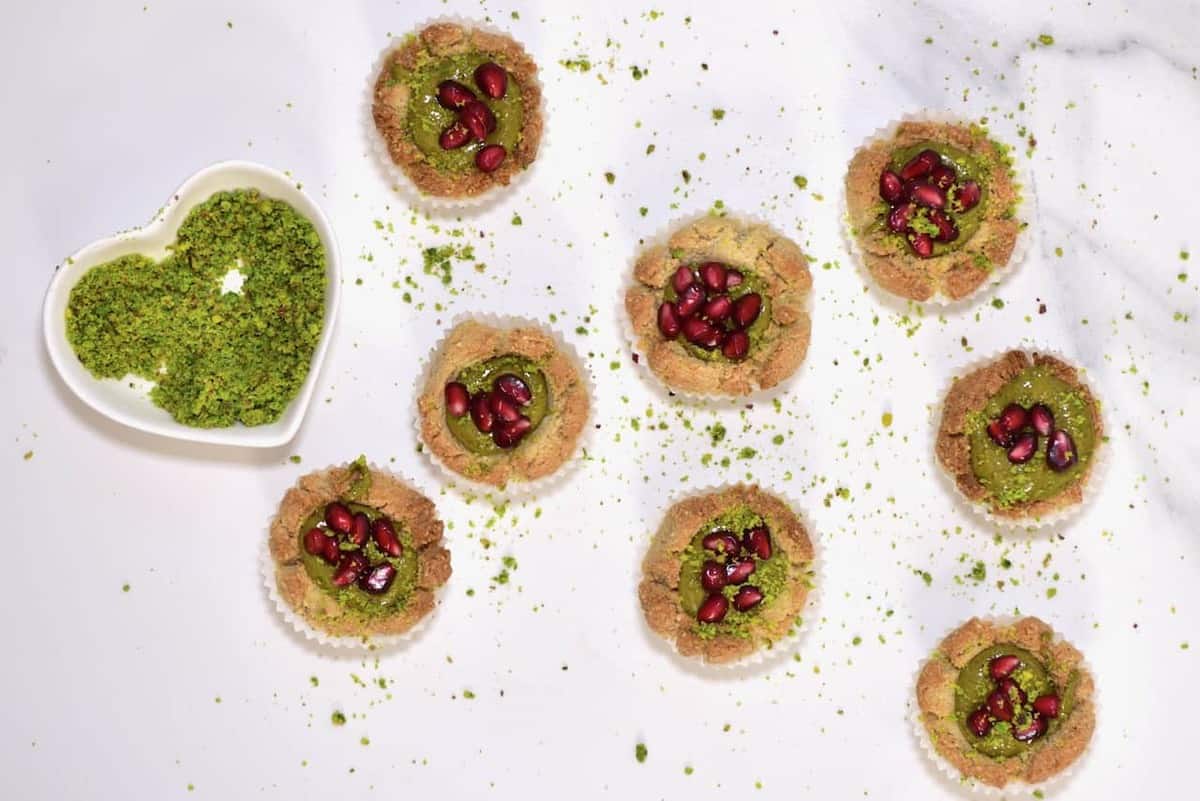
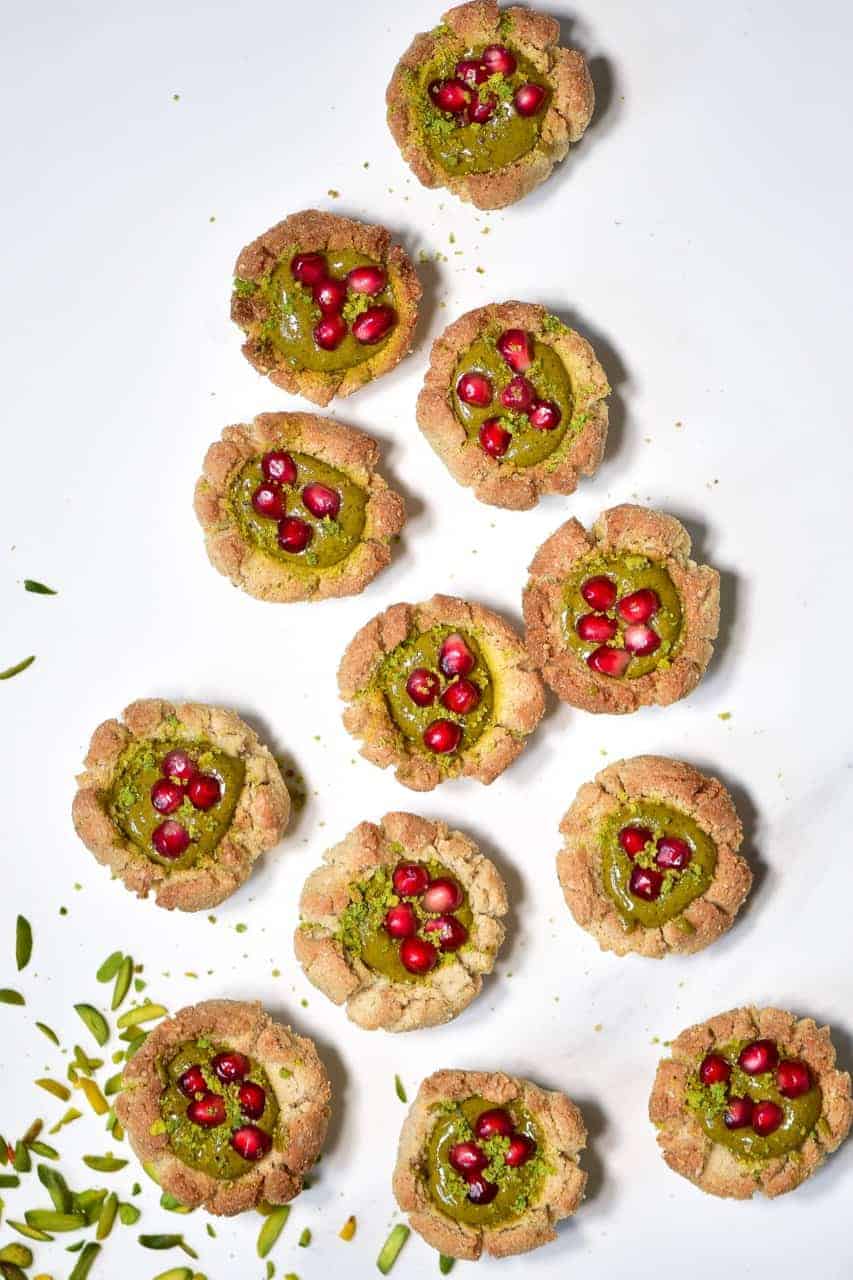
If you’re in a hurry to enjoy these delicious cookies, then you can have these as a no-bake cookie recipe by simply adding some pistachio butter to them now and decorating with some pomegranate seeds and chopped pistachios.
Note* Due to the gluten-free nature of these cookies and the lack of dairy, these cookies are more crumbly than general cookie dough so cracking around the edges when pressing your indentation is perfectly normal.
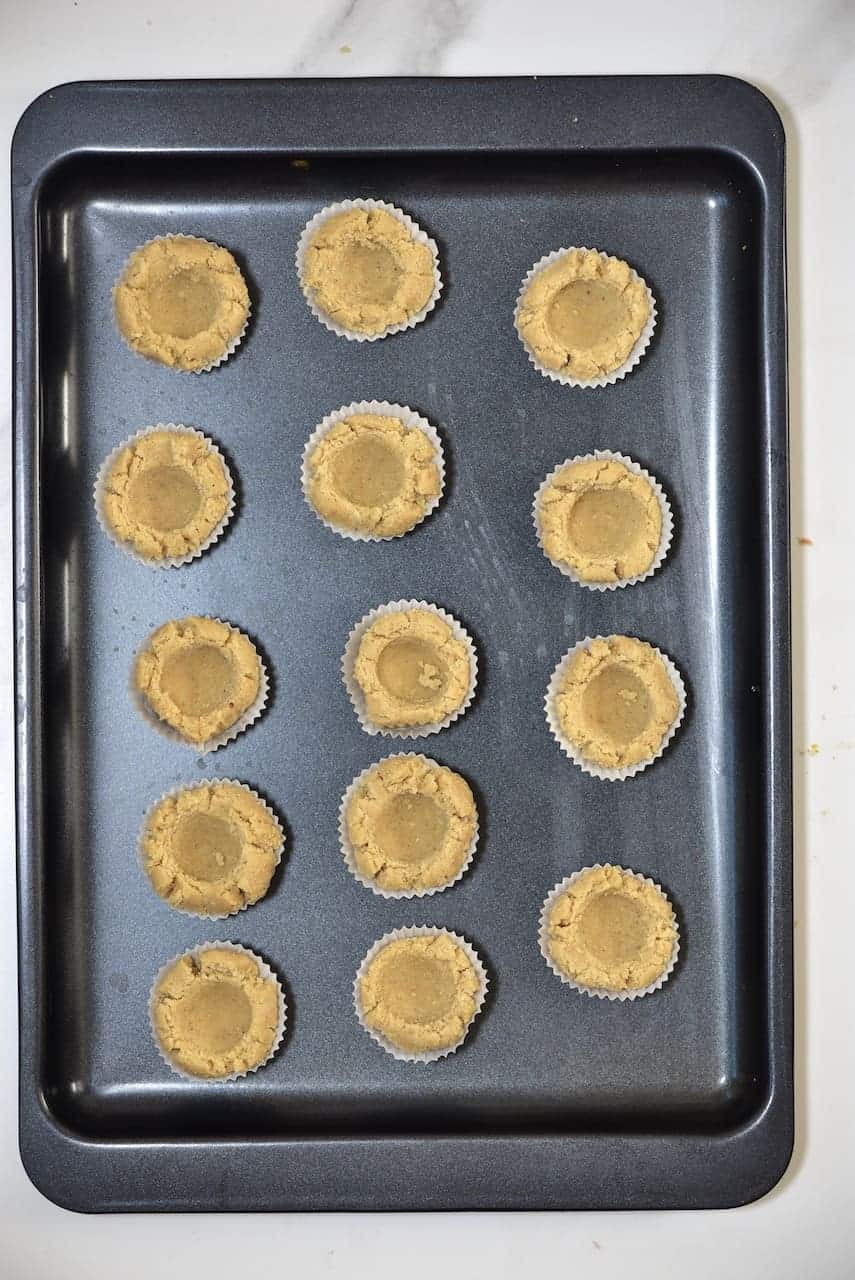
However, if you want to bake the cookies, then you can now bake them in the oven either in mini cupcake cups or on a baking tray lined with parchment paper.
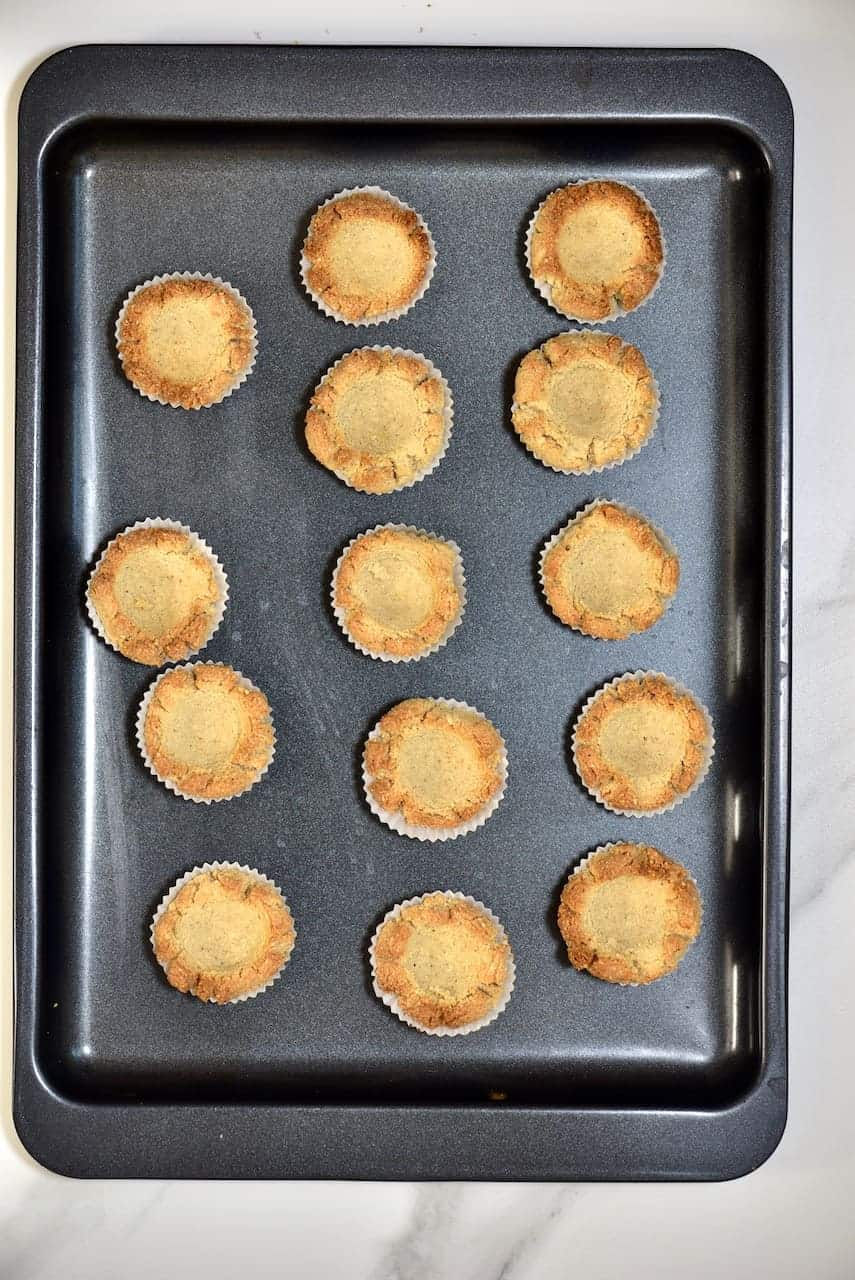
These only take ten minutes to bake in the oven and will turn a lovely golden colour around the edges.
If you want to use some chocolate chips as a filling, you’ll want to add these to the cookies while they’re still warm, so they melt into the thumbprint.
For the pistachio butter-filled cookies, allow the cookies to cool down a bit before filling them.
Again you can decorate the pistachio cookies with pomegranate seeds and ground pistachios or even a sprinkle of desiccated coconut. Also, feel free to experiment with other fillings and toppings of your choice.
For a sweeter, dessert-like version you can drizzle some white chocolate over the cookies at the end. Or, for a chocolate thumbprint cookie version, you can add some cocoa powder into the base almond cookie recipe.
Other great snack recipes you may like
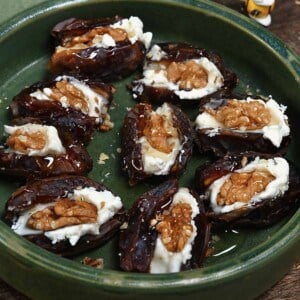
For another delicious no-bake snack recipe, you may like these healthy cacao & almond protein balls or these coconut bliss balls . These 4-Ingredient Stuffed Dates: with home-made almond butter & Chocolate are always a winner too!
IngredientsUS CustomaryMetric1x2x3x
- ▢ 2 cups almond flour
- ▢ 3 tBsp coconut oil
- ▢ 1 tsp ground cardamom powder
- ▢ 2 tBsp maple syrup
- ▢ 2 tBsp coconut flour
- ▢ 1/4 cup pistachio butter
Toppings (optional)
- ▢ ground pistachios
- ▢ pomegranate seeds
Instructions
- To begin, mix the almond flour* with the other base ingredients and then form small, one bite-sized cookies. If you want you can measure these out and use around 1tbsp per cookie. However, I eyeballed it and made 14 of them.
- To make them into thumbprint cookies, the process is precisely what it says. Roll each piece of dough into a ball, and then you can use a finger/ thumb to make the indentations. You could also use the rounded back of a spoon. In fact, I used a small 1/2 tsp measuring spoon for an even indentation in each cookie.**
- If you’re in a hurry to enjoy these delicious cookies, then you can have these as a no-bake cookie recipe by simply adding some pistachio butter to them now and decorating with some pomegranate seeds and chopped pistachios.
- However, if you want to bake the cookies, then you can now bake them in the oven either in mini cupcake cups or on a baking tray lined with parchment paper.
- These only take ten minutes to bake in the oven at 160ºC (fan-assisted) and will turn a lovely golden colour around the edges.
- Once cooled down, add the pistachio butter and decorate.***
Video
Notes
Nutrition
Nutrition information is automatically calculated, so should only be used as an approximation.
Date Paste (One Ingredient)
Equipment
- Blender/Food processor
Ingredients
- 1 lb dates any type, fresh. I used Medjool dates, pitted (about 26 dates)
This will yield about1.5cups.
Instructions
- If needed, remove the date pits. To do so, you can cut or pull apart the date to release the pit.
- Optional: Soak the dates in hot water for 30 minutes to soften them. This is only necessary if the dates are too dry or your machine is not very strong.
- Place the pitted dates into the blender or food processor and process until smooth and paste-like. Depending on your machine, this can take some time. Give it a break every few minutes to avoid overheating. If you’re struggling to blend it into a paste, add some hot water to your machine, one tablespoon at a time.
- When the mixture is smooth, homogenous, and lump-free, the date paste is ready. You can then use it or transfer it to an airtight container and store it for later.
Video
Notes
Nutrition
Recipe on Alphafoodie: https://www.alphafoodie.com/how-to-make-date-paste/
