Recipes
Easy Homemade Strawberry Jam (No Pectin)
By Samira Kazan
updated January 17, 2024

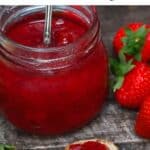
Make the best strawberry jam with this easy no-pectin strawberry jam recipe! It’s super fruity, made with just 3 ingredients, fresh or frozen berries, & can be refrigerated, frozen, or water bath canned!
Have lots of strawberries to use? Making strawberry jam is a surprisingly simple, almost fool-proof process that can be ready in as little as 30 minutes with only strawberries, lemon, and sugar. This recipe uses beginner-friendly steps, so anyone can capture the taste of these summery berries for longer.
Unlike store-bought versions, my homemade strawberry jam requires less sugar, tastes much better and fresher, and is bursting with flavor. It’s also free from additives, preservatives, and thickeners (though you can flavor it if preferred – check the recipe card for inspiration!).
Another fun way to use up strawberries? Try my sweet and salty Strawberry Pretzel Salad – it’s a nostalgic treat that everyone loves.
Want to save this recipe?
- The Ingredients
- How to Make Strawberry Jam Without Pectin
- How to Store
- Top Tips for Success
- How to Serve
- More Homemade Jam Recipes
- Easy Homemade Strawberry Jam (No Pectin) Recipe
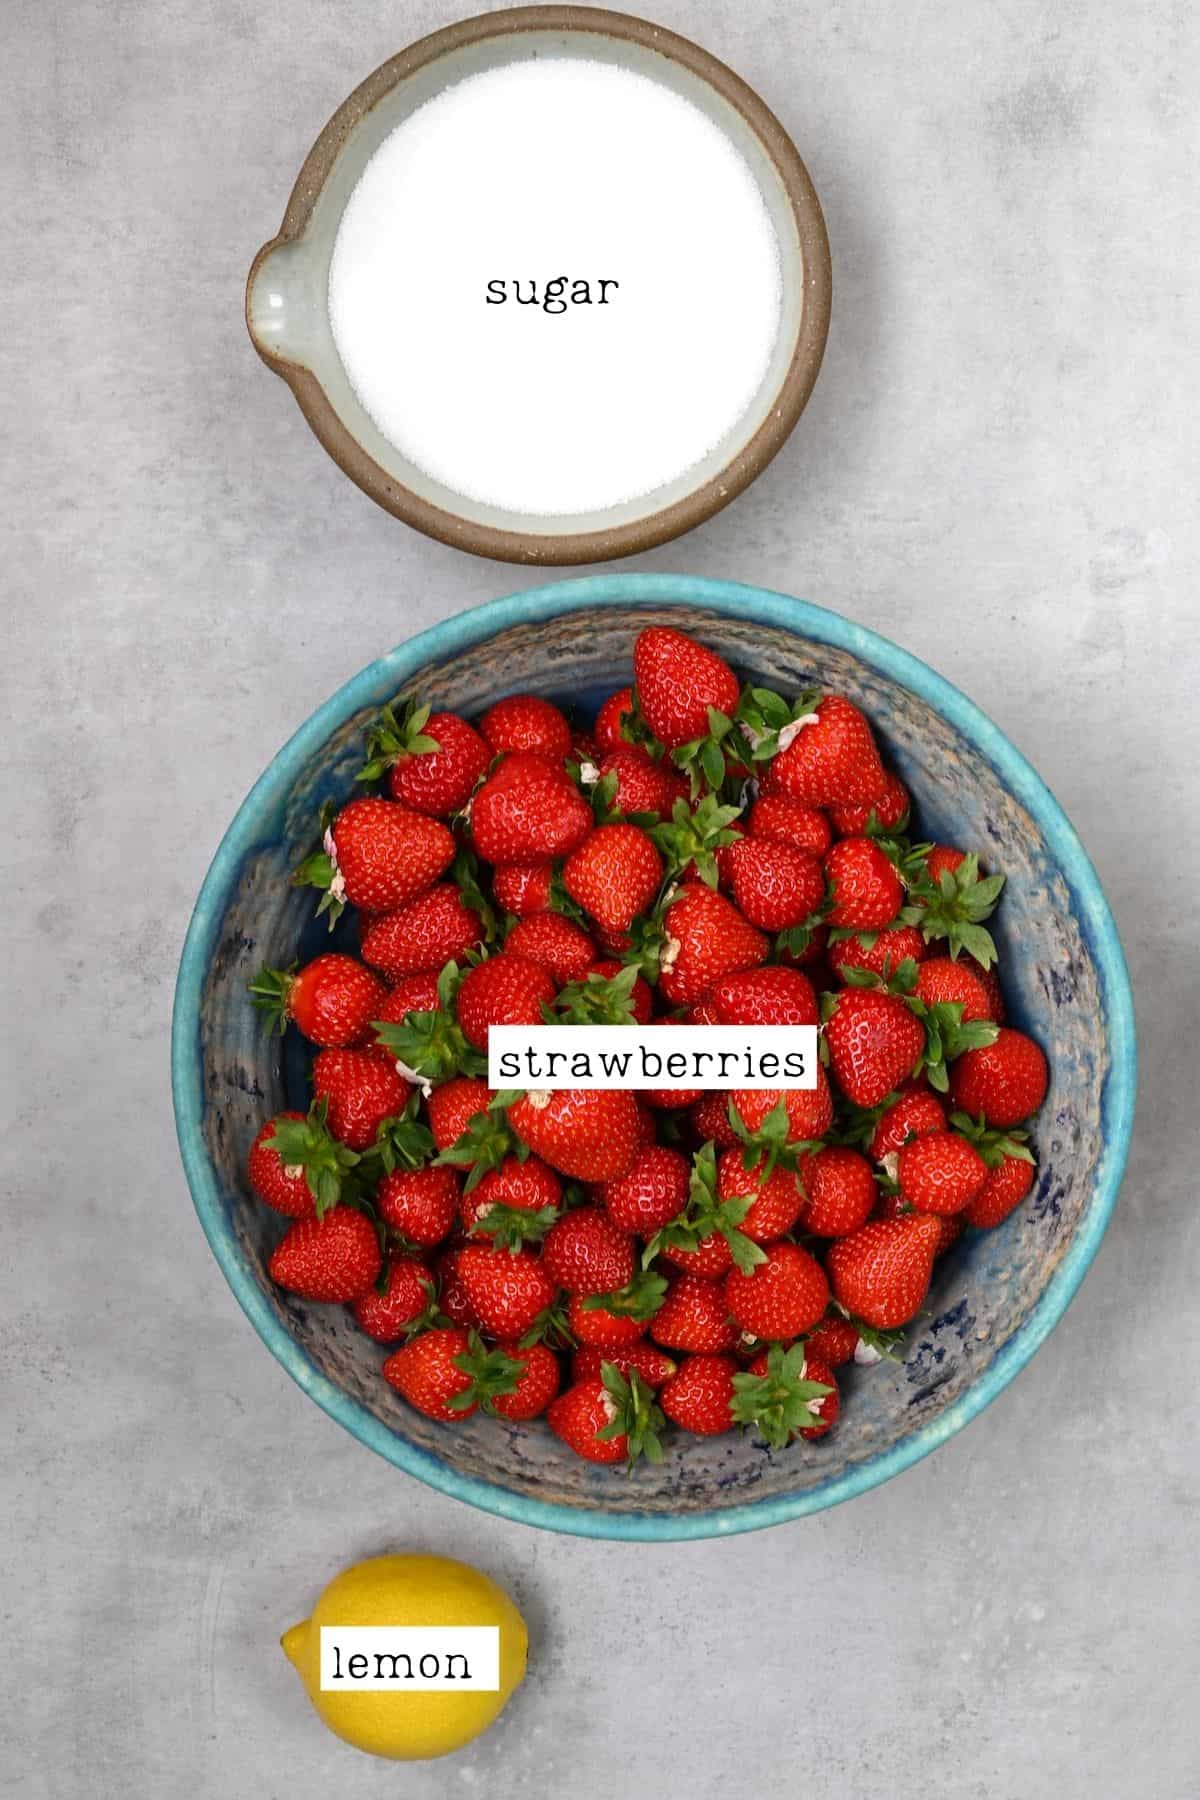
The Ingredients
- Strawberries: Slightly under-ripe fresh strawberries (some or all) work best to prepare a homemade jam that isn’t overly sweet. Frozen berries work, too, but they aren’t my preference.
- Sugar: Regular, granulated white sugar will provide the cleanest flavor, though you could experiment with brown sugar or use unrefined options (like coconut sugar).
It’s possible to use jam sugar, too, if that’s all you have, but jam sugar contains added pectin, so it will provide a harder set and cook quicker (up to 75% quicker). This strawberry jam no pectin recipe takes longer to cook before reaching the gel stage.
- Lemon : Use fresh or bottled lemon juice – the latter has a consistent pH (unlike fresh lemons) and is better for canning. The pH levels in lemon work as a sort of “bond” to bring the pectin together in the jam mixture and allow it to set. It also helps prevent the growth of bacteria. I use lemon zest, too, for more flavor.
How to Make Strawberry Jam Without Pectin
First, sterilize the jars/tools – i.e., non-reactive saucepan, spoon, etc.- in hot, soapy liquid. Or do so in the dishwasher, ensuring they’re still hot when you use them. Then leave them to drain and dry on a clean, sterilized surface.
If you don’t have a thermometer, place 2-3 small plates in the freezer for the gel test.
To water bath can the jam, prepare the canner now by adding a trivet/rack and filling it with enough water to submerge the jars by an inch. If you didn’t use the dishwasher to keep the jars hot, place the lidded jars in the water and heat the water to an almost boil while preparing the jam.
Prepare the Ingredients
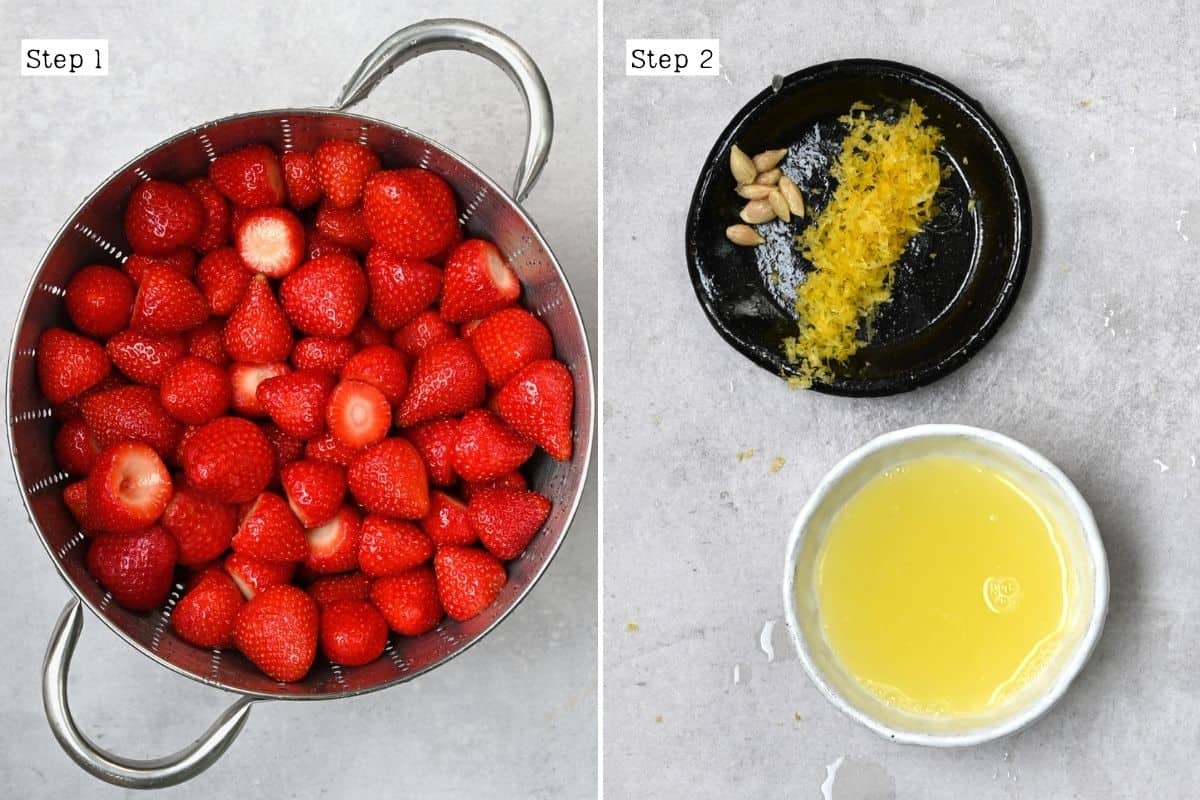
Wash the strawberries well, then use a small knife (or a straw pushed through the bottom) to remove the stems and leaves. Remove any berries that are blemished/spoiled.
Also, zest , then juice the lemon .
Optionally keep a few of the lemon seeds, too, as they’re packed with pectin and can be fished out of the jam before storing/canning it.
Cook the Jam
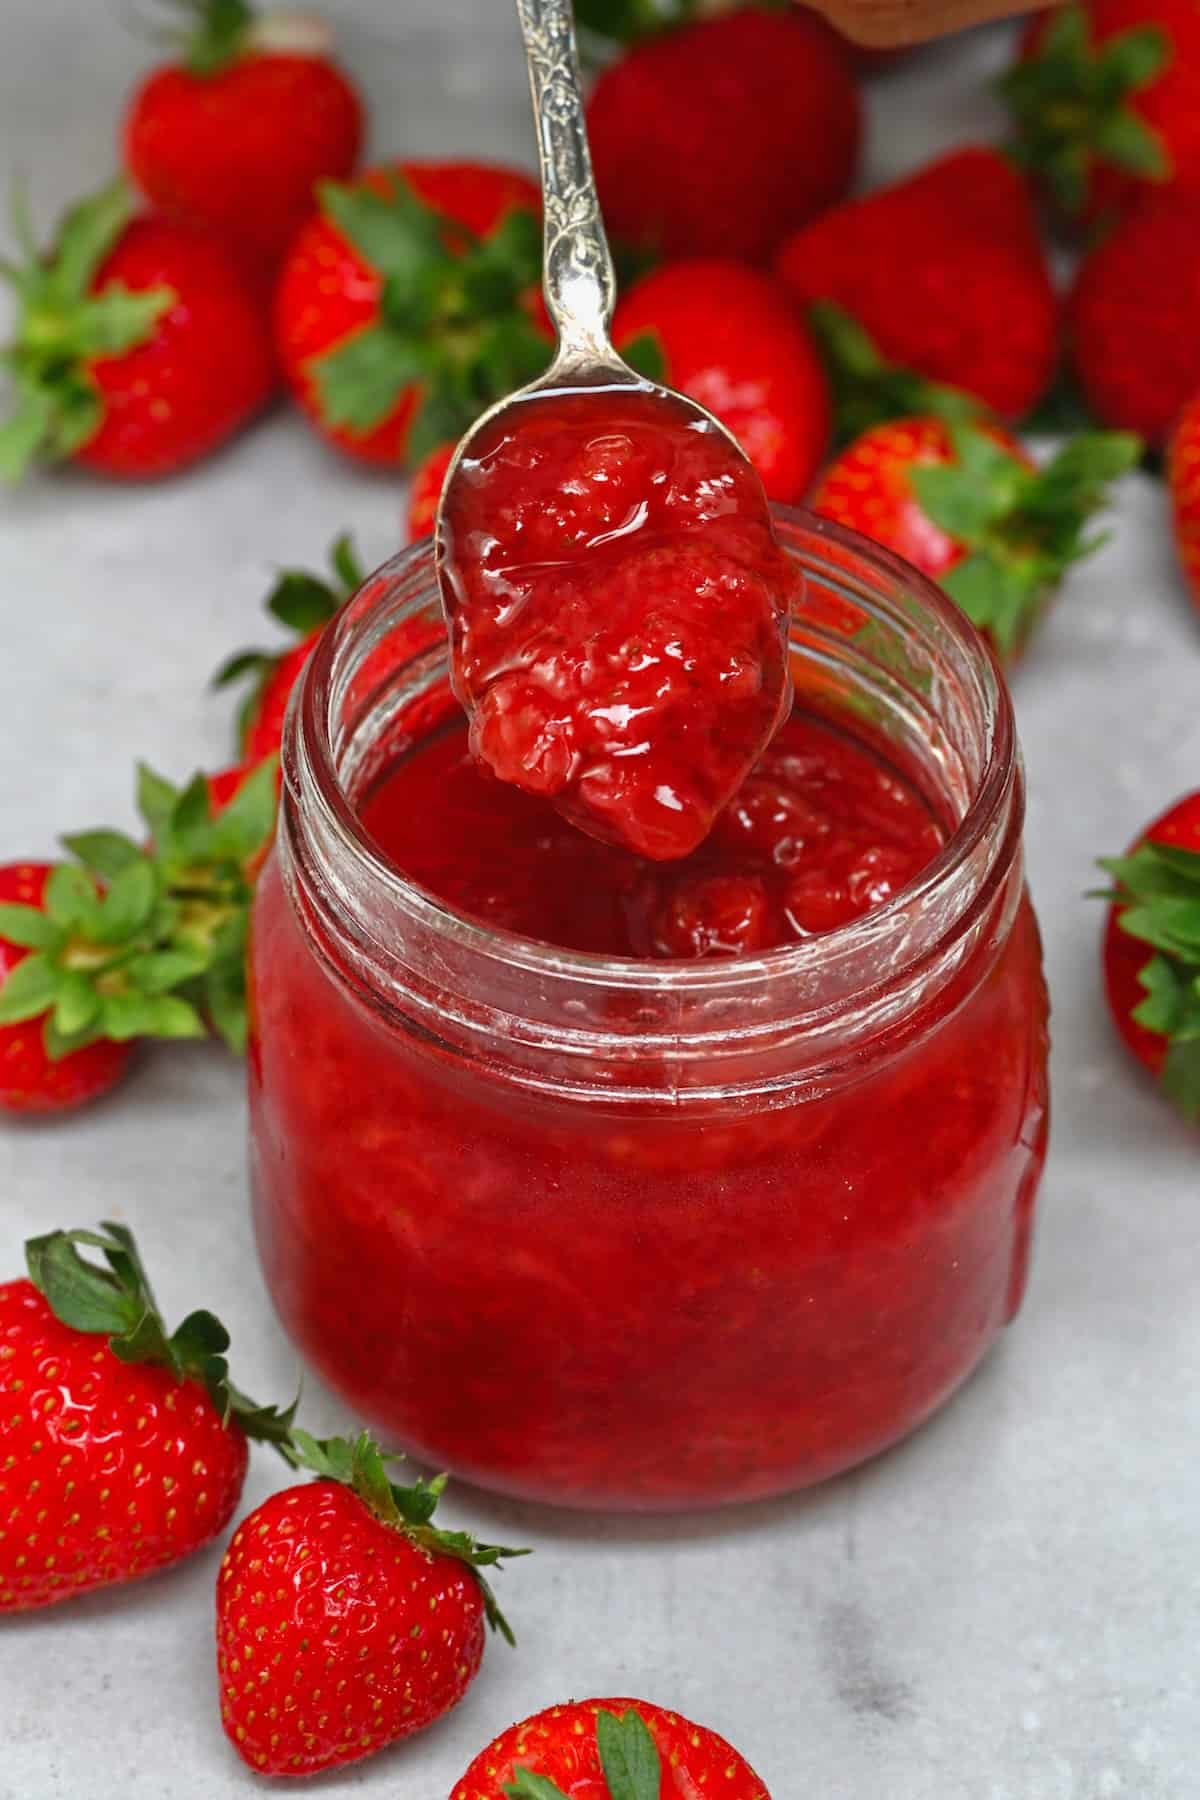
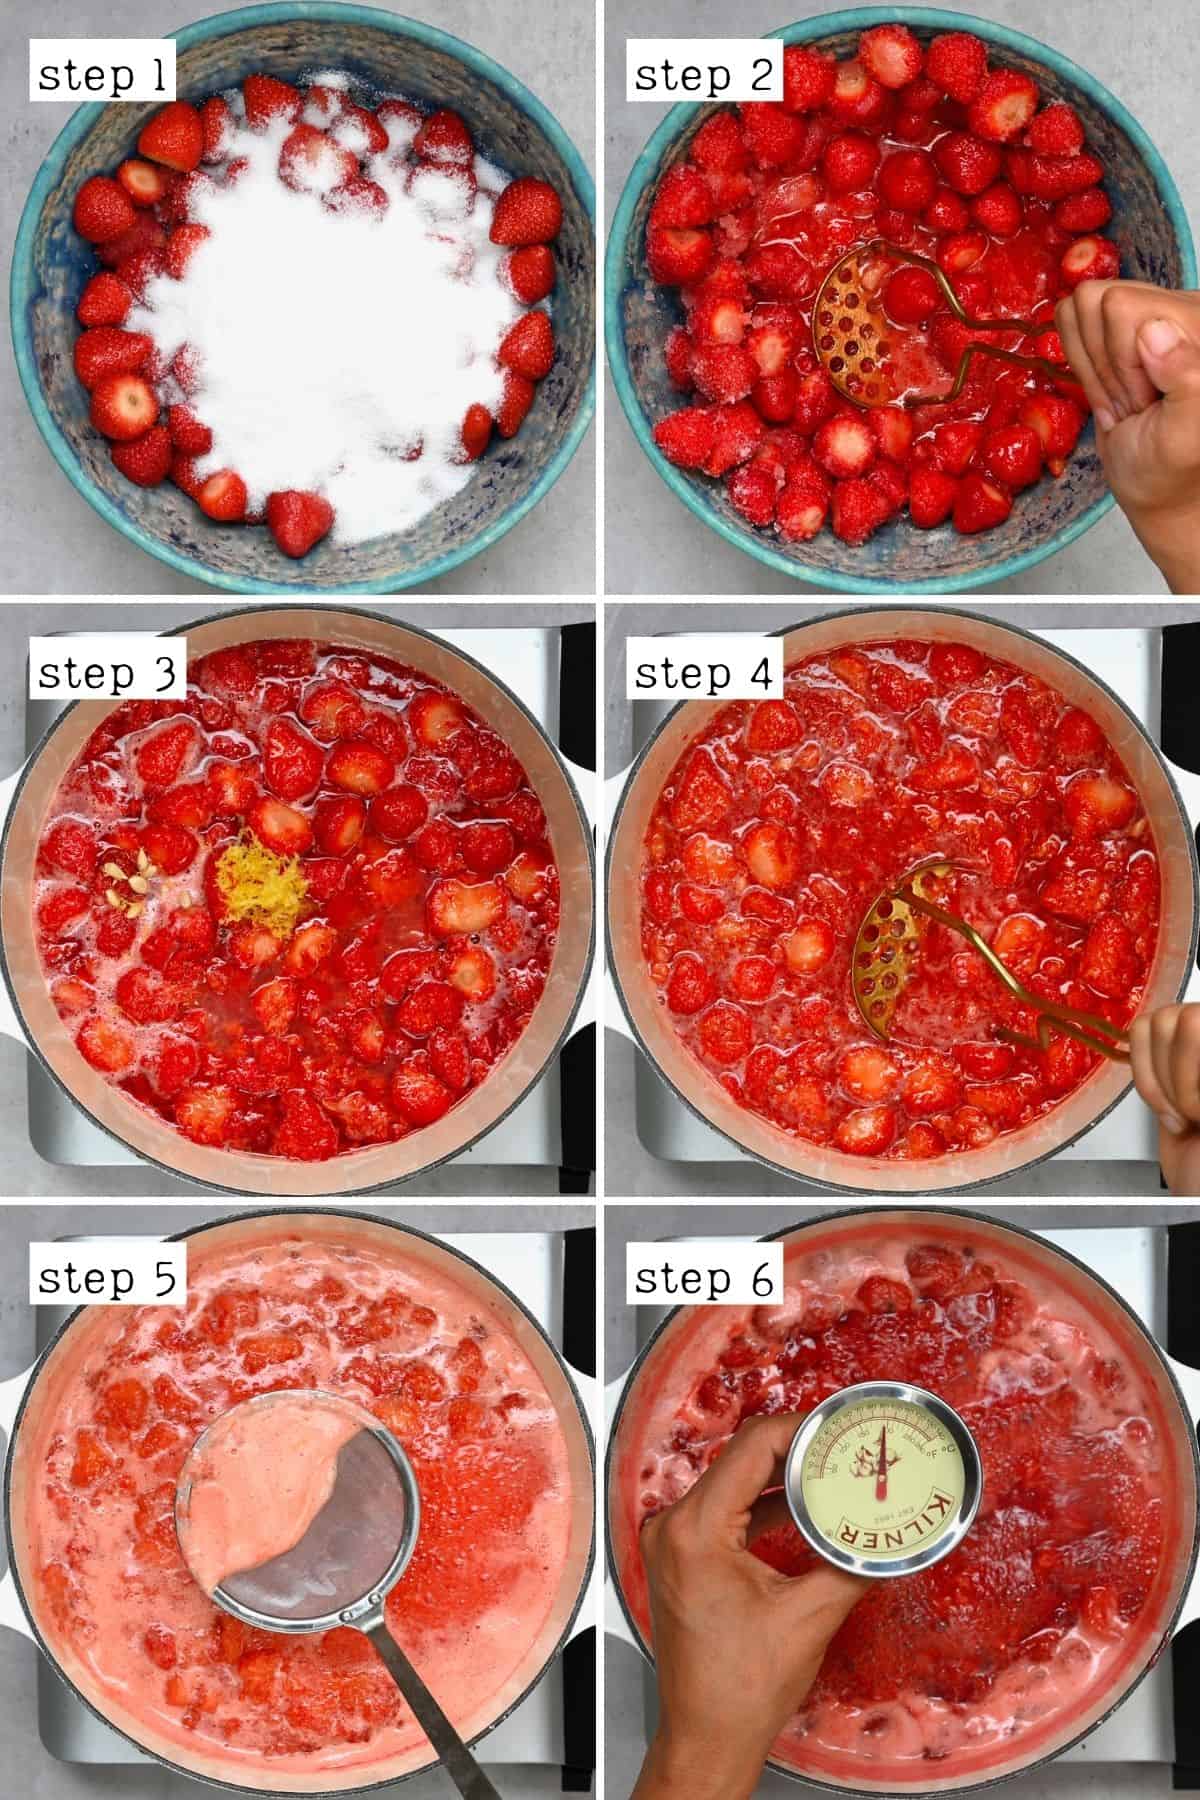
Transfer the strawberries and sugar to a large, deep, heavy-based stainless-steel saucepan and use a potato masher to mash them into a pulp (or your desired consistency).
Add the lemon juice and zest (and seeds, if using), and stir. Bring the mixture to a full rolling boil over medium-low heat, stirring constantly to ensure the sugar dissolves, and the jam doesn’t scorch to the bottom of the pan.
Skim any foam that appears (to avoid cloudy jam), simmering until it thickens enough to coat the back of a spoon. This takes about 15-20 minutes for this small batch.
The Gel Test
Remove the jam from the heat before testing its set. Then, if you have a thermometer, use it to test that the jam has reached 220ºF/104ºC.
If not, add a spoonful of jam to one of the freezer plates and return it to the freezer for a minute before testing. It should be set and wrinkle when pressed on the edges.
If it hasn’t set, continue to cook the jam for a few minutes and test it again.
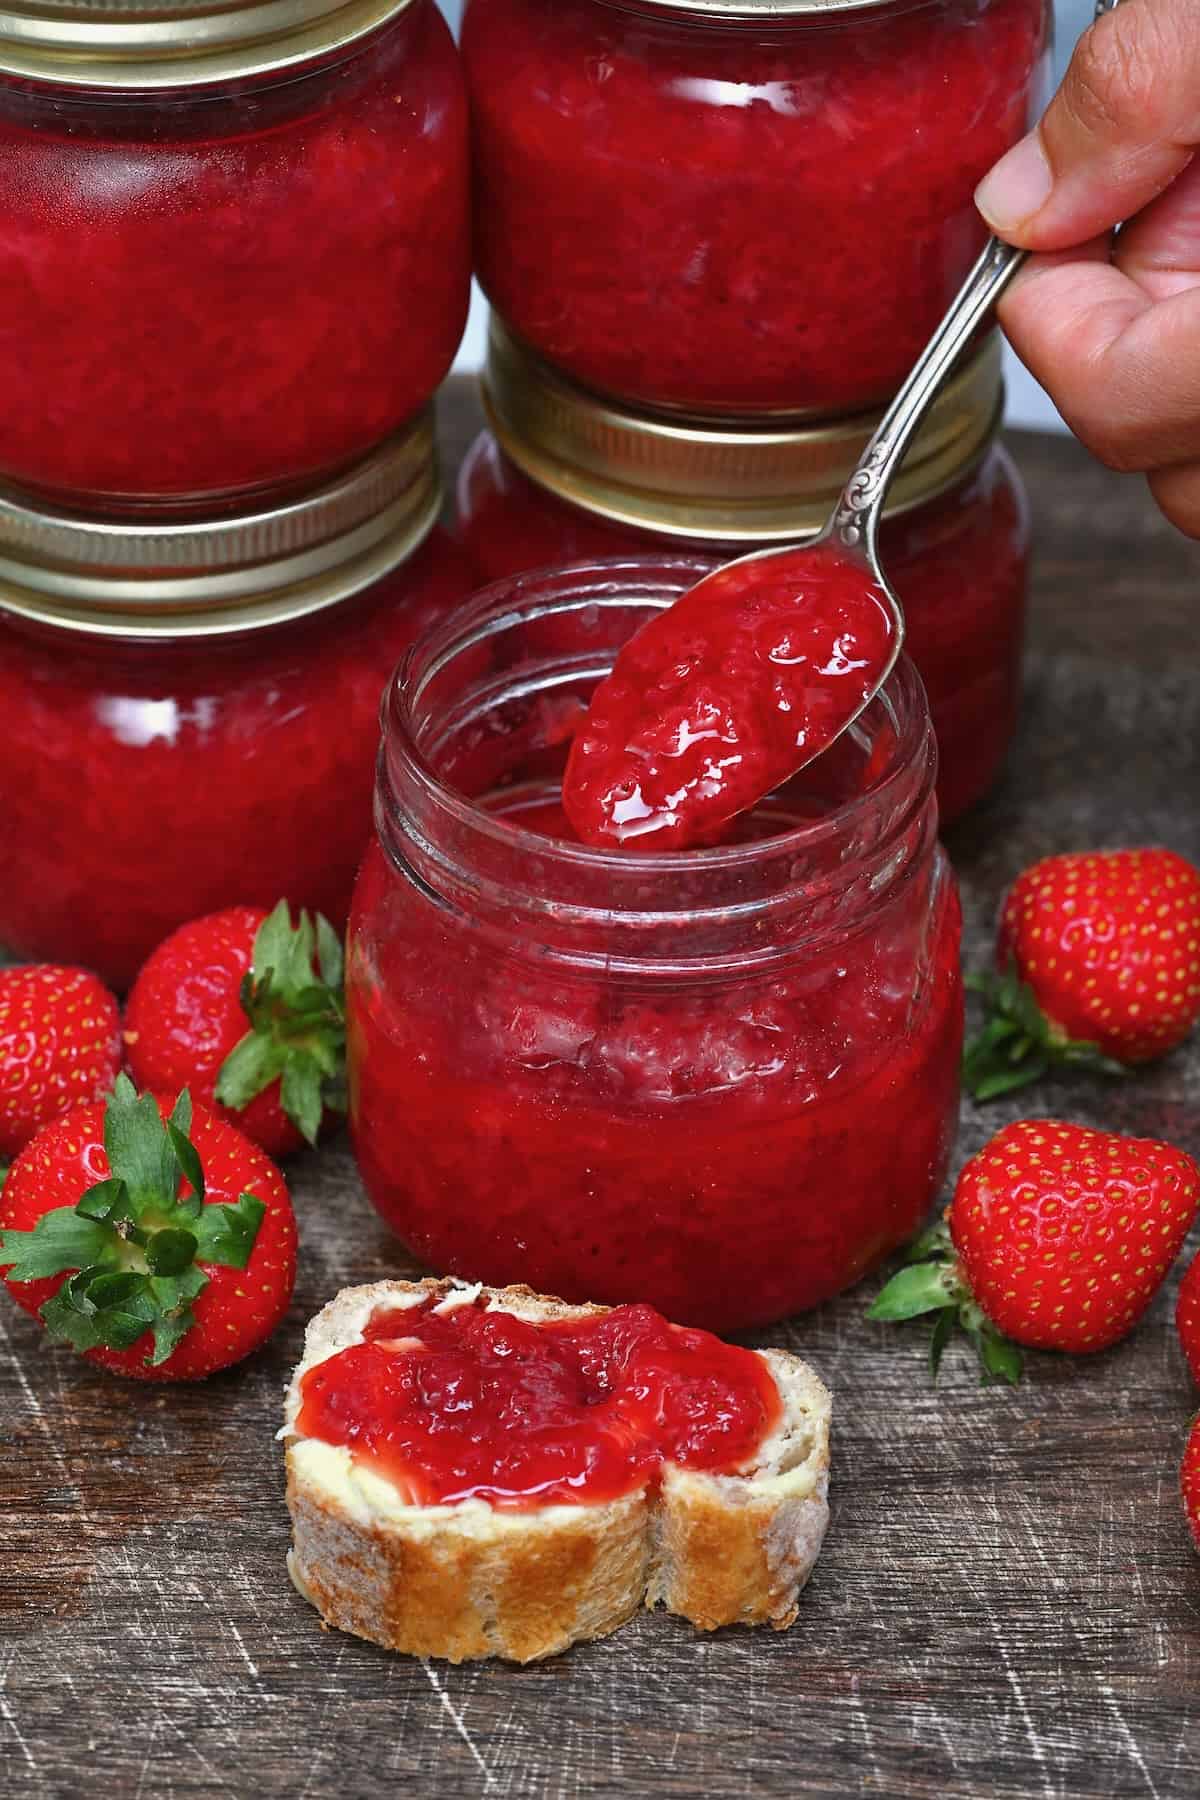
Prepare and Fill the Jars
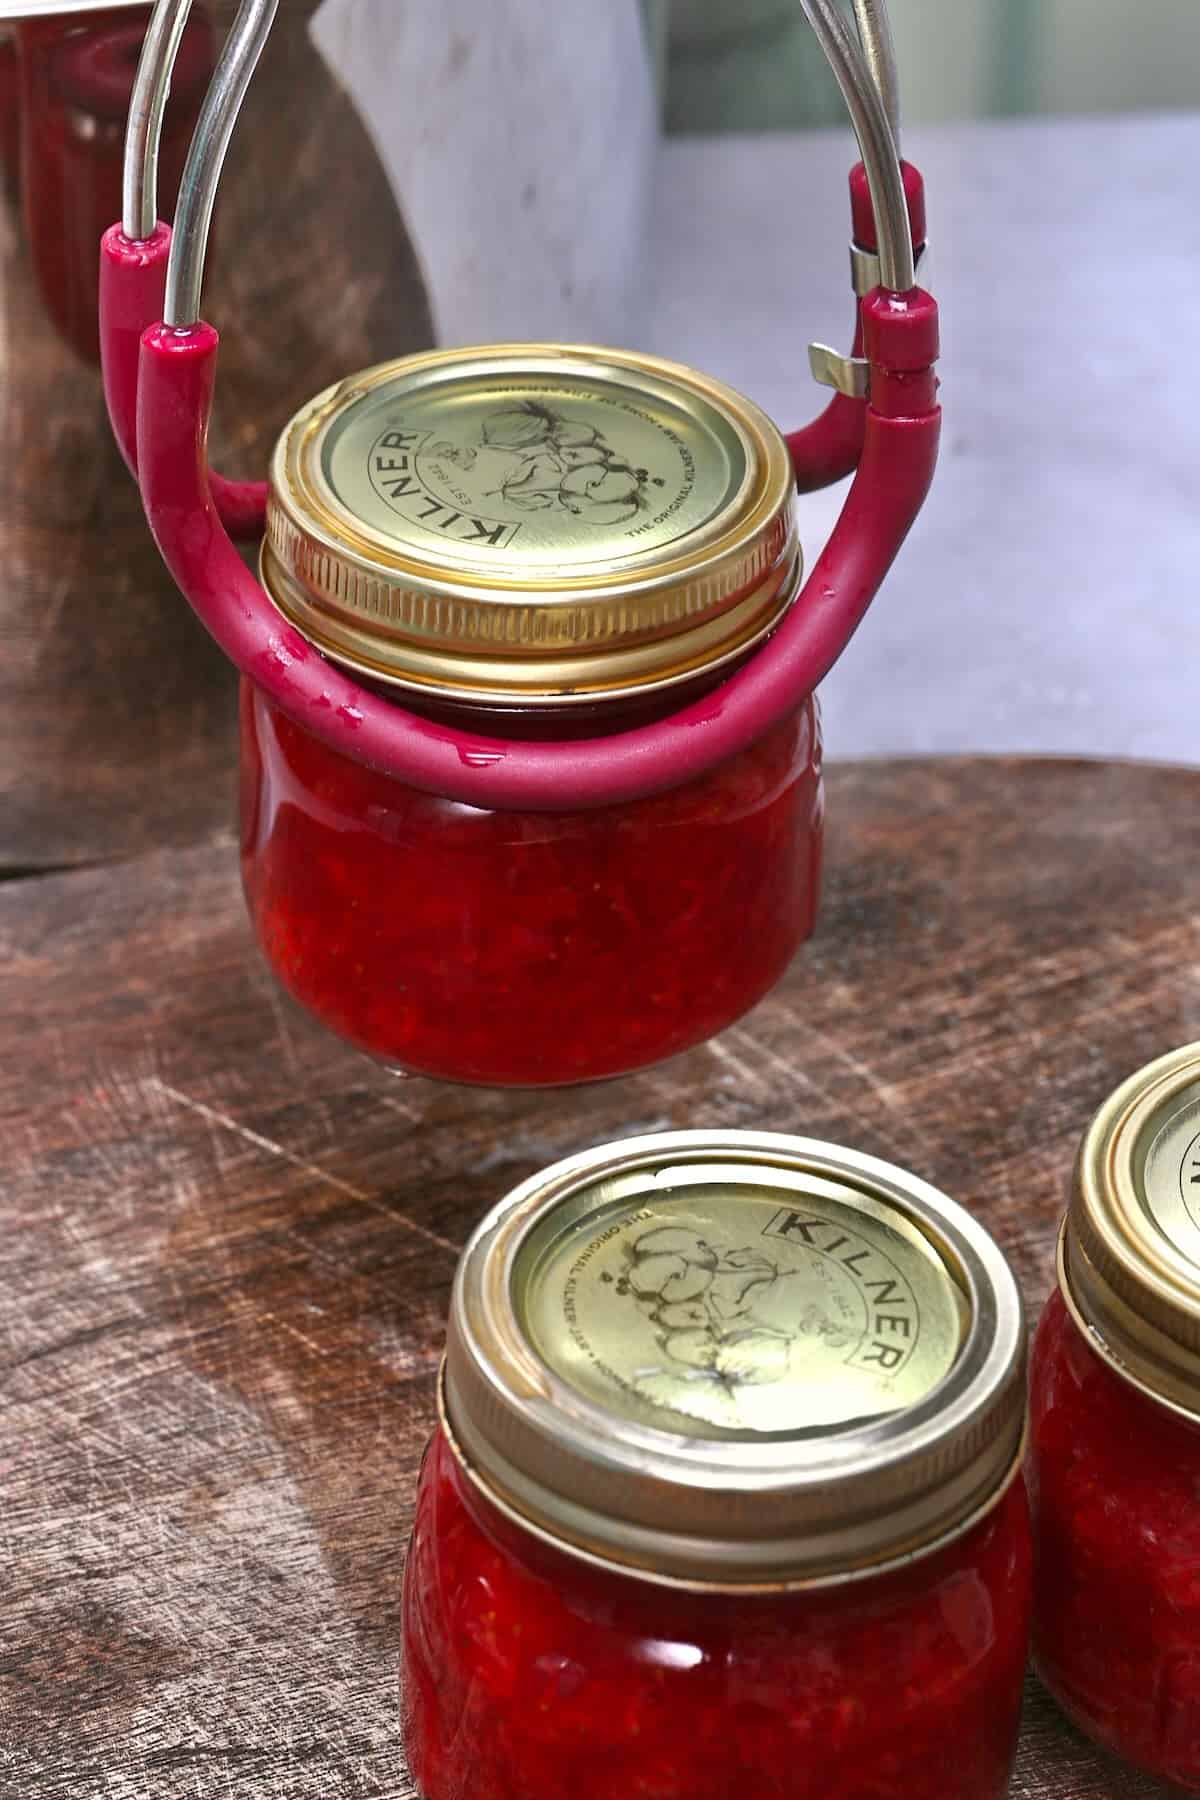
Place the sterilized, hot jars on a clean kitchen towel/wooden board (to avoid them cracking). Carefully pour/spoon the jam (using a jarring funnel helps avoid mess) into the jars, leaving ¼-inch headspace (0.5 cm) at the top.
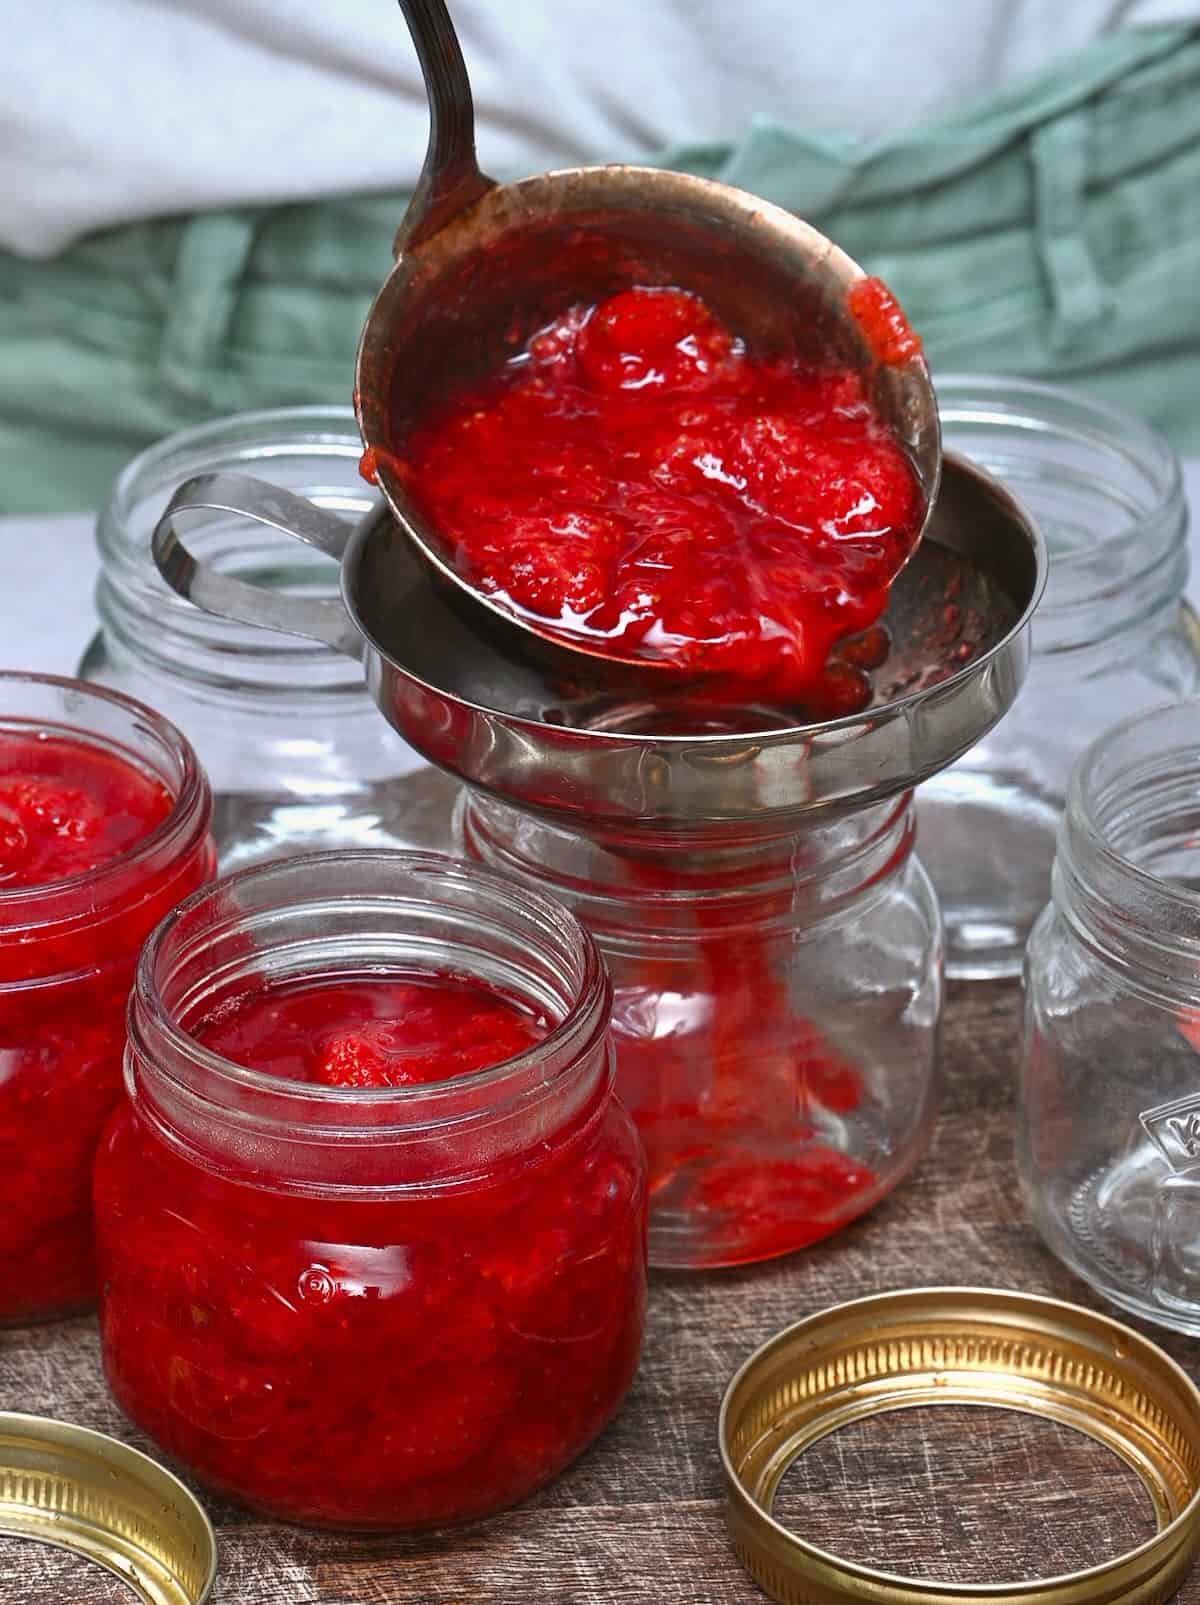
Wipe the jar rims with a clean kitchen towel and place the lid on the jar, screwing the screw bands until resistance is met, then increase to fingertip-tight.
If you aren’t canning, your homemade jam is now ready to cool slightly, then refrigerate.
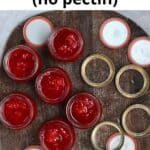
Water Bath Canning
Place the filled jars in the prepared canner, ensuring they’re submerged under at least 1 inch of water. Then, bring the water to a boil over medium-high heat, add a lid, and allow them to process for 10 minutes ( adjust the time based on your altitude).

Remove the water bath canner lid and allow the jars to sit for 5 minutes before using canning jar tongs to transfer them to a clean kitchen towel (to avoid cracking) an inch or two apart to cool undisturbed for 24 hours.
Once cooled, check the jar seals – remove the screw band, and the lid should stay in place. Then store them in a cool, dark location (like your pantry) for up to a year and a half.
Re-process any unsealed jars with new lids/jars (after checking for chips) or transfer them to the fridge to use within a month.
How to Store
If you haven’t water bath canned the homemade jam, aim to use it within 2-3 weeks in the refrigerator or 4-6 months in the freezer.
Canning jam makes it shelf-stable to store in a cool, dark pantry/kitchen cupboard for 12 months . Once opened, transfer the jar to the fridge to use within a month.
Top Tips for Success
- The best strawberries : Slightly under-ripe berries work best for delicious jam that’s not overly sweet.
- Make sure to use sterilized jars : This is important to avoid premature spoiling.
- For the best flavor : Macerate the strawberries and sugar for a few hours (or overnight) first. This pulls out juices from the fruit to create a syrup, releasing more flavor and reducing cooking time.
- Stir constantly: To avoid it scorching and sticking to the bottom of the saucepan.
- Mix the berries: Feel free to use a combination (i.e., blueberries, raspberries, blackberries). Adjust the cooking time accordingly, as the pectin levels vary.
- The sugar content: Reduced sugar in a jam recipe means a shorter shelf life and thinner set. Low-sugar/sugar-free strawberry jam, for instance, requires added pectin.

How to Serve
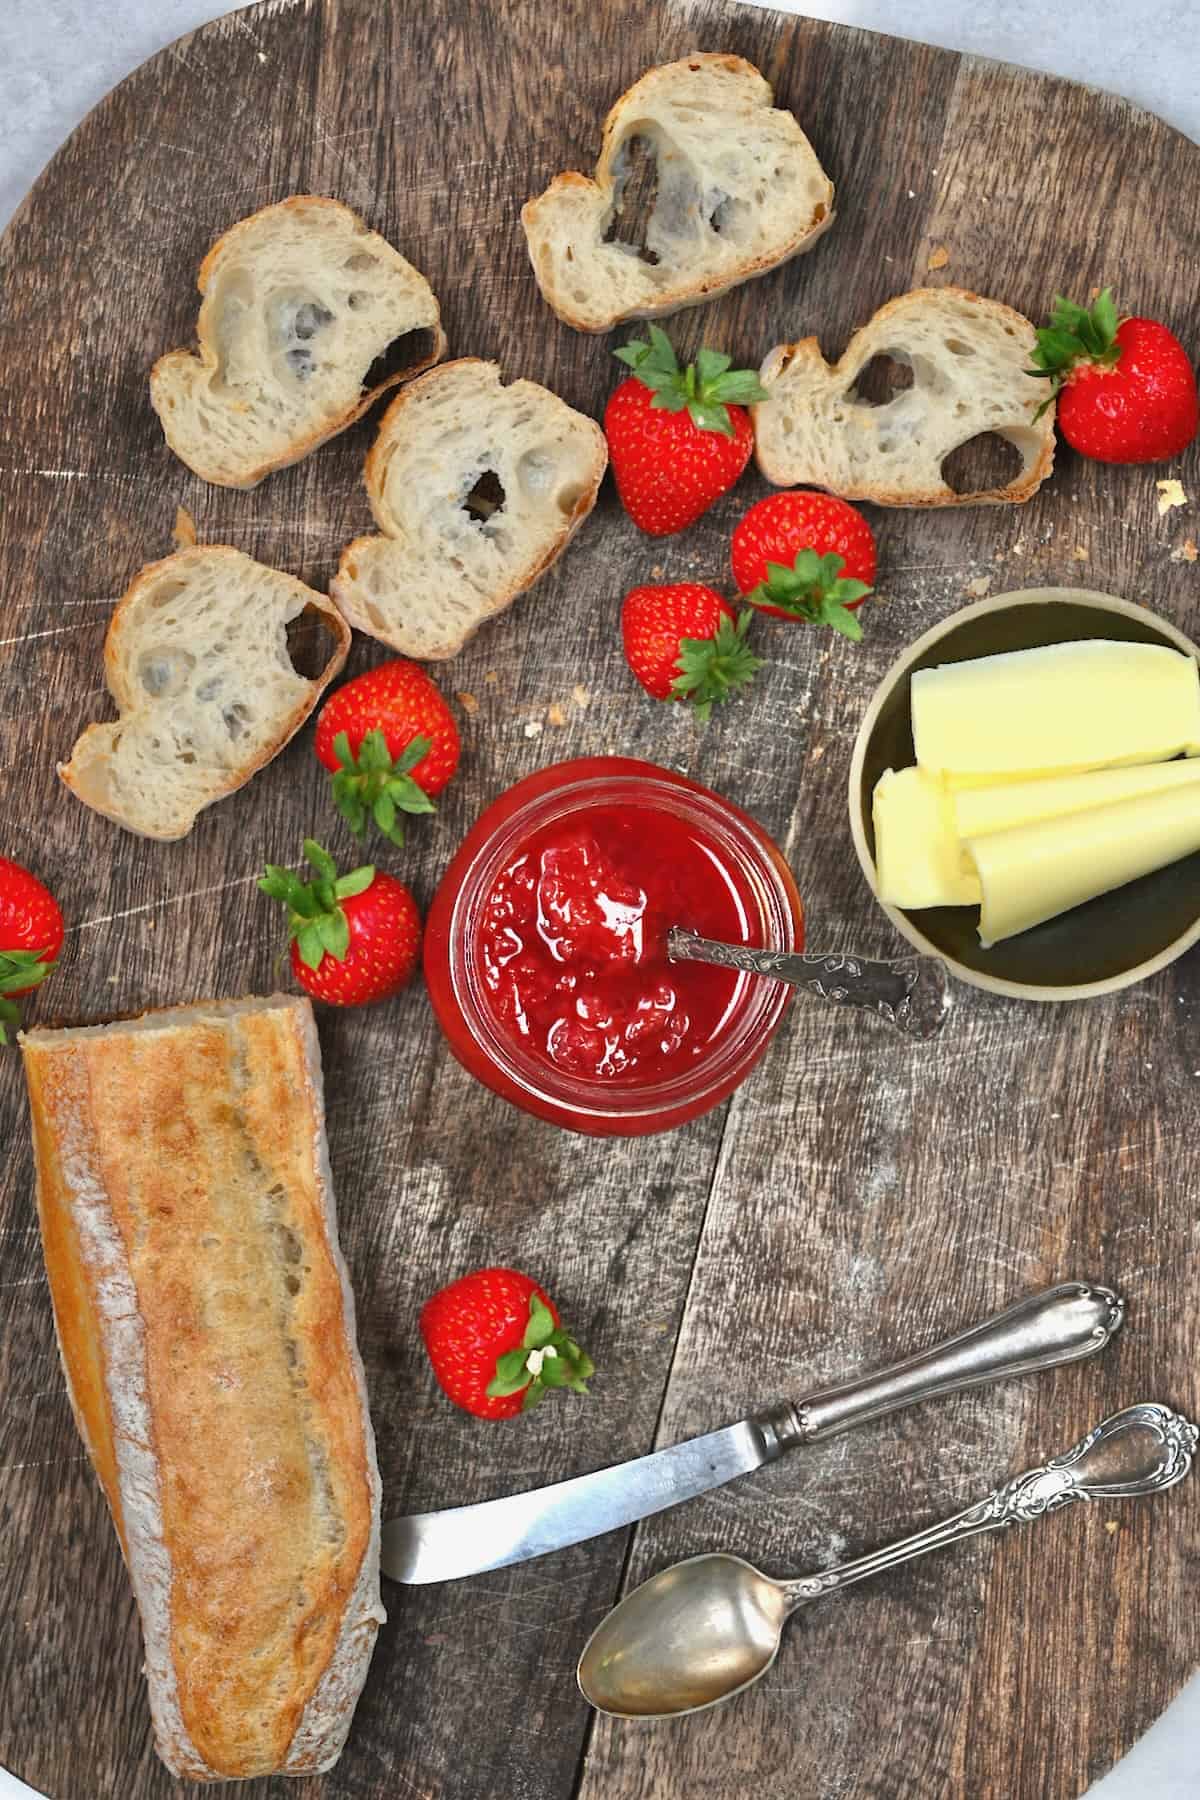
You can use strawberry jam in all the same ways you would other fruity jams. I.e., spreading over toast /bagels, over pancakes, croissants, French toast , and banana bread , with overnight oats, chia pudding, rice pudding , or yogurt, and to make a classic peanut butter and jelly sandwich or grilled cheese .
You can also use it with vanilla ice cream or to spread/fill baked goods, too, like a Swiss roll , layer cake, cupcakes, thumbprint cookies , and more. It makes a great gift, too.
More Homemade Jam Recipes
- Raspberry jam recipe
- Blueberry jam recipe
- Blackberry jam recipe
- Rhubarb jam recipe
Equipment
- 7 Canning jars (8 oz) (250 ml)
- Heavy-based stainless steel saucepan
- Silicone spatula or wooden spoon
- Potato masher or another similar tool
- Canning funnel
- Jelly bag optional
- Food Thermometer
- Bubble remover optional
- Magnetic lid wand optional
- Water bath canner
- Canning tongs (Jar lifter)
- Jar wrench
IngredientsUS CustomaryMetric1x2x3x
- ▢ 3.5 lb strawberries slightly underripe work best; though you can use fresh or frozen
- ▢ 1.16 lb white sugar 2¾ cups; or experiment with brown sugar, coconut sugar, etc.
- ▢ 1/3 cup lemon juice
- ▢ 1 Tbsp lemon zest from 1 lemon
- ▢ 6-7 lemon seeds optional, they are high in pectin
Instructions
Prepare the tools
- Sterilize the jars/tools – i.e., non-reactive saucepan, spoon, etc.- in hot, soapy liquid. Or do so in the dishwasher, ensuring they’re still hot when you use them. Then leave them to drain and dry on a clean, sterilized surface.
- If you don’t have a thermometer, place 2-3 small plates in the freezer for the gel test.
- If you’re planning to water bath can the jam, prepare the canner by adding a trivet/rack and filling it with enough water to submerge the jars by an inch. If you didn’t use the dishwasher to keep the jars hot, place the lidded jars in the water and heat the water to an almost boil while preparing the jam.
Prepare the berries
- Wash the strawberries well, then use a small knife (or a straw pushed through the bottom) to remove the stems and leaves. Remove any berries that are blemished/spoiled.
- Zest and juice the lemon. Optionally keep a few of the lemon seeds, too, as they’re packed with pectin and can be fished out of the jam before storing/canning it.
Make the jam
- Transfer the strawberries and sugar to a large, deep, heavy-based stainless-steel saucepan and use a potato masher to mash them into a pulp (or your desired consistency).
- Add the lemon juice and zest (and seeds, if using), and stir. Bring the mixture to a boil over medium-low heat, stirring constantly to ensure the sugar dissolves, and the jam doesn’t scorch to the bottom of the pan.
- Skim any foam that appears (to avoid cloudy jam), simmering until it thickens enough to coat the back of a spoon. This usually takes about 15-20 minutes.
The gel test
- Remove the jam from the heat before testing its set. Then, if you have a thermometer, use it to test that the jam has reached 220ºF/104ºC. If not, add a spoonful of jam to one of the freezer plates and return it to the freezer for a minute before testing. It should be set and wrinkle when pressed on the edges. If it hasn’t set, continue to cook the jam for a few minutes and test it again.
Fill the jars
- Place the sterilized, hot jars on a clean kitchen towel/wooden board (to avoid them cracking) and carefully pour/spoon the jam (using a jarring funnel helps avoid mess) into the jars, leaving ¼-inch headspace (0.5 cm) at the top.
- Wipe the jar rims with a clean kitchen towel and place the lid on the jar, screwing the screw bands until resistance is met, then increase to fingertip-tight. If you aren’t canning, your homemade jam is now ready to cool, then refrigerate.
Water bath canning
- Place the filled jars in the prepared canner, ensuring they’re submerged under at least 1 inch of water. Bring the water to a boil over medium-high heat, add a lid, and allow them to process for 10 minutes (adjust the time based on your altitude).
- Remove the canner lid and allow them to sit for 5 minutes before using canning jar tongs to transfer the jars to a clean kitchen towel (to avoid cracking) an inch or two apart to cool undisturbed for 24 hours.
- Once cooled, check the jar seals (remove the screw band, and the lid should stay in place), then store them in a cool, dark location (like your pantry) for up to a year and a half. Re-process any unsealed jars with new lids/jars (after checking for chips) or transfer them to the fridge to use within a month.
Video
Notes
- Vanilla : Add pure vanilla extract (or paste) at the end (off heat).
- Almond extract : Stir it in off the heat at the end for a subtle nutty flavor.
- Orange : Use orange zest instead of lemon for a bright, citrusy flavor.
- Spices : You can experiment with cinnamon, nutmeg, pumpkin pie spice, etc. Add it to taste.
- Fresh herbs : I.e., a handful of finely chopped mint, thyme, rosemary, or basil.
- Ginger : Add finely grated ginger to taste, starting with about ½ teaspoon.
- Chili : i.e., strawberry jalapeño jam/strawberry habanero jam. Finely dice the chili and remove the seeds. Add as much as you’d like for a subtle or big kick.
- Maple syrup/ honey : Add just a small amount instead of regular sugar for subtle flavor depth without overwhelming the strawberry flavor.
- Balsamic vinegar : A splash adds a wonderful tangy depth.
- Alcohol : Add a splash of Amaretto, bourbon, or orange liqueur to create a more complex, full-bodied jam.
Nutrition
Nutrition information is automatically calculated, so should only be used as an approximation.
Recipes › Desserts
Almond Pistachio Thumbprint Cookies Recipe
By Samira Kazan
updated September 21, 2020

Delicious gluten-free, vegan bite-size almond & pistachio thumbprint cookies. Not only are they easy to make- they can either be baked or kept as a no-bake cookie recipe!
These almond pistachio thumbprint cookies are a delicious vegan and gluten-free cookies recipe using almond flour and pistachio butter. Unlike your generic shortbread thumbprint cookies, these vegan bite-size snacks have a delightful crumbly almond base and can be cooked or kept as a no-bake cookie recipe.
Depending on whether you want these as raw snacks or baked cookies, they are delicious. However, it’s worth noting that there will be some textural difference.
For the raw version, these pistachio thumbprint cookies are a little more gooey and moist. In comparison, when baked, these cookies are more crumbly.
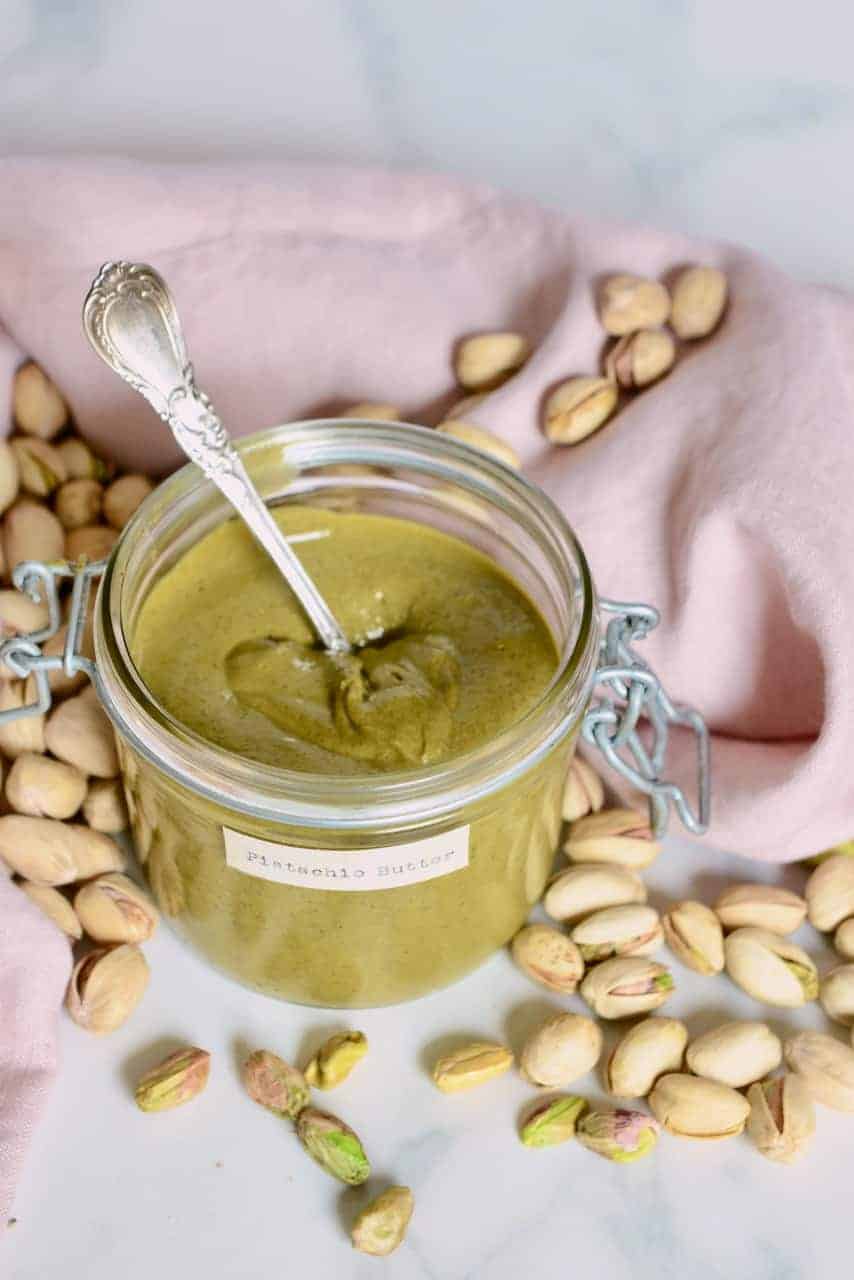
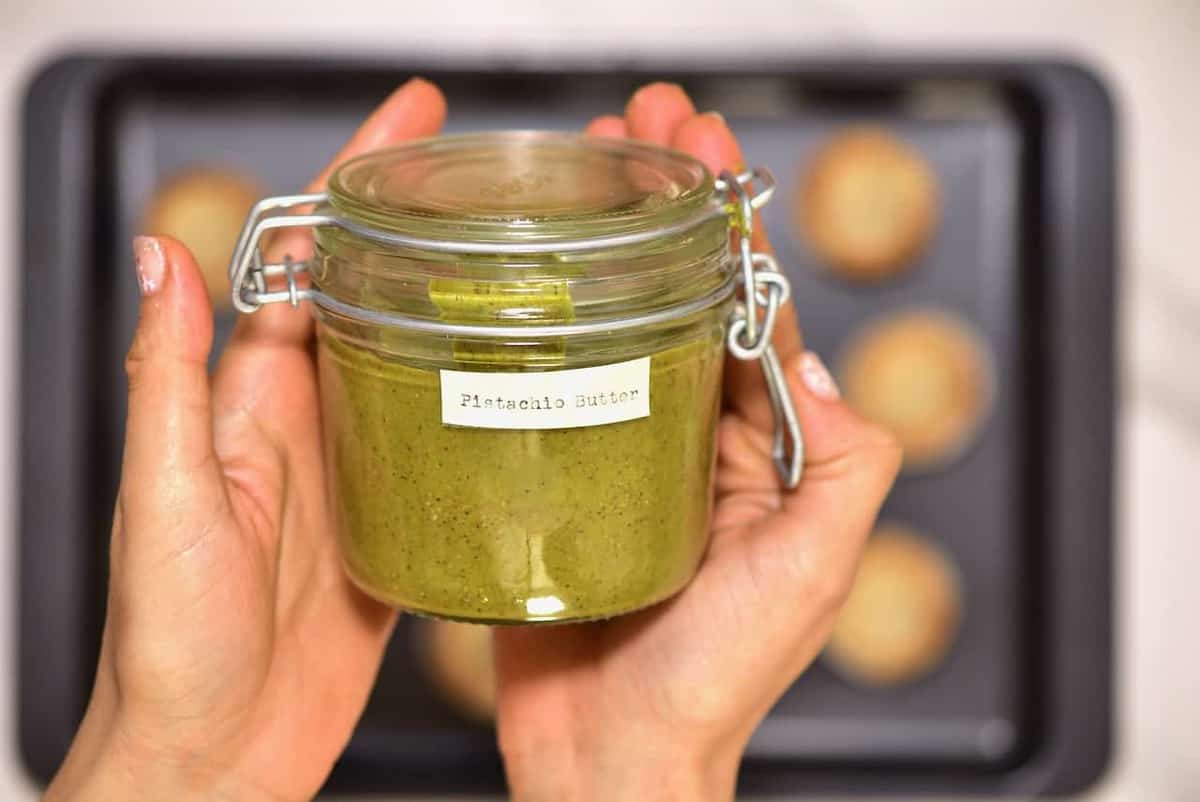
I always love to switch up classic recipes and decided that rather than using the usual choice of jam filling for this thumbprint cookie recipe, I used some homemade pistachio butter .
Pistachio butter is one of the most delicious, decadent version of all nut butters and yet can be made at home with just pistachios, salt and a blender or food processor. Plus the pistachio flavour compliments the flavour of the gluten-free almond cookies.
These cookies are then an excellent healthier cookie snack option. They can also be displayed in mini cupcake cakes, in a gift box, for a delicious homemade edible gift at Christmas (or any time of the year!).
If you’ve been following me on Instagram, you’ll know that I’ve been cooking up a storm this festive period, with a new recipe posted every day. Honestly, I couldn’t wait for the day to share these pistachio thumbprint cookies though because they are one of my favourite treats so far.
I’ve very recently compiled a post for the ultimate guide to homemade nut & seed butters, so I have spent a LOT of time this year in the kitchen blending up delicious nut butters and nut butter recipes. As much as I have a soft spot for good old almond butter, pistachio butter has taken my heart.
While it’s not a nut butter you’d want to eat by the spoonful every day (or rather you would – but your hips wouldn’t like it!), pistachio butter has an incredible luxury element that works well in so many different recipes. Check out my pistachio butter post for some inspiration.
Want to save this recipe?
- Variations on these thumbprint cookies
- How To Make The Thumbprint Cookies
- Other great snack recipes you may like
- Pistachio Almond Cookies Recipe
Variations on these thumbprint cookies
Obviously, my filling of choice is my homemade pistachio butter. However, you can experiment with various fillings including a delicious vegan homemade Nutella , the classic choice of jam, or even some vegan chocolate chips (that will melt from the heat and be heavenly!).
For a sweeter pistachio creme style filling, melt some white chocolate in a heatproof bowl then mix in some pistachio butter with a dash of homemade vanilla powder .
You can also make a delicious chocolate version of these pistachio thumbprint cookies by adding some cocoa powder into the base almond cookies recipe. If the biscuit mix feels too crumbly after adding the powder, add another tsp of coconut oil to offset the powder.
Plus, you can experiment with additional toppings for the pistachio thumbprint cookies. For example, a drizzle of melted white chocolate is a lovely dessert-like touch.
Note* For vegan cookies use dairy-free white chocolate and chocolate chips.
How To Make The Thumbprint Cookies
This pistachio thumbprint cookies recipe is super simple and can be made in just five minutes if you’re keeping them raw. Or around 20 minutes, if baking- which means they’re an excellent option for a last-minute edible gift idea or to whip up on busy days when you don’t have much time to spare.
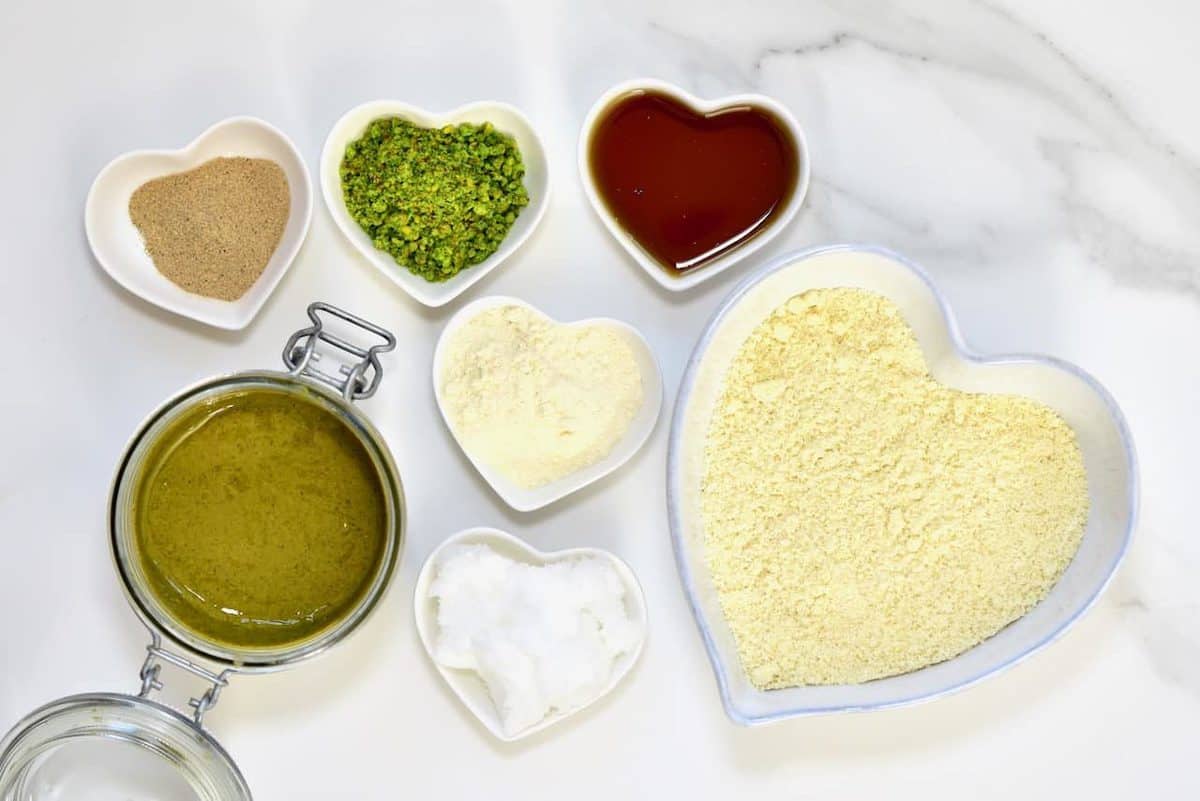
The almond cookies base is made up of almond flour, coconut oil, maple syrup, coconut flour and cardamon.
Don’t fret if you don’t have almond flour to hand though as this can be whizzed up in a couple of minutes. Blitz some raw almonds in a high-speed food processor for a couple of minutes and you’ll get homemade almond flour, which is a great gluten-free flour to have to hand at all times.
This recipe is also a great way to use leftover almond pulp after making homemade almond milk . Simply allow the pulp to dry out, and it’s ready to use as almond flour.
Note* For this particular recipe the ground almonds don’t have to be too fine, which is why any of the above options will work fine for the almond cookies recipe.
The method
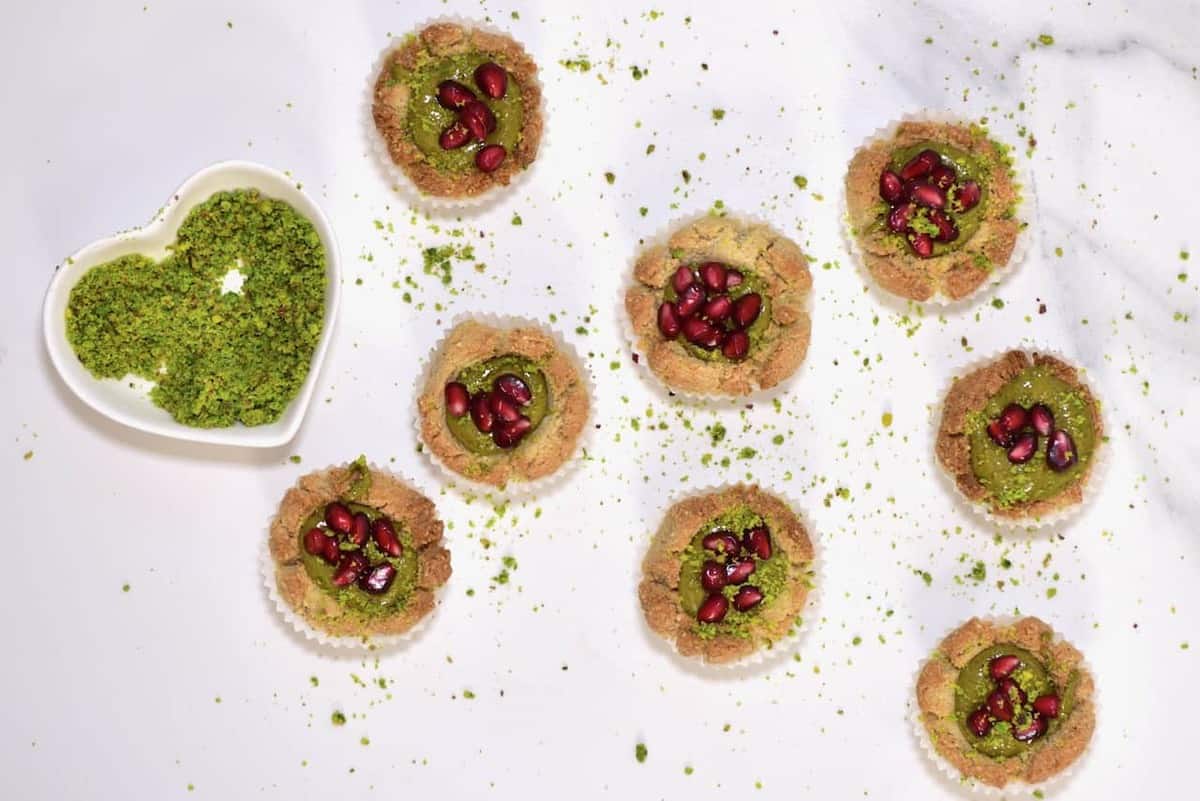
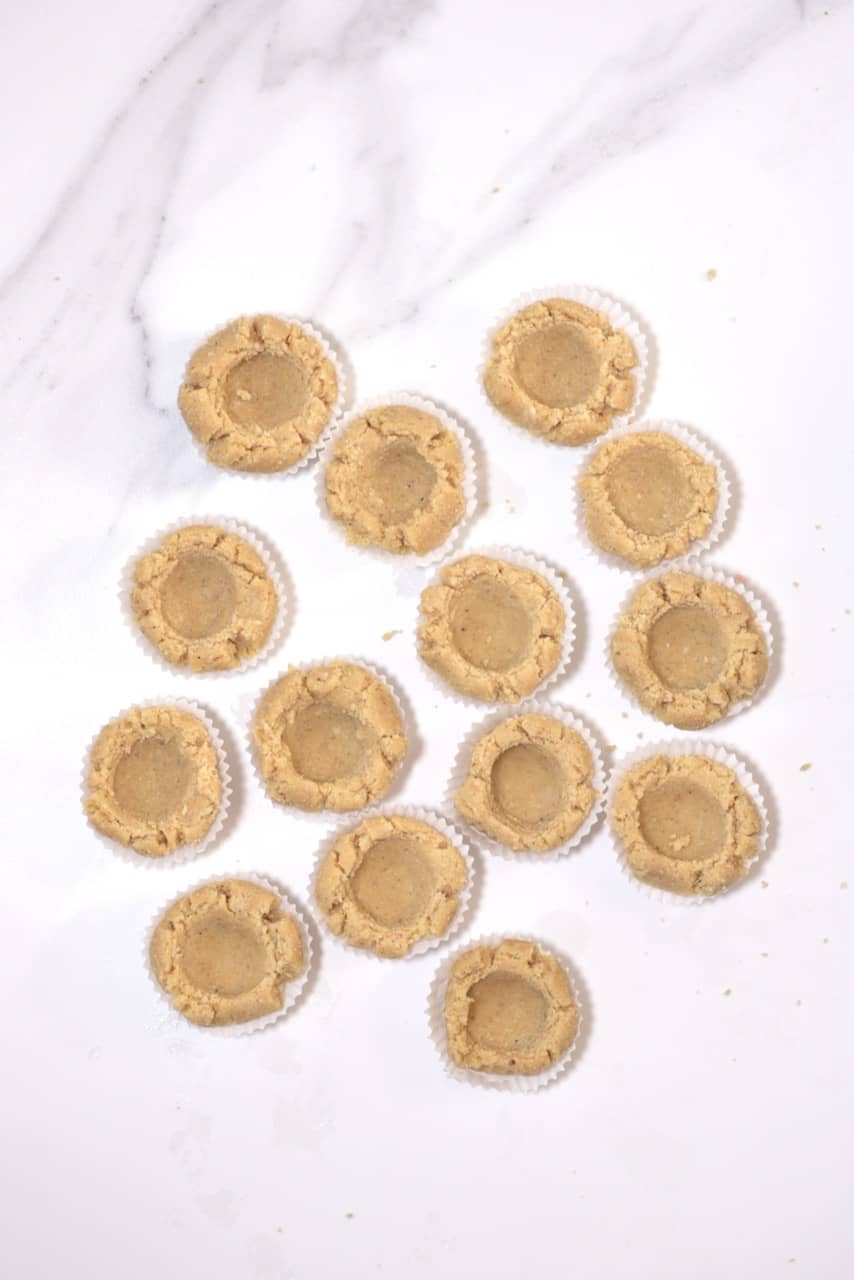
To begin, mix the almond flour with the other base ingredients and then form small, one bite-sized cookies. If you want you can measure these out and use around 1tbsp per cookie. However, I eyeballed it and made 14 of them.
To make them into thumbprint cookies, the process is precisely what it says. Roll each piece of dough into a ball, and then you can use a finger/ thumb to make the indentations. You could also use the rounded back of a spoon. In fact, I used a small 1/2 tsp measuring spoon for an even indentation in each cookie.
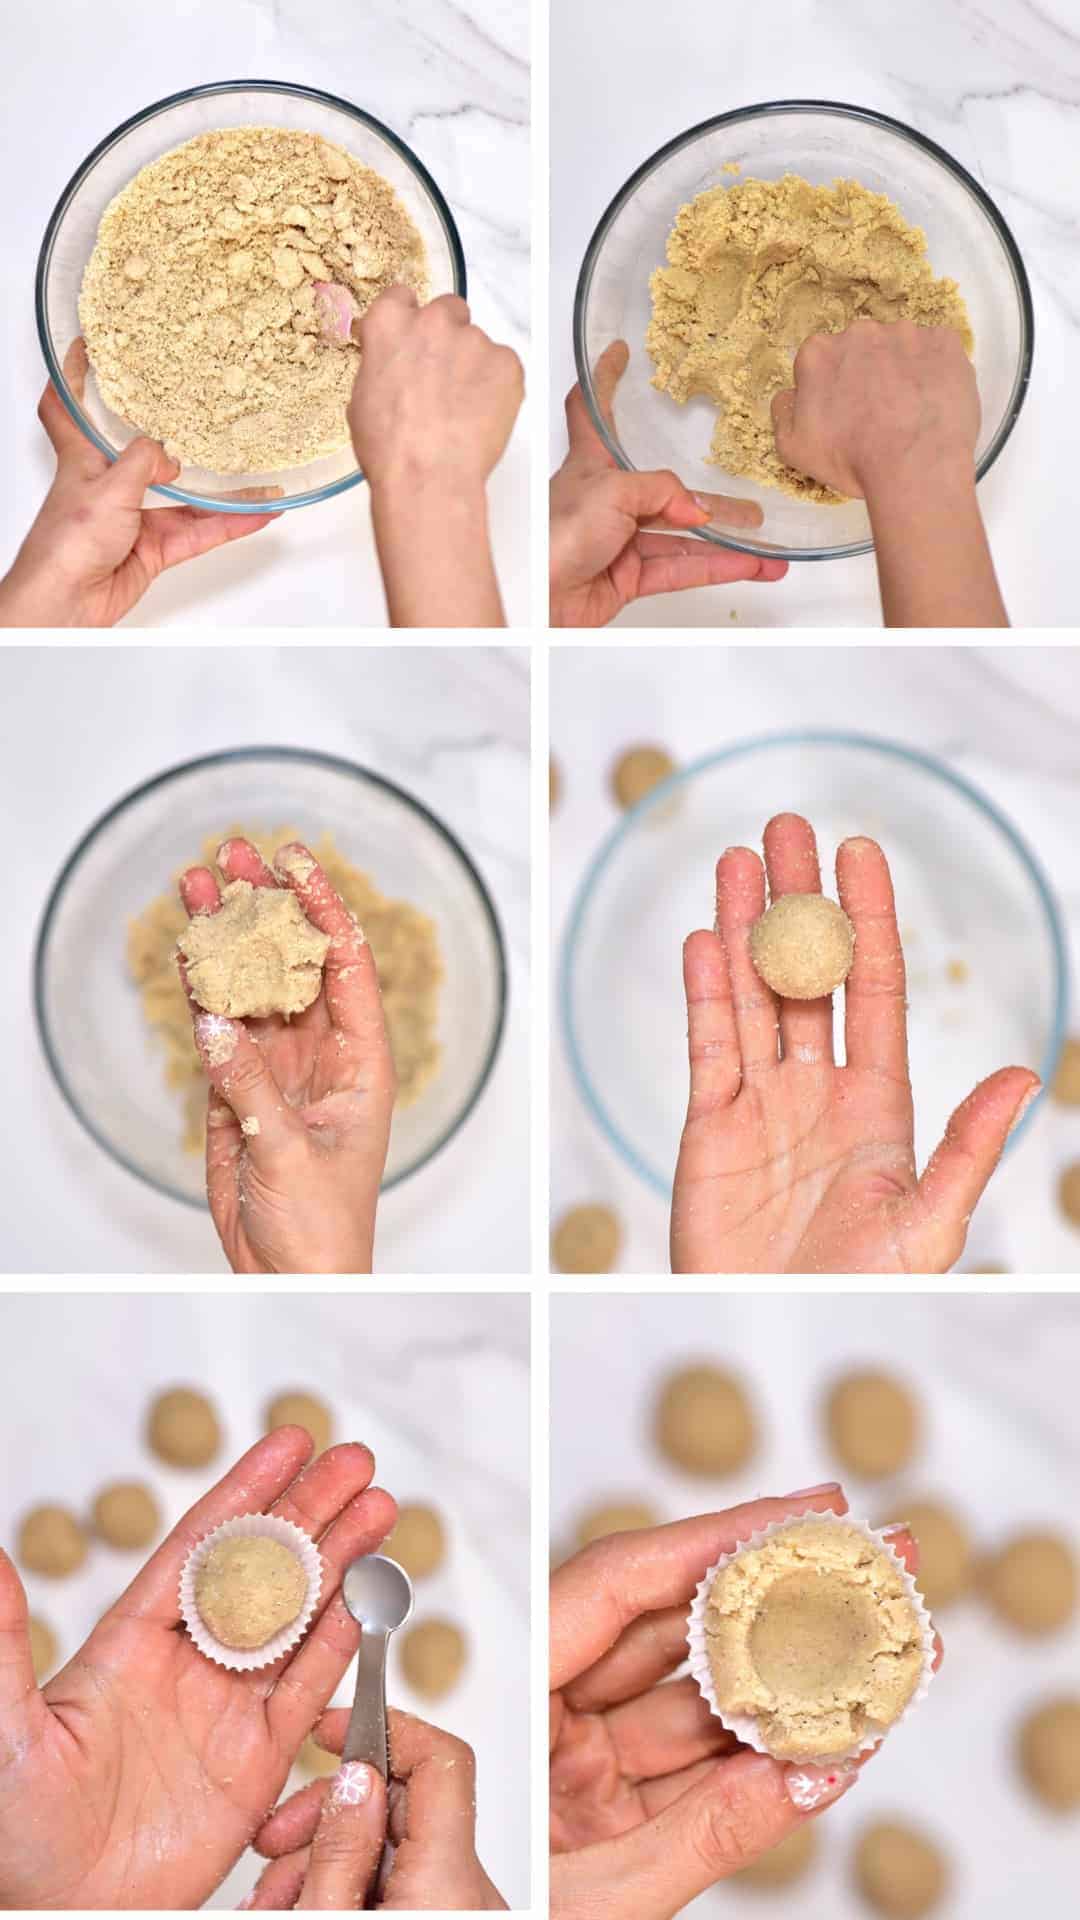
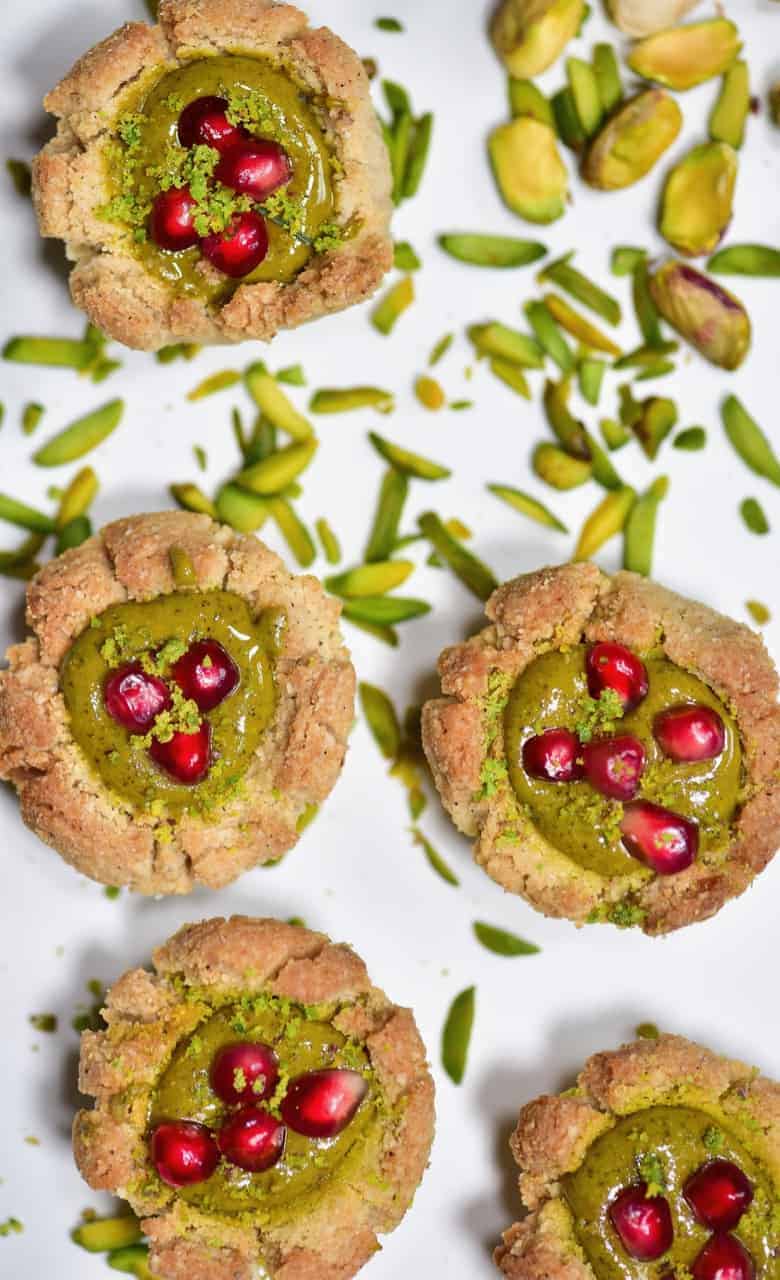
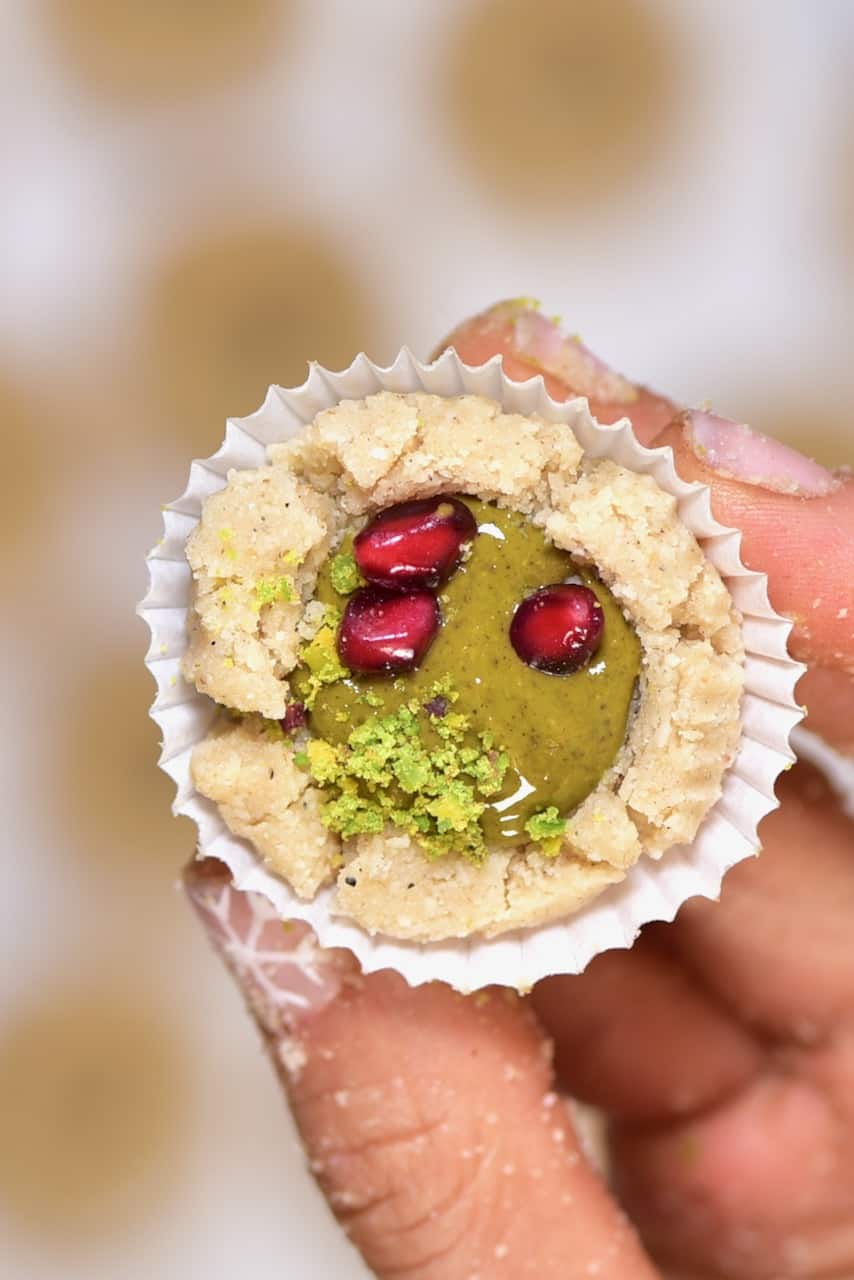
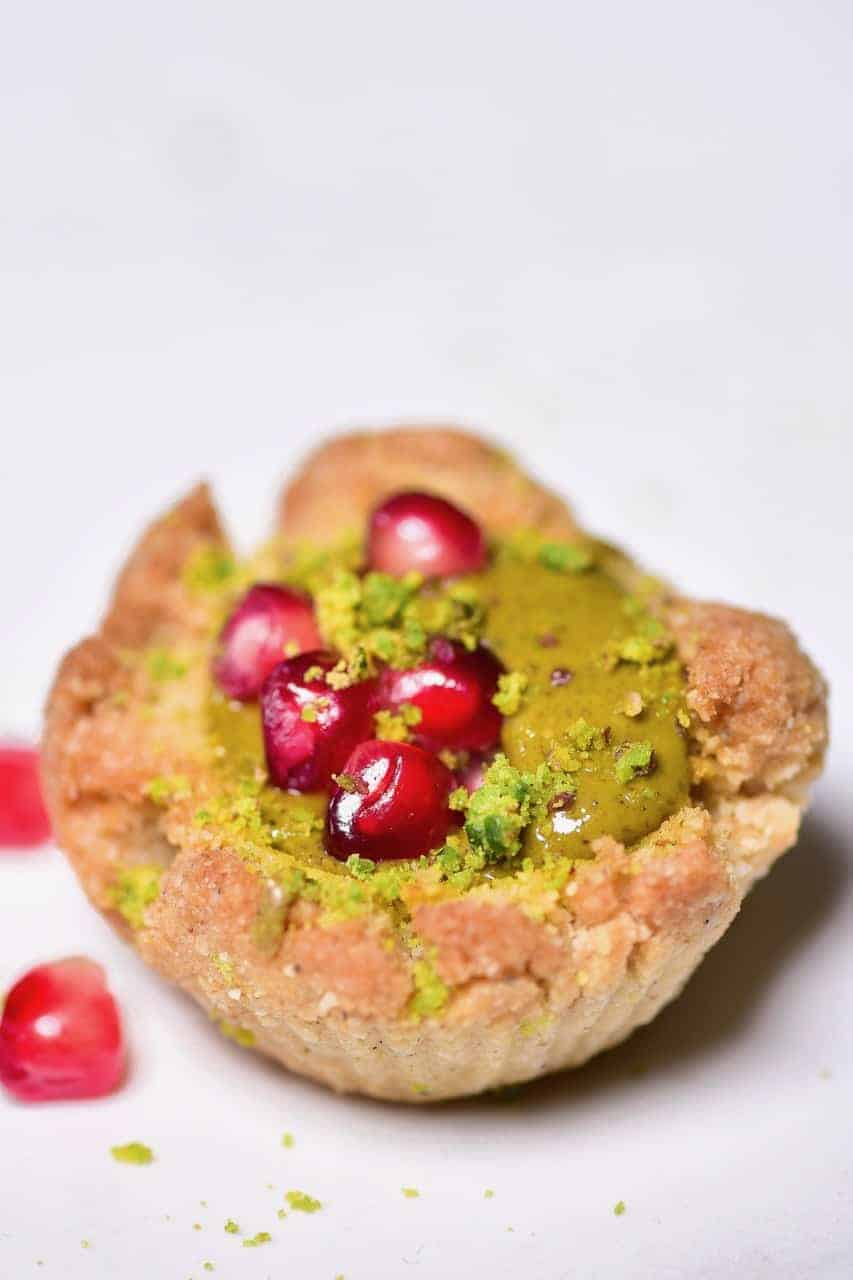
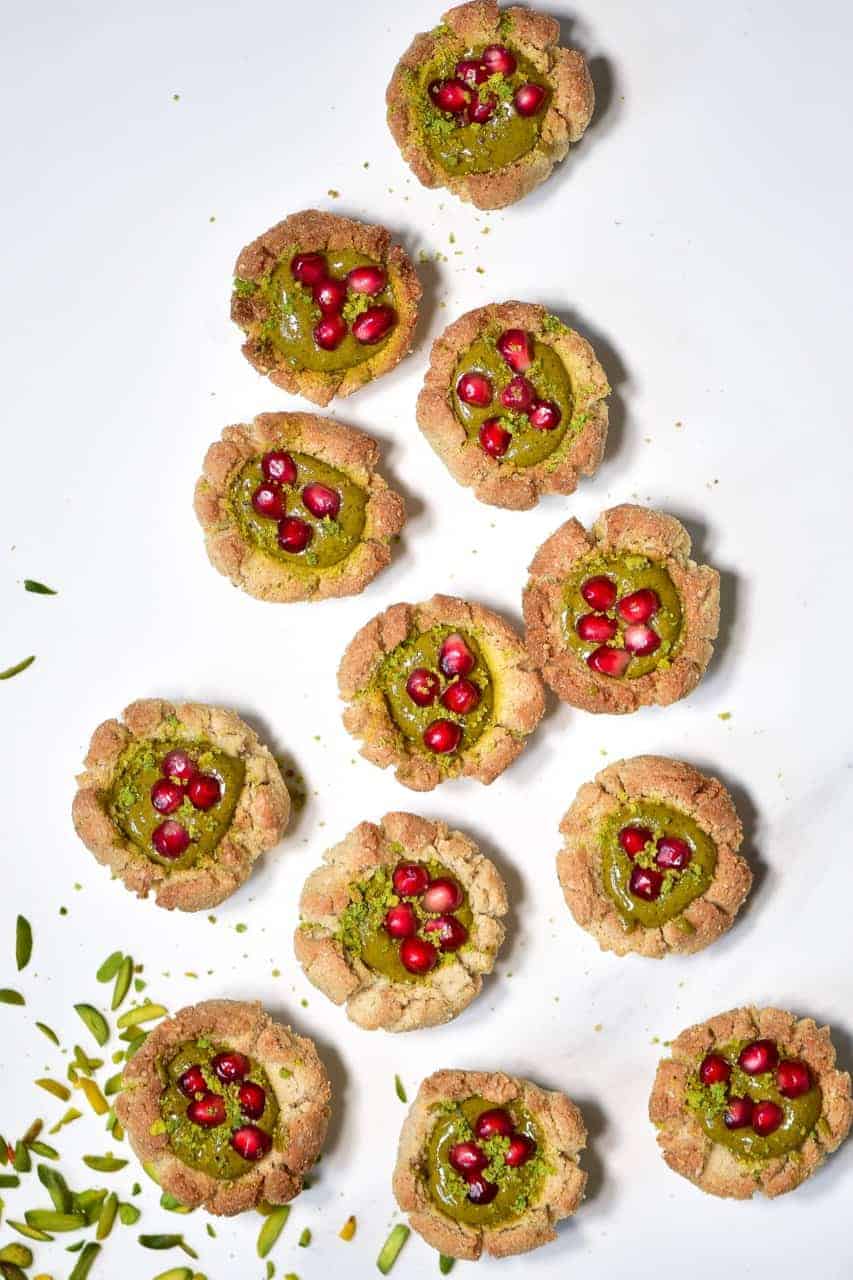
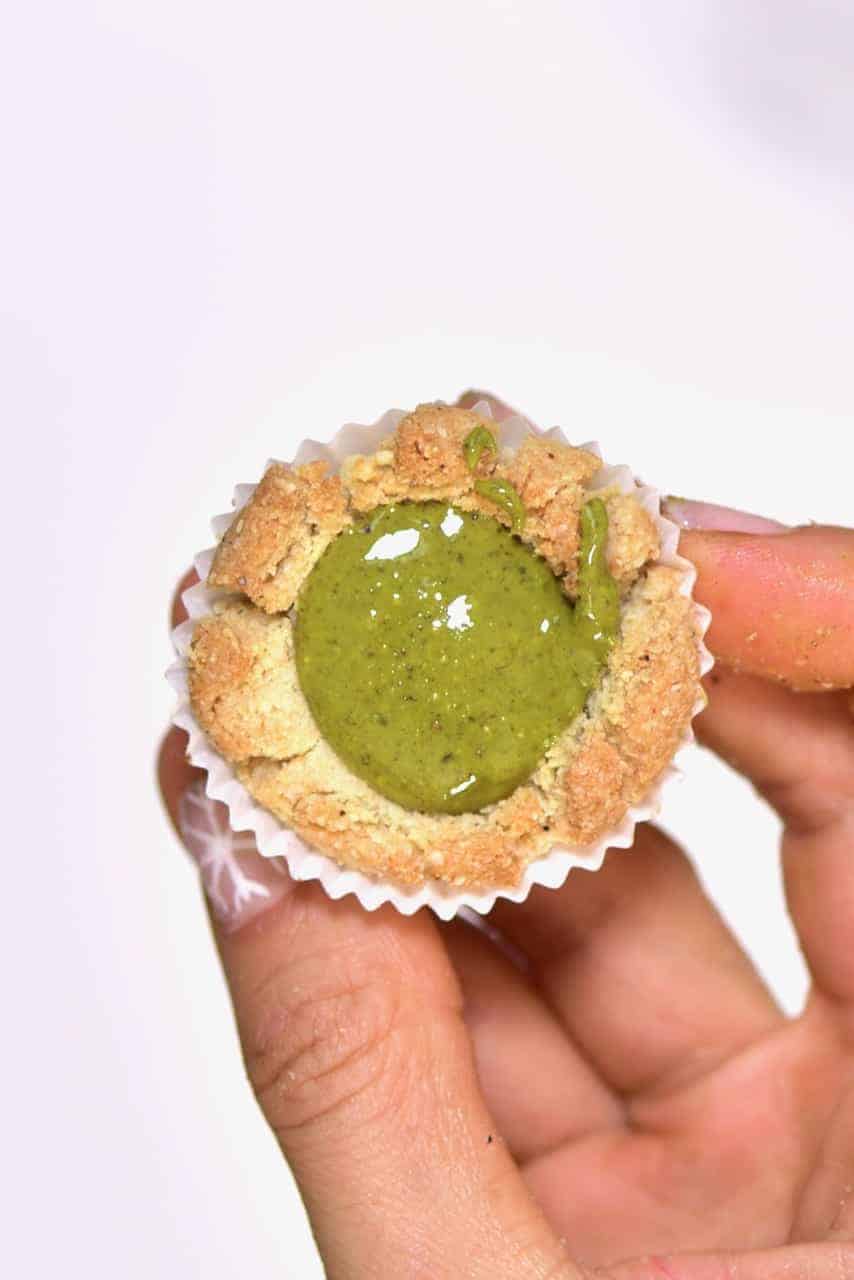
If you’re in a hurry to enjoy these delicious cookies, then you can have these as a no-bake cookie recipe by simply adding some pistachio butter to them now and decorating with some pomegranate seeds and chopped pistachios.
Note* Due to the gluten-free nature of these cookies and the lack of dairy, these cookies are more crumbly than general cookie dough so cracking around the edges when pressing your indentation is perfectly normal.
However, if you want to bake the cookies, then you can now bake them in the oven either in mini cupcake cups or on a baking tray lined with parchment paper.
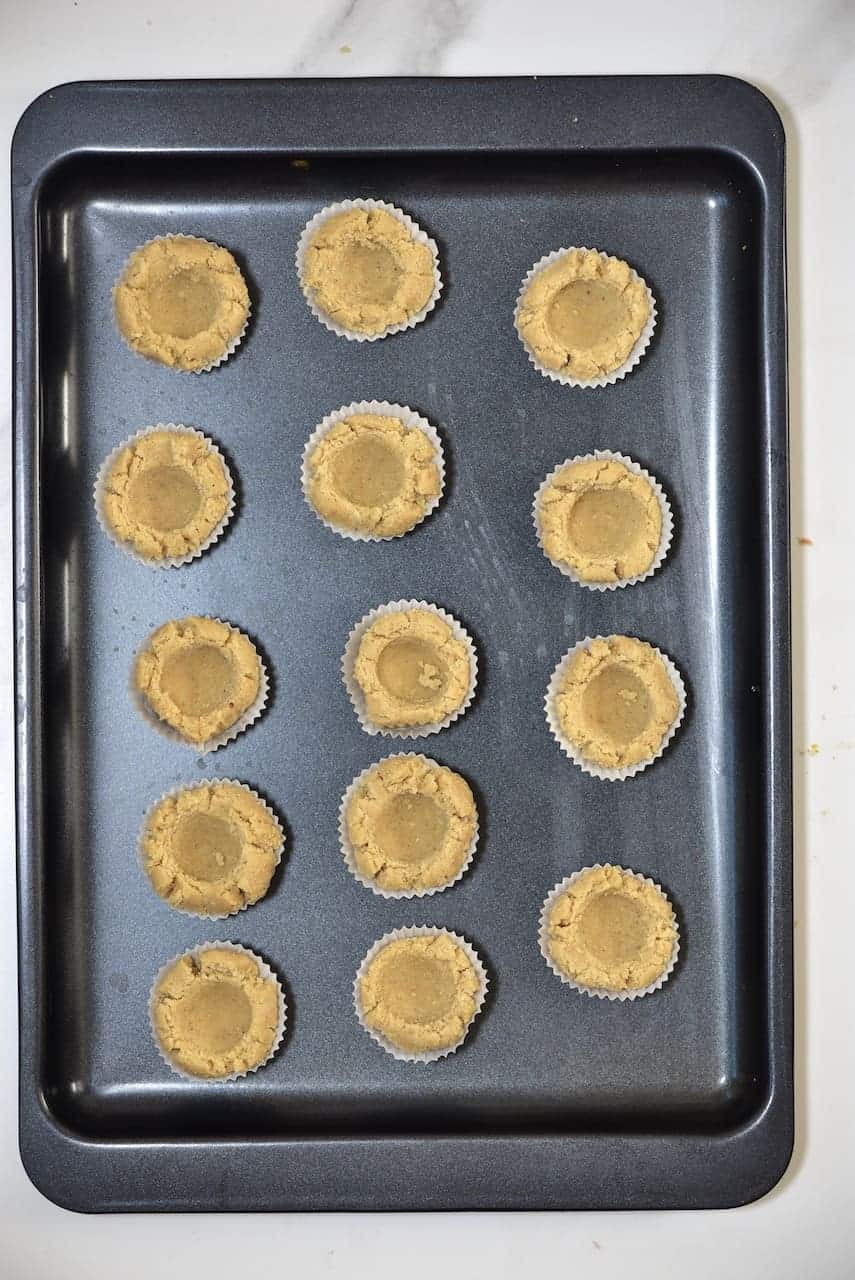
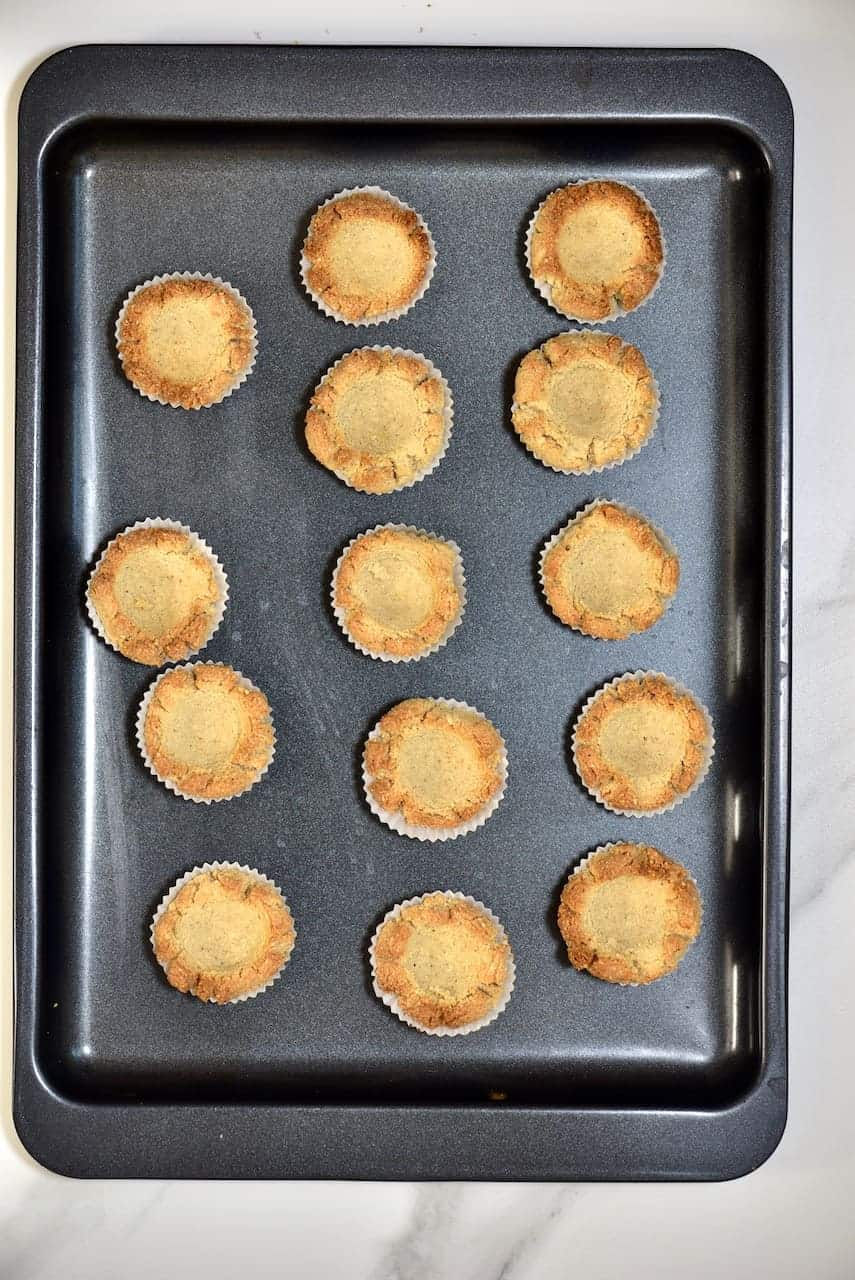
These only take ten minutes to bake in the oven and will turn a lovely golden colour around the edges.
If you want to use some chocolate chips as a filling, you’ll want to add these to the cookies while they’re still warm, so they melt into the thumbprint.
For the pistachio butter-filled cookies, allow the cookies to cool down a bit before filling them.
Again you can decorate the pistachio cookies with pomegranate seeds and ground pistachios or even a sprinkle of desiccated coconut. Also, feel free to experiment with other fillings and toppings of your choice.
For a sweeter, dessert-like version you can drizzle some white chocolate over the cookies at the end. Or, for a chocolate thumbprint cookie version, you can add some cocoa powder into the base almond cookie recipe.
Other great snack recipes you may like
For another delicious no-bake snack recipe, you may like these healthy cacao & almond protein balls or these coconut bliss balls . These 4-Ingredient Stuffed Dates: with home-made almond butter & Chocolate are always a winner too!
IngredientsUS CustomaryMetric1x2x3x
- ▢ 2 cups almond flour
- ▢ 3 tBsp coconut oil
- ▢ 1 tsp ground cardamom powder
- ▢ 2 tBsp maple syrup
- ▢ 2 tBsp coconut flour
- ▢ 1/4 cup pistachio butter
Toppings (optional)
- ▢ ground pistachios
- ▢ pomegranate seeds
Instructions
- To begin, mix the almond flour* with the other base ingredients and then form small, one bite-sized cookies. If you want you can measure these out and use around 1tbsp per cookie. However, I eyeballed it and made 14 of them.
- To make them into thumbprint cookies, the process is precisely what it says. Roll each piece of dough into a ball, and then you can use a finger/ thumb to make the indentations. You could also use the rounded back of a spoon. In fact, I used a small 1/2 tsp measuring spoon for an even indentation in each cookie.**
- If you’re in a hurry to enjoy these delicious cookies, then you can have these as a no-bake cookie recipe by simply adding some pistachio butter to them now and decorating with some pomegranate seeds and chopped pistachios.
- However, if you want to bake the cookies, then you can now bake them in the oven either in mini cupcake cups or on a baking tray lined with parchment paper.
- These only take ten minutes to bake in the oven at 160ºC (fan-assisted) and will turn a lovely golden colour around the edges.
- Once cooled down, add the pistachio butter and decorate.***
Video
Notes
Nutrition
Nutrition information is automatically calculated, so should only be used as an approximation.
Easy Homemade Strawberry Jam (No Pectin)
Equipment
- 7 Canning jars (8 oz) (250 ml)
- Heavy-based stainless steel saucepan
- Silicone spatula or wooden spoon
- Potato masher or another similar tool
- Canning funnel
- Jelly bag optional
- Food Thermometer
- Bubble remover optional
- Magnetic lid wand optional
- Water bath canner
- Canning tongs (Jar lifter)
- Jar wrench
Ingredients
- 3.5 lb strawberries slightly underripe work best; though you can use fresh or frozen
- 1.16 lb white sugar 2¾ cups; or experiment with brown sugar, coconut sugar, etc.
- 1/3 cup lemon juice
- 1 Tbsp lemon zest from 1 lemon
- 6-7 lemon seeds optional, they are high in pectin
Instructions
Prepare the tools
- Sterilize the jars/tools - i.e., non-reactive saucepan, spoon, etc.- in hot, soapy liquid. Or do so in the dishwasher, ensuring they’re still hot when you use them. Then leave them to drain and dry on a clean, sterilized surface.
- If you don’t have a thermometer, place 2-3 small plates in the freezer for the gel test.
- If you’re planning to water bath can the jam, prepare the canner by adding a trivet/rack and filling it with enough water to submerge the jars by an inch. If you didn’t use the dishwasher to keep the jars hot, place the lidded jars in the water and heat the water to an almost boil while preparing the jam.
Prepare the berries
- Wash the strawberries well, then use a small knife (or a straw pushed through the bottom) to remove the stems and leaves. Remove any berries that are blemished/spoiled.
- Zest and juice the lemon. Optionally keep a few of the lemon seeds, too, as they’re packed with pectin and can be fished out of the jam before storing/canning it.
Make the jam
- Transfer the strawberries and sugar to a large, deep, heavy-based stainless-steel saucepan and use a potato masher to mash them into a pulp (or your desired consistency).
- Add the lemon juice and zest (and seeds, if using), and stir. Bring the mixture to a boil over medium-low heat, stirring constantly to ensure the sugar dissolves, and the jam doesn’t scorch to the bottom of the pan.
- Skim any foam that appears (to avoid cloudy jam), simmering until it thickens enough to coat the back of a spoon. This usually takes about 15-20 minutes.
The gel test
- Remove the jam from the heat before testing its set. Then, if you have a thermometer, use it to test that the jam has reached 220ºF/104ºC. If not, add a spoonful of jam to one of the freezer plates and return it to the freezer for a minute before testing. It should be set and wrinkle when pressed on the edges. If it hasn’t set, continue to cook the jam for a few minutes and test it again.
Fill the jars
- Place the sterilized, hot jars on a clean kitchen towel/wooden board (to avoid them cracking) and carefully pour/spoon the jam (using a jarring funnel helps avoid mess) into the jars, leaving ¼-inch headspace (0.5 cm) at the top.
- Wipe the jar rims with a clean kitchen towel and place the lid on the jar, screwing the screw bands until resistance is met, then increase to fingertip-tight. If you aren’t canning, your homemade jam is now ready to cool, then refrigerate.
Water bath canning
- Place the filled jars in the prepared canner, ensuring they’re submerged under at least 1 inch of water. Bring the water to a boil over medium-high heat, add a lid, and allow them to process for 10 minutes (adjust the time based on your altitude).
- Remove the canner lid and allow them to sit for 5 minutes before using canning jar tongs to transfer the jars to a clean kitchen towel (to avoid cracking) an inch or two apart to cool undisturbed for 24 hours.
- Once cooled, check the jar seals (remove the screw band, and the lid should stay in place), then store them in a cool, dark location (like your pantry) for up to a year and a half. Re-process any unsealed jars with new lids/jars (after checking for chips) or transfer them to the fridge to use within a month.
Video
Notes
- Vanilla : Add pure vanilla extract (or paste) at the end (off heat).
- Almond extract : Stir it in off the heat at the end for a subtle nutty flavor.
- Orange : Use orange zest instead of lemon for a bright, citrusy flavor.
- Spices : You can experiment with cinnamon, nutmeg, pumpkin pie spice, etc. Add it to taste.
- Fresh herbs : I.e., a handful of finely chopped mint, thyme, rosemary, or basil.
- Ginger : Add finely grated ginger to taste, starting with about ½ teaspoon.
- Chili : i.e., strawberry jalapeño jam/strawberry habanero jam. Finely dice the chili and remove the seeds. Add as much as you’d like for a subtle or big kick.
- Maple syrup/ honey : Add just a small amount instead of regular sugar for subtle flavor depth without overwhelming the strawberry flavor.
- Balsamic vinegar : A splash adds a wonderful tangy depth.
- Alcohol : Add a splash of Amaretto, bourbon, or orange liqueur to create a more complex, full-bodied jam.
Nutrition
Recipe on Alphafoodie: https://www.alphafoodie.com/easy-homemade-strawberry-jam/
