Recipes › Desserts
How To Make Homemade Caramel Sauce
By Samira Kazan
updated July 29, 2024

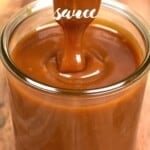
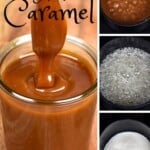


How to make caramel sauce with just 4 ingredients. This quick, easy, homemade caramel sauce requires no thermometer and is perfect for adding to breakfasts, desserts, and drinks!
With the holidays just around the corner, it’s just about time to start thinking about getting those ‘make-ahead’ recipes ready. I’ve already stocked my fridge/freezer with other spreads and sauces like this DIY Homemade Vegan Nutella , homemade jams (like easy blackberry jam recipe and homemade raspberry jam ), and my chocolate syrup ; now it’s the turn of this homemade caramel sauce!
If you’ve ever spent time watching any baking/cooking competition, you’ve probably seen people burning their caramelizing sugar more than once, which makes it seem like it is a long and complicated process. In reality, this homemade caramel sauce is fairly quick, simple, and versatile!
While it’s true that burning the caramel can happen (and I’ll admit, it’s happened to me too), it’s usually when you decide to take your eye off the pan during the pivotal moment (it takes seconds for it to turn from delicious golden amber to burned!). All you need is a little patience and to pay attention, and you should never have to deal with burnt caramel again.
In fact, with a bit of practice, you’ll come to recognize the exact shade of sugar that yields your favorite caramel flavor. Until then, feel free to experiment a bit; if it’s not browned enough, it simply won’t have the flavor you need, too much and it’ll burn and become bitter. But, there are lots of shades in-between; you need to catch them in time!

Not only is homemade caramel sauce more cost-effective than buying store-bought, but it also is super easy, and you can even make up a large batch, split it in two, and easily have yourself a homemade caramel sauce and salted caramel sauce with just one single additional ingredient. Even better, making caramel sauce as an even larger batch, you can split it into even more flavors: coffee, fruity, chocolate, boozy (read my recipe tips for suggestions and tips!).
Want to save this recipe?
- How to make caramel sauce
- How to store
- How to use
- Top tips for how to make caramel sauce
- More caramel recipes
- How To Make Creamy Homemade Caramel Sauce Recipe
How to make caramel sauce
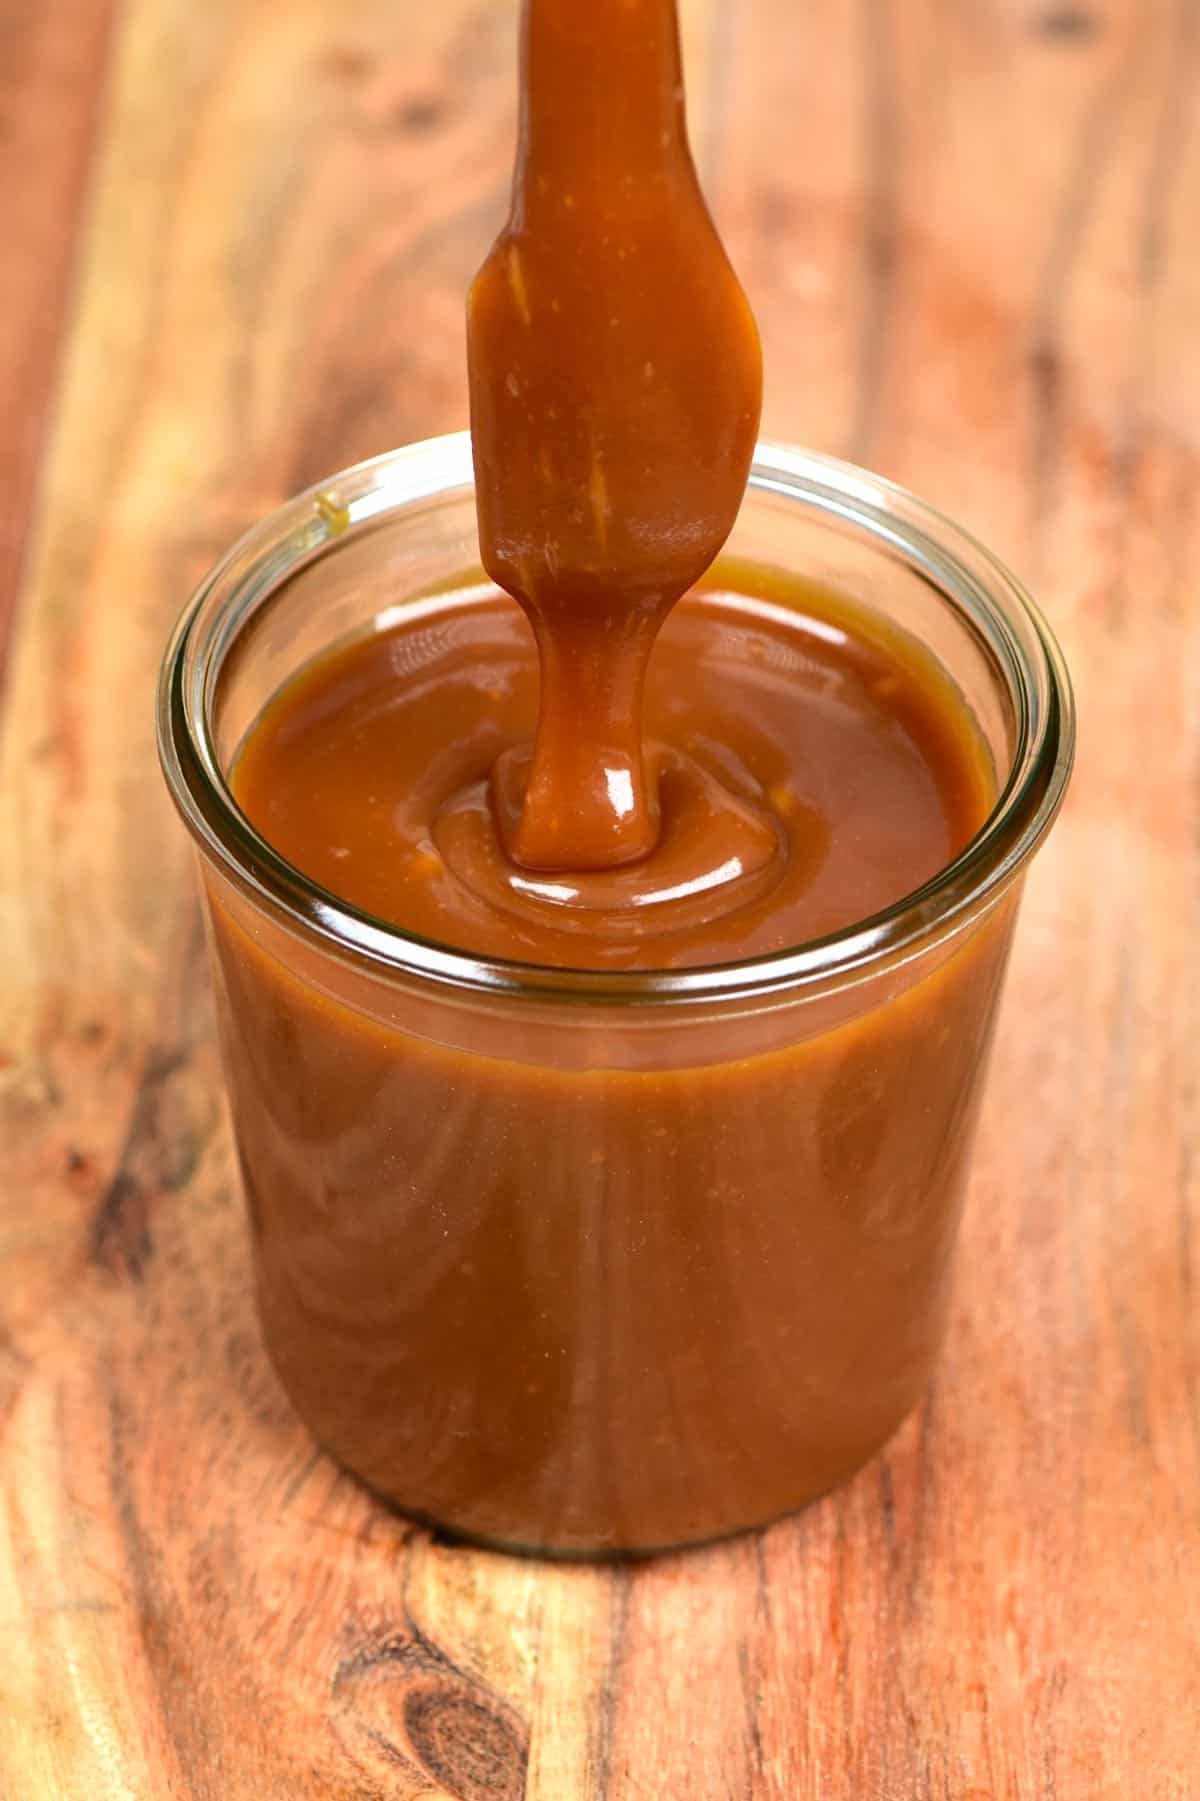
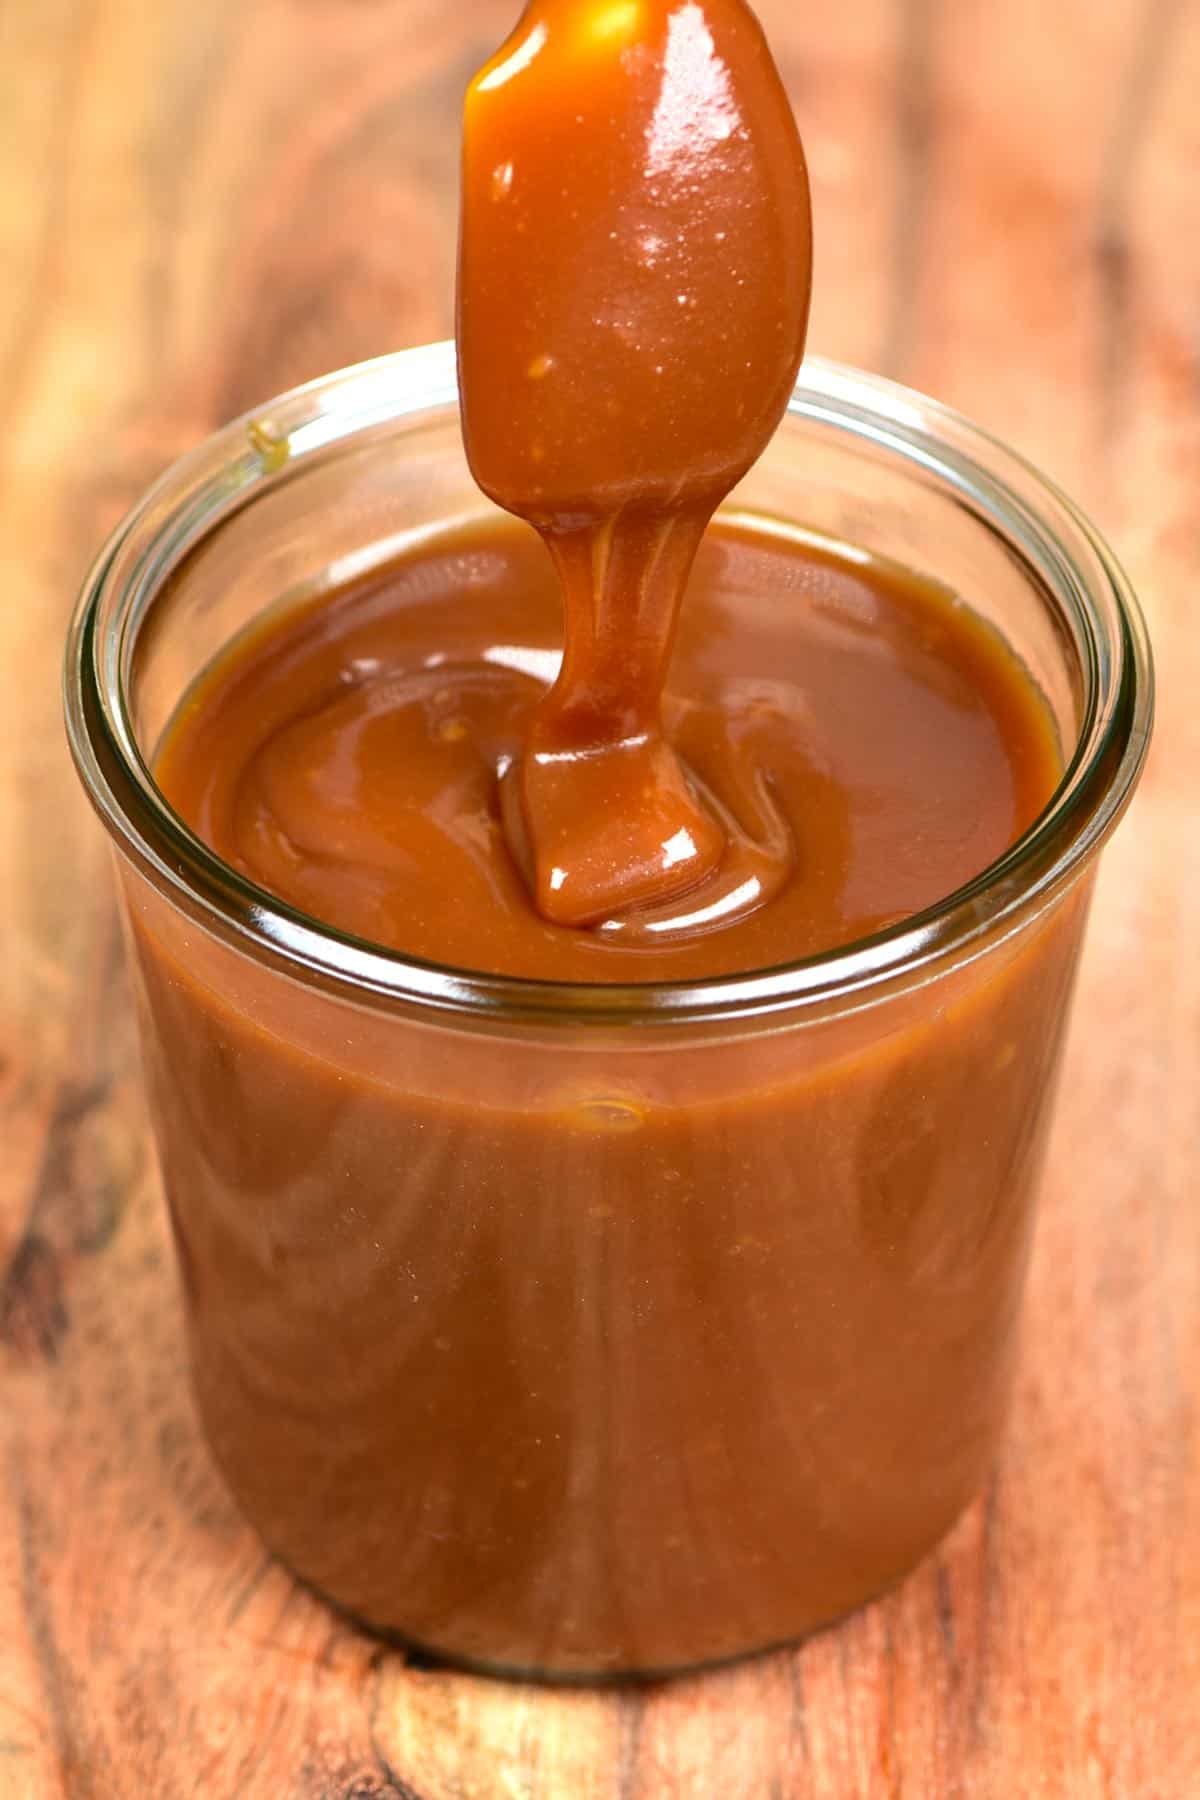
This easy caramel sauce recipe is simple and results in a smooth and rich caramel that you’ll be struggling not to eat straight from the jar with a spoon (I won’t judge you; I do it too!).
The Ingredients
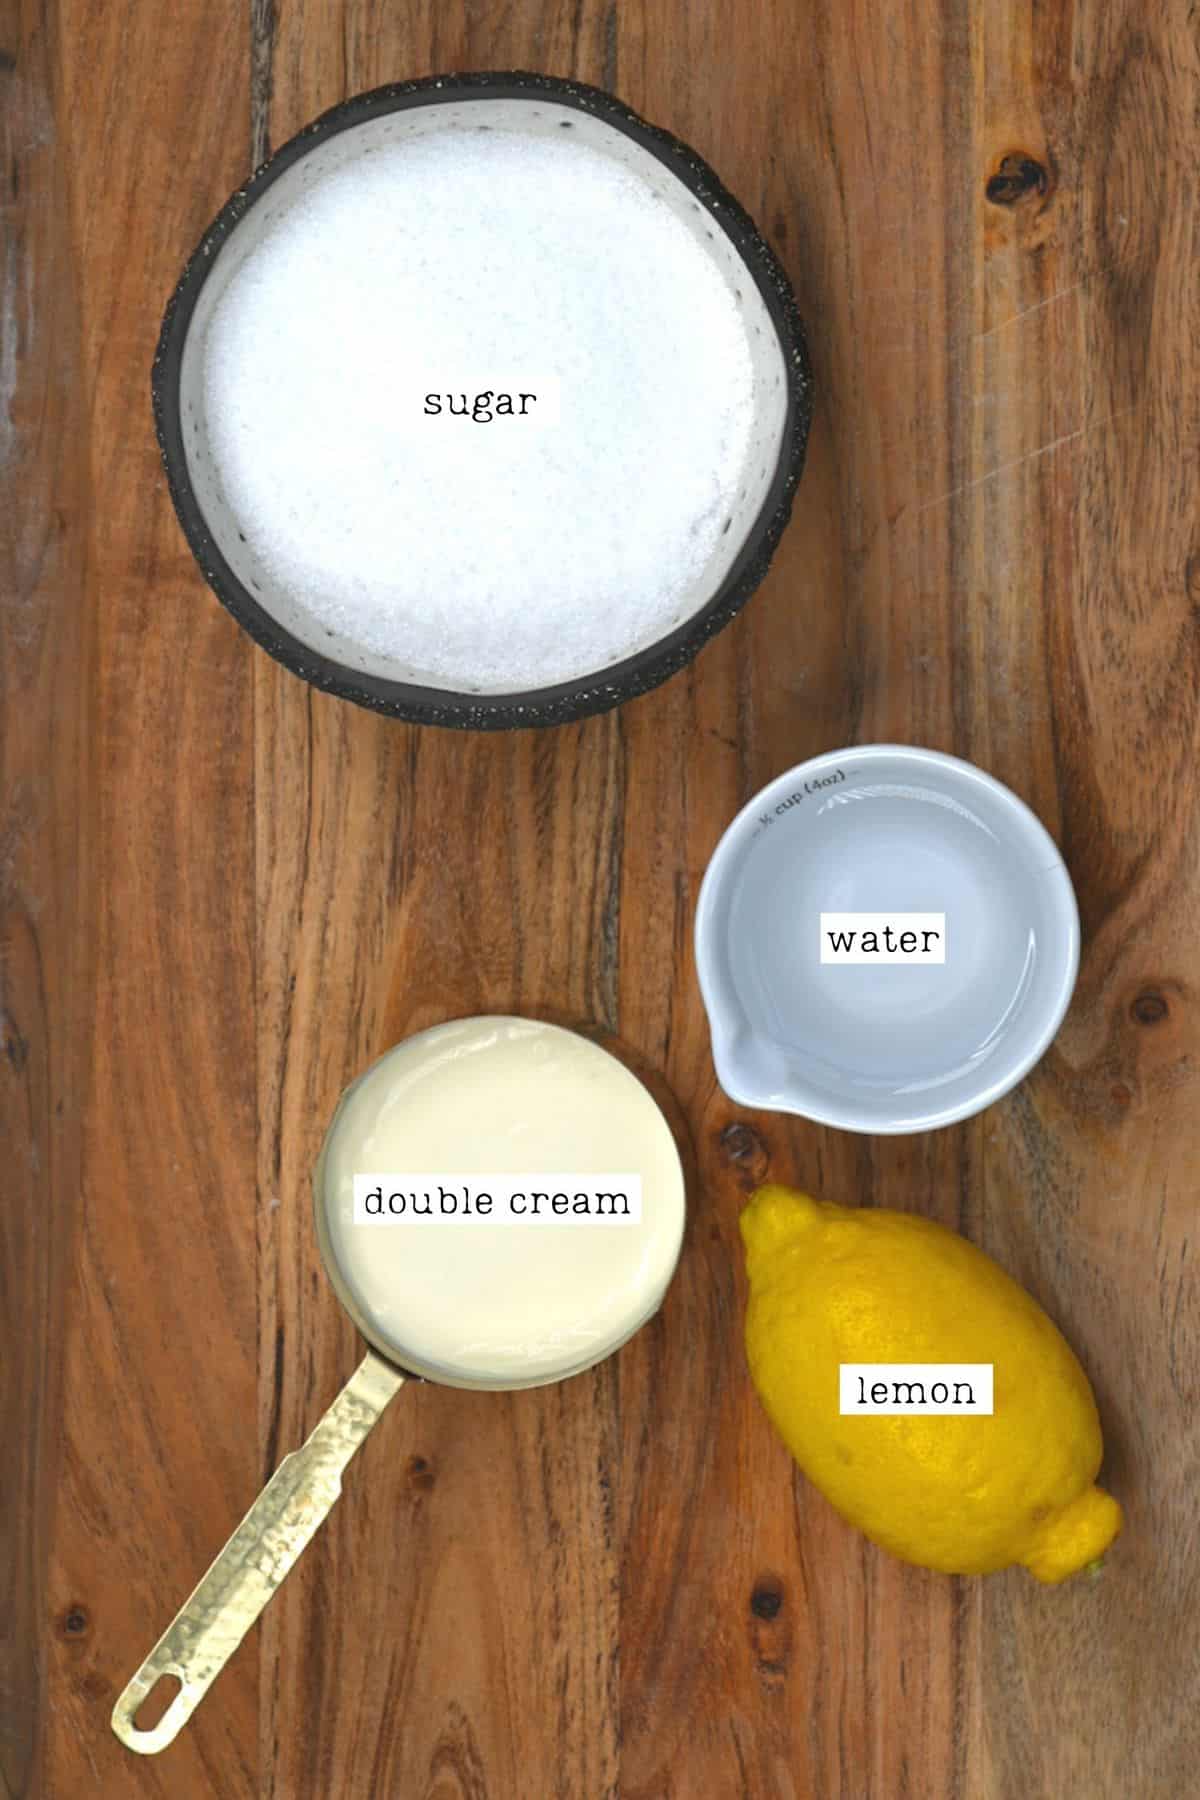
- Sugar – while it’s traditional for the caramel to have caramelized white sugar, you can swap this with your sugar of choice: coconut sugar, brown sugar (creates a butterscotch type sauce).
- Heavy cream (double cream) – this is the key to silky, rich, creamy caramel. Though you could technically try half and half, your caramel won’t be as thick or creamy.
- Lemon juice – this ingredient may not be included in your typical homemade caramel sauce recipe, but I never omit it. Lemon juice (or other acidic ingredients) helps stop the caramel from crystalizing by interfering with the crystallization process.
- Salt (not pictured above) – if you want plain caramel, you only need a pinch of salt to balance out the caramel’s super sweetness (add more for salted caramel sauce). Make sure to use a high-quality salt, though – my favorite options include coarse sea salt, Maldon salt flakes, or fleur de sel.
- Water
Optional: Add some vanilla extract for more flavor. You can also add some unsalted butter , for even richer results – add around 1/2 cup of butter (1 stick/ 113g)
For a vegan caramel sauce
You can use coconut cream or coconut condensed milk .
For Flavored Caramel sauce
Chocolate caramel sauce: For a chocolate version, you can add some high-quality finely chopped dark or milk chocolate (or melted choc) into the caramel sauce. Add it after you’ve added the cream, right at the end. Add 1-2 cups of chocolate, depending on how strong you want it to be.
Coffee Caramel Sauce: Add anywhere from 1/2-2tsp of instant coffee granules to the caramel sauce right at the end, as you take it off the heat. You could also add coffee to the chocolate version for a mocha caramel sauce.
Boozy caramel sauce: Add in a few tbsp (up to 1/4 cup) of your favorite alcohol for boozy caramel. Rum, bourbon, amaretto, Kahlua, etc. Add it towards the end of the cooking process, after the cream.
Spiced caramel sauce: There are several spices (or blends) that work well with caramel. Depending on how strong you like the flavor, add 1/2tsp-1 1/2tsp of cinnamon, gingerbread spice, pumpkin pie spice, etc. You can add a dash of cayenne pepper for a ‘spicy’ (hot) caramel sauce.
Fruity Caramel Sauce: Using either fruit puree or juice, you can make a whole range of fruity caramels – this isn’t something I’ve experimented with a lot (yet!), though. Think strawberry, mango, pineapple, etc.
The Step-By-Step Instructions
Before I dive into the recipe for caramel sauce, I thought I’d take a moment to talk about the method I’ve used for this homemade caramel sauce. When making caramel sauce, you can generally choose from a wet method or a dry method . The dry method uses only sugar over low heat to melt it. In contrast, the wet method combines sugar with water.
I’ve used the wet method for one simple reason – it’s easier! When using just sugar, it’s a lot easier to burn the sugar. While the wet method does take longer (as you have to wait for the water to evaporate before the sugar caramelizes), I find it easier to get all the sugar melted, heat it evenly, and avoid grainy sauce.
Step 1: Melt & Caramelize the sugar
Add the sugar, water, and lemon to your high-sided saucepan and heat over medium-high, bringing to a boil. Don’t stir the mixture at all – swirl the pan lightly rather than stirring.
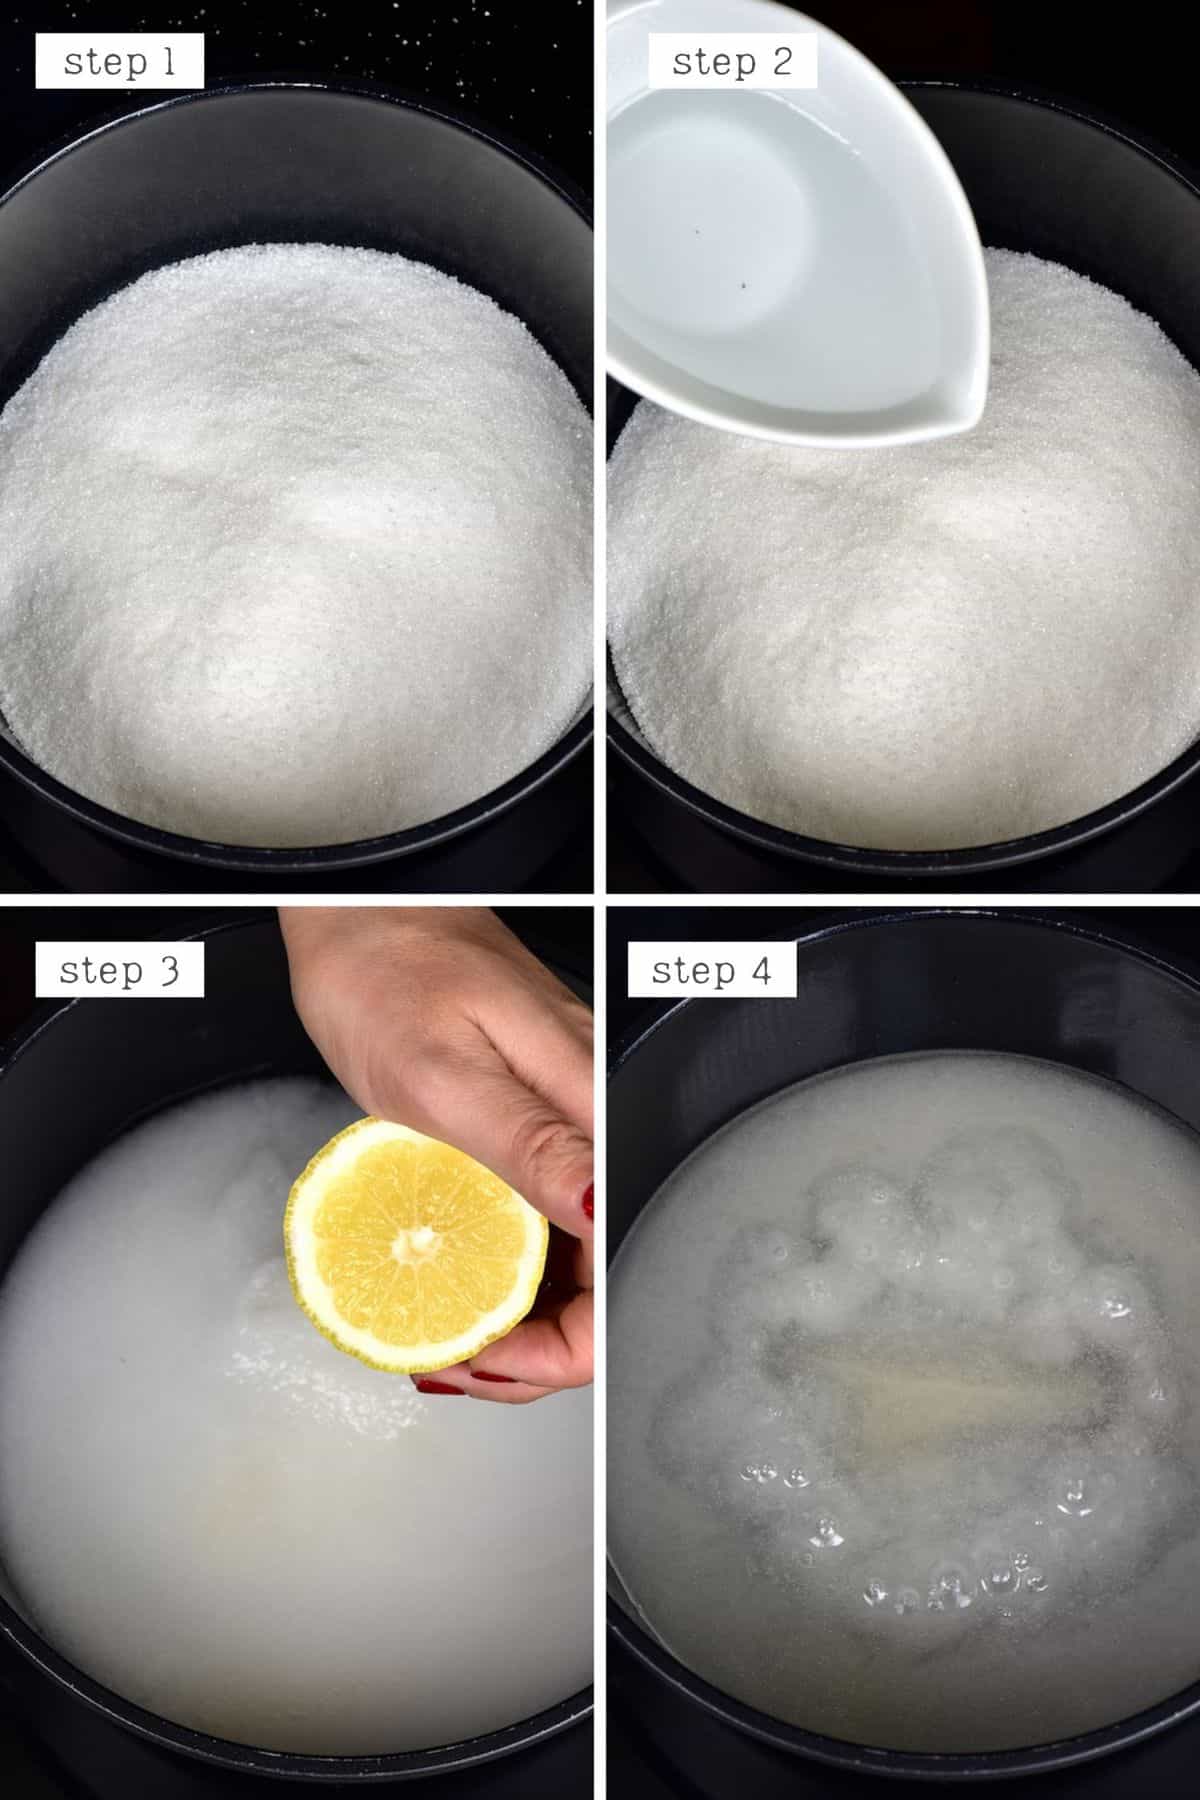
Once the mixture begins to boil, the sugar will eventually begin to caramelize and turn golden in color. The longer you heat it, the more the color will deepen from a honey yellow to an amber, then a deep amber.
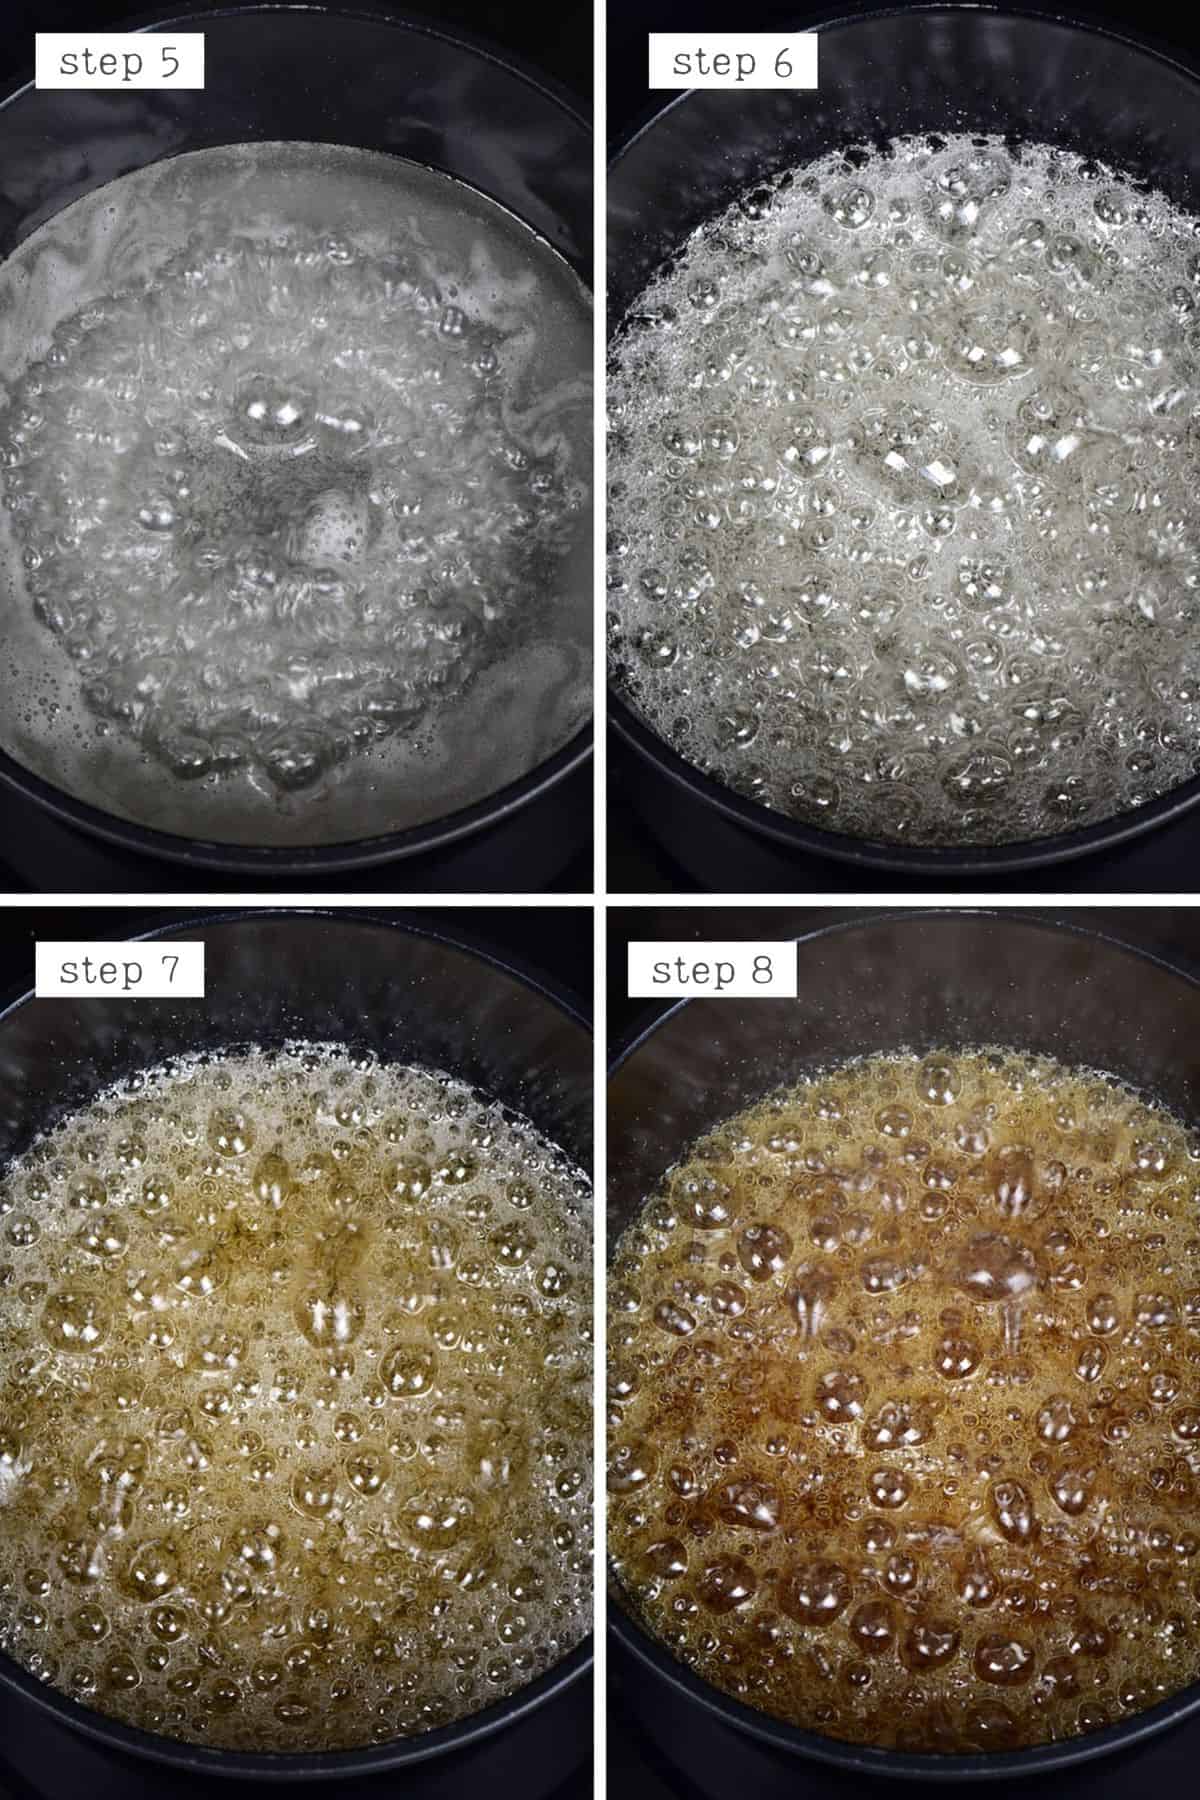
The caramel will turn from deep amber to burnt in seconds, so be careful not to leave it for too long. I like to move to the next step when my mixture is a medium amber color.
Step 2: Add the cream
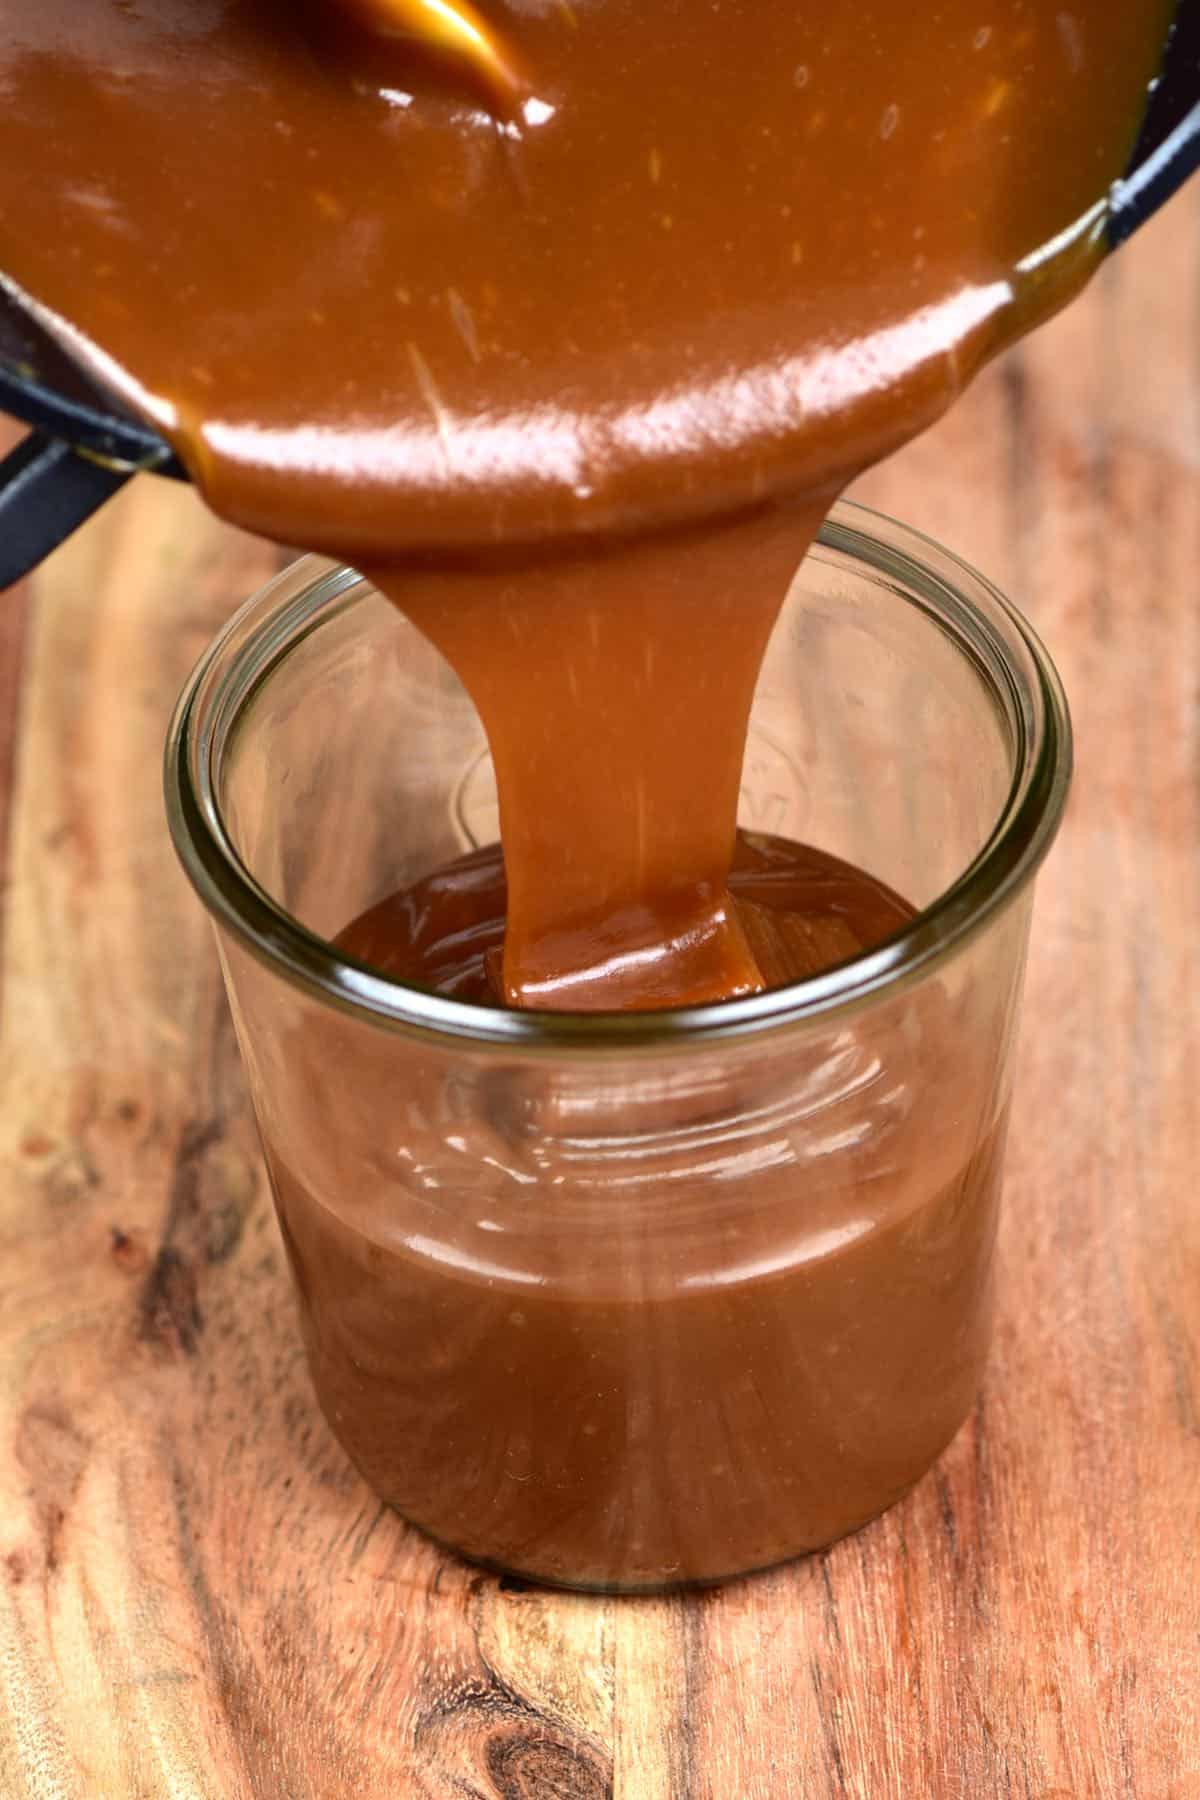
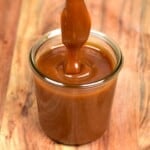
As soon as the mixture becomes a medium amber color (look at my photo for reference), carefully pour in the cream and add the salt. At this point, you can stir the mixture with a heat-proof silicone spatula or wooden spoon. Mix until it is thoroughly combined and into a smooth caramel sauce.
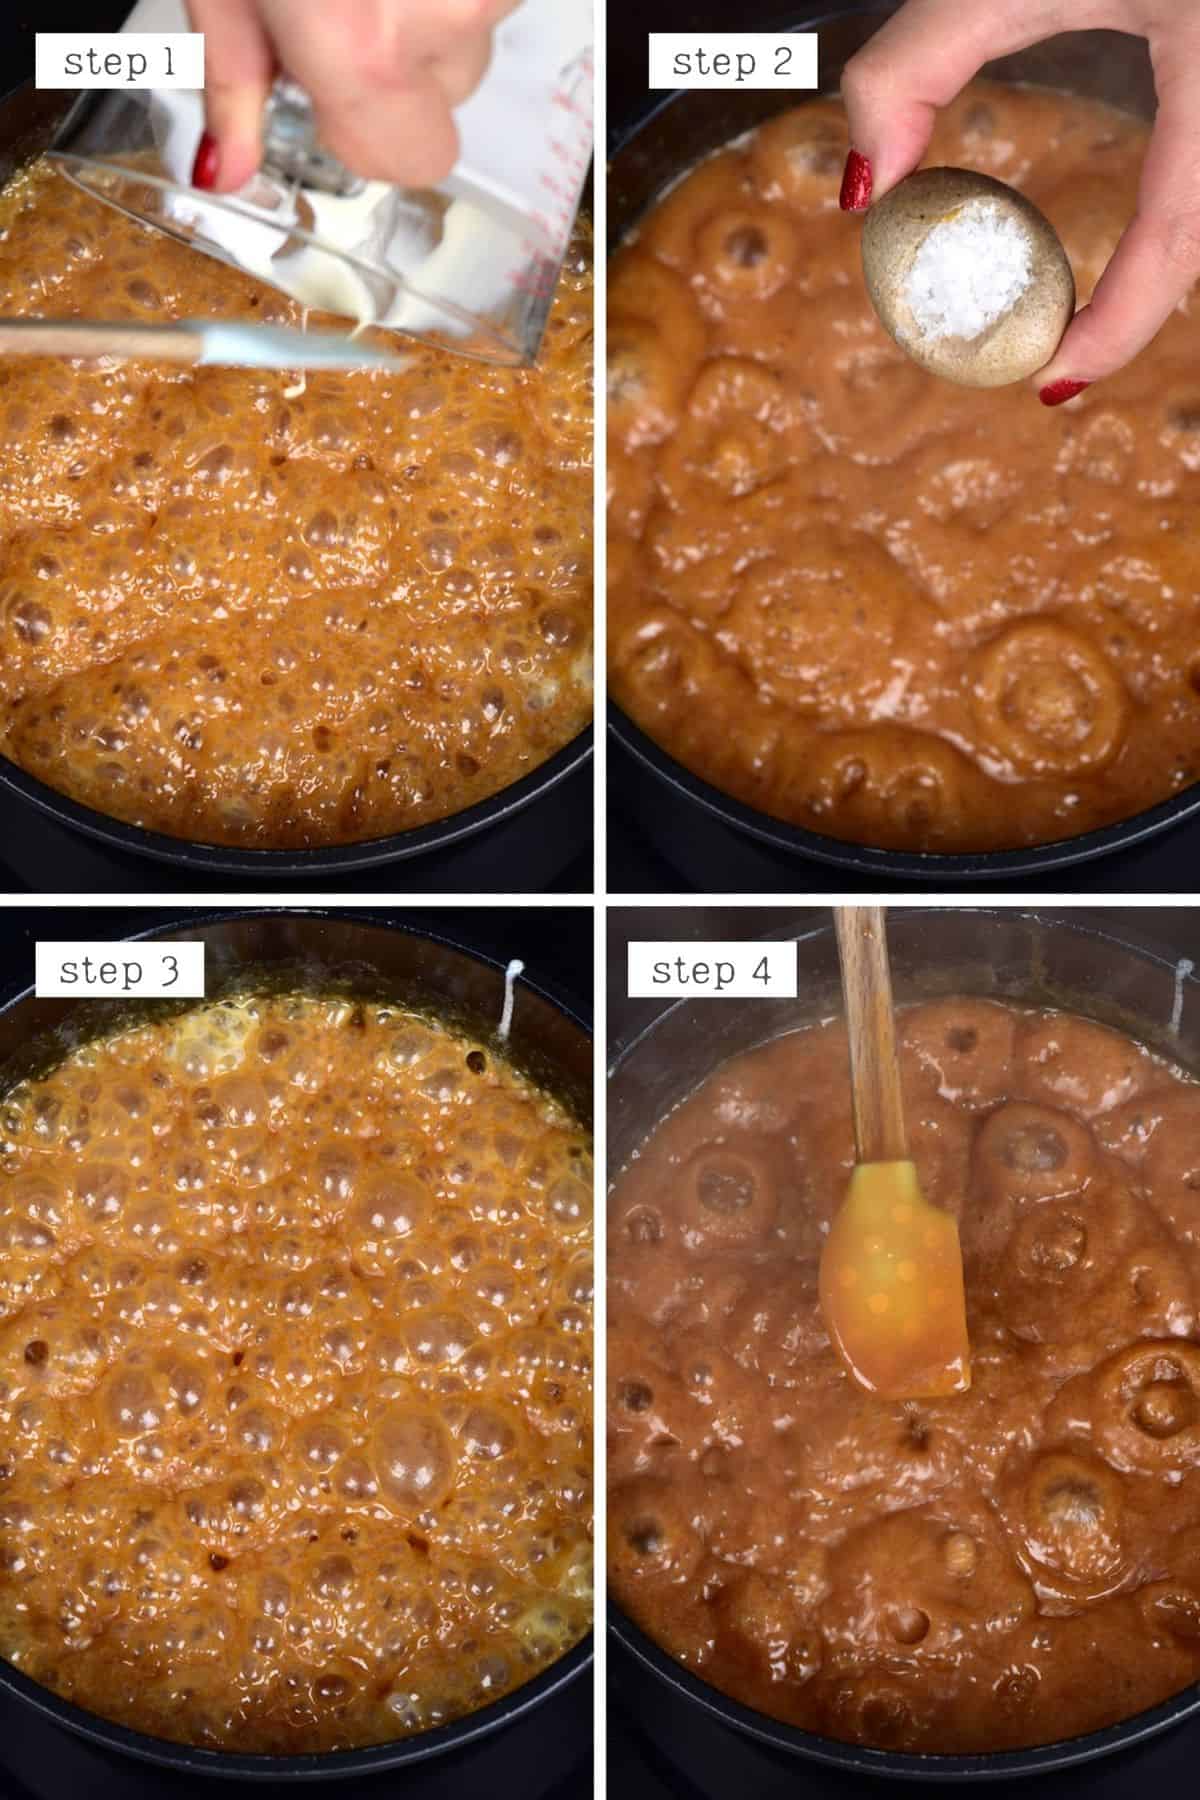
Step 3: Reduce further & add any flavoring
If it’s too thick, you can add a little extra cream. If it’s too thin, then you can continue to reduce the caramel.
Note that the caramel will be more liquidy while it’s still hot and will thicken up as it cools, and thicken even more when refrigerated.

At this point, switch off the heat and add any extra flavorings, stirring them in well to combine fully.
To taste the caramel and adjust any flavorings, add a little of the caramel to a cold saucer/plate and cool for 30-60 seconds, then taste.
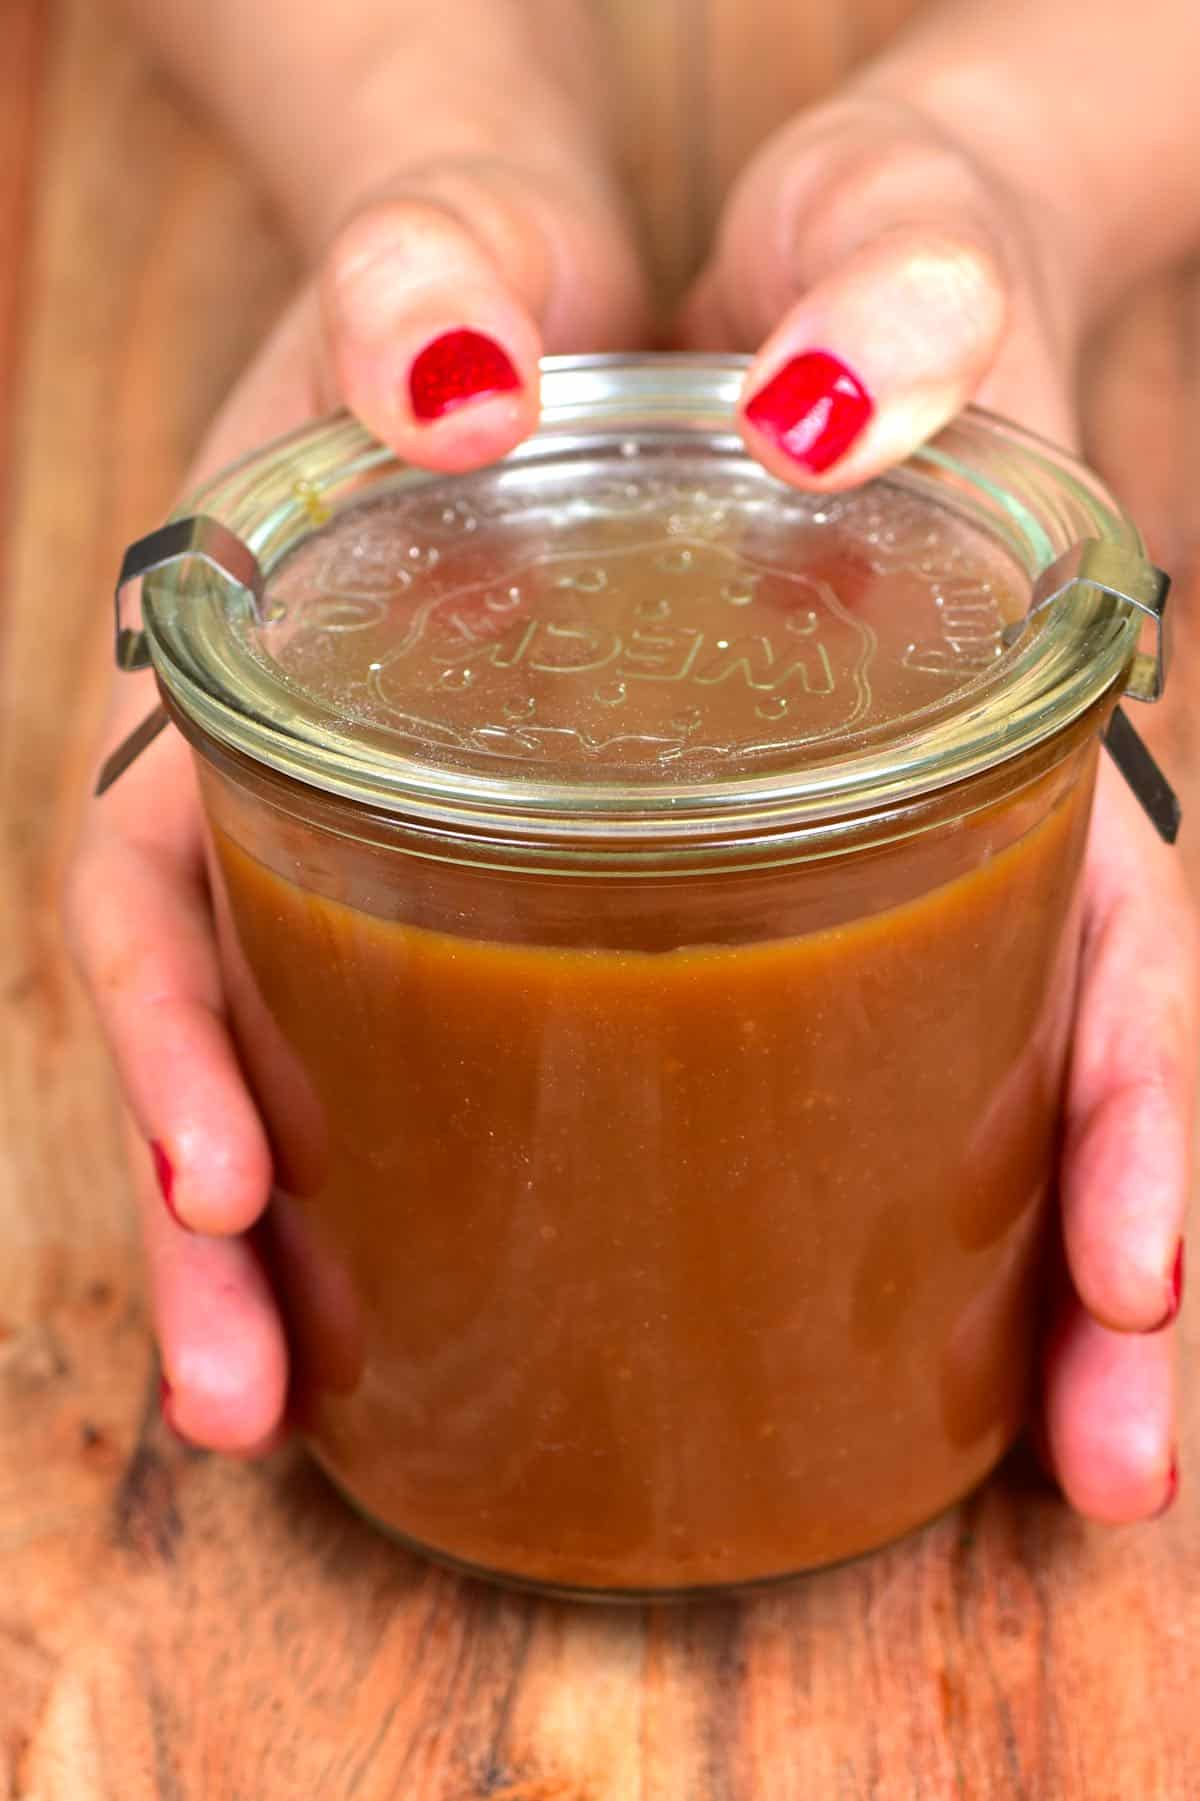
If you want to use the sauce immediately while warm, allow it to cool slightly, then serve. To save for later, allow the homemade caramel sauce to cool completely before transferring to a glass jar.
How to store
Store your homemade caramel sauce in a covered jar in the refrigerator for between 2-3 weeks .
You can also freeze the caramel sauce in a freezer-safe container for up to three months .
It will thicken up as it chills. If you want it thinner, then reheat it lightly in the microwave (15-20 seconds to thin, 40-45 for a heated sauce) or over the stove, stirring frequently. If it’s still too thick, then add in an extra splash of cream and stir well.
How to use
There are tons of ways to use this creamy caramel, whether as a dip, sauce, drizzle, or syrup. Here are just a few of my favorite options.
- Drizzle over pancakes , like protein pancakes or Fluffy Japanese Style Pancakes .
- Over French toast – with berries or other fruit.
- Use with oat dishes – like berry oatmeal and overnight oats .
- Over cupcakes, cakes, and brownies
- Drizzled over mug cakes – like this One-Minute Vegan Chocolate Mug Cake
- Over cheesecake and Gluten-Free Vegan Pumpkin Pie (Keto, Paleo, No-bake!)
- With ice-cream – like this Caramel Ice Cream
- As a syrup over hot chocolate and within coffee drinks – like this Healthier Homemade Mocha Frappuccino
- Stir into icing for a caramel icing.
- For cookies, you could use it to create caramel sandwich cookies or fill these almond thumbprint cookies .
Top tips for how to make caramel sauce
- Make sure you measure out all of your ingredients in advance, so they’re ready to add to the caramel when needed. If you don’t, you’re almost guaranteed to burn the sugar while measuring out the cream!
- Use room temperature or warm double cream . If you add cold cream to the boiling sugar mixture, it will cause it to seize. While you can fix it with continued heating, it adds time and is a bit of a mess. I like to use room temp cream and add it in a slow, steady stream.
- Use the right pan. It’s best to use a heavy-bottomed, light-colored (silver or white) saucepan, so you can see the shade of caramel changing as you cook it. But, most important, use a big enough pan, with high sides. The caramel will bubble up A LOT when you first add in the cream, so you need the space to allow it to do so.
- Don’t stir the caramelizing sugar! It may be tempting, but stirring the sugar water mixture will actually encourage grains to form, and the caramel may end up grainy and crystallized. Instead, gently swirl the pan, being careful not to make it go too high up the sides of the pan (as that can cause crystallization too).
Read the recipe card notes for other tips for making homemade caramel!
More caramel recipes
- Caramel Ice Cream
- Healthy Salted Caramel Overnight Oats
- Vegan caramel sauce (with sugar-free date caramel sauce option)
IngredientsUS CustomaryMetric1x2x3x
- ▢ 2 cups sugar white granulated
- ▢ 2/3 cup water
- ▢ 1.5 cups heavy cream (double cream)
- ▢ Lemon generous squeeze
- ▢ pinch sea salt more for salted caramel (around 1/2-1tsp or large flaked salt- but far less for small granules salt)
Instructions
Step 1: Melt & Caramelize the sugar
- Add the sugar, water, and lemon to your high-sided saucepan and heat over medium-high, bringing to a boil. Don’t stir the mixture at all – swirl the pan lightly rather than stirring.
- Once the mixture begins to boil, the sugar will eventually begin to caramelize and turn golden in color. The longer you heat it, the more the color will deepen from a honey yellow to an amber, then a deep amber. The caramel will turn from deep amber to burnt in seconds, so be careful not to leave it for too long. I like to move to the next step when my mixture is a medium amber color.
Step 2: Add the cream
- As soon as the mixture becomes a medium amber color (look at my photo for reference), carefully pour in the cream and add the salt. At this point, you can stir the mixture with a heat-proof silicone spatula or wooden spoon. Mix until it is thoroughly combined and into a smooth caramel sauce.
Step 3: Reduce further & add any flavoring
- If it’s too thick, you can add a little extra cream. If it’s too thin, then you can continue to reduce the caramel. Note that the caramel will be more liquidy while it’s still hot and will thicken up as it cools, and thicken even more when refrigerated.
- At this point, switch off the heat and add any extra flavorings, stirring them in well to combine fully. To taste the caramel and adjust any flavorings, add a little of the caramel to a cold saucer/plate and cool for 30-60 seconds, then taste.
- If you want to use the sauce immediately while warm, allow it to cool slightly, then serve. To save for later, allow the homemade caramel sauce to cool completely before transferring to a glass jar.
How To Store
- Store your homemade caramel sauce in a covered jar in the refrigerator for between 2-3 weeks. You can also freeze the caramel sauce in a freezer-safe container for up to three months. It will thicken up as it chills. If you want it thinner, then reheat it lightly in the microwave (15-20 seconds to thin, 40-45 for a heated sauce) or over the stove , stirring frequently. If it’s still too thick, then add in an extra splash of cream and stir well. once reheated, use the caramel immediately. Don’t return any of it back to the glass jar!
Video
Notes
- The type of cooker you use can affect the way the caramel is made . On an induction/electric hob, I find that you can wait for it to become a deep reddish amber color. However, on a gas hob, it’s usually best to move on to the next step when it’s a slightly lighter amber.
- If your caramel sauce is a little thin once it’s cooled, you can actually return it to the pan and boil for slightly longer to reduce it.
- If you still have issues with the sugar crystallizing on the side of the pot , there are two steps you can do. First, you could use a pastry brush dipped in water to brush the sugar down from the sides of the pan. Alternatively, when the sugar syrup begins to boil, cover it with a lid and keep it closed for a couple of minutes. During this time, the condensation will build up in the pan and wash down the sugar crystals.Â
- To fix crystallized caramel – add an extra 1/4 cup of water to the sugar mixture and bring it back to a boil (optionally, with a lid on to take advantage of the condensation). This will allow the sugar crystals to re-dissolve. Then, continue with the recipe.Â
Nutrition
Nutrition information is automatically calculated, so should only be used as an approximation.
Recipes › Desserts
Almond Pistachio Thumbprint Cookies Recipe
By Samira Kazan
updated September 21, 2020

Delicious gluten-free, vegan bite-size almond & pistachio thumbprint cookies. Not only are they easy to make- they can either be baked or kept as a no-bake cookie recipe!
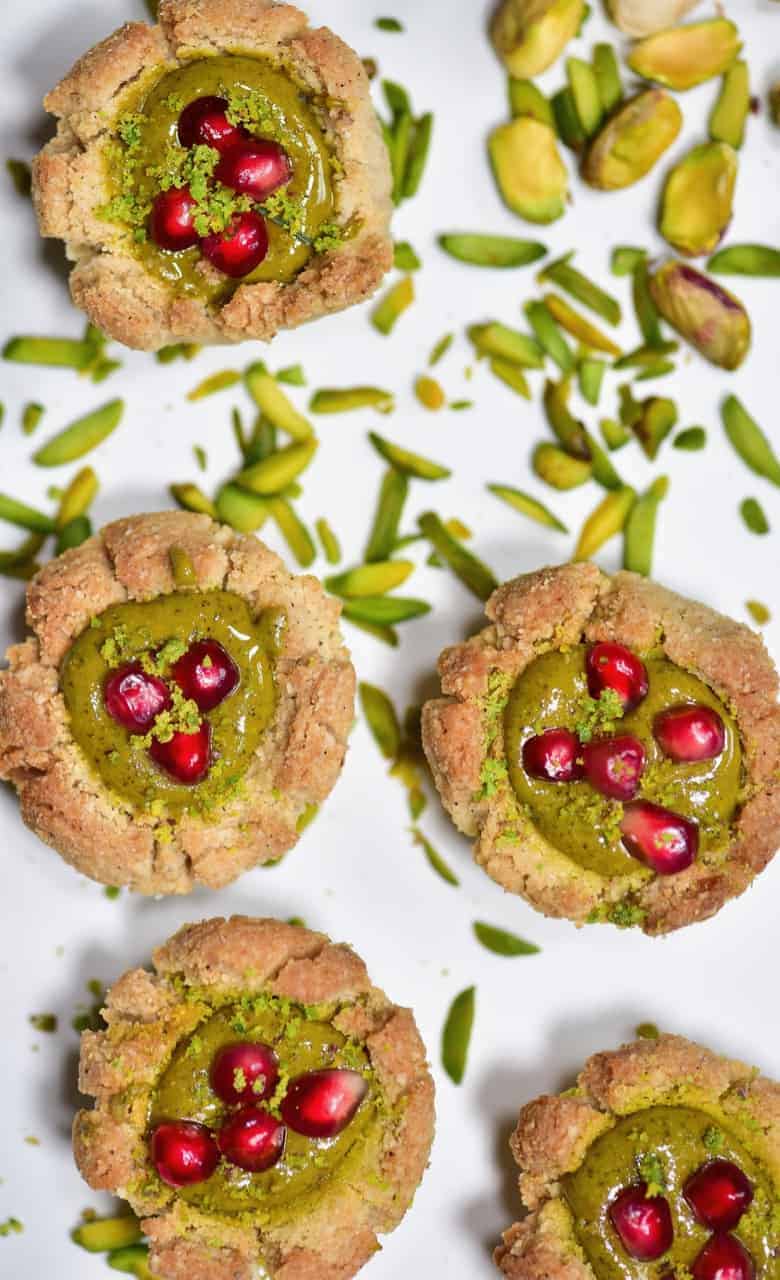
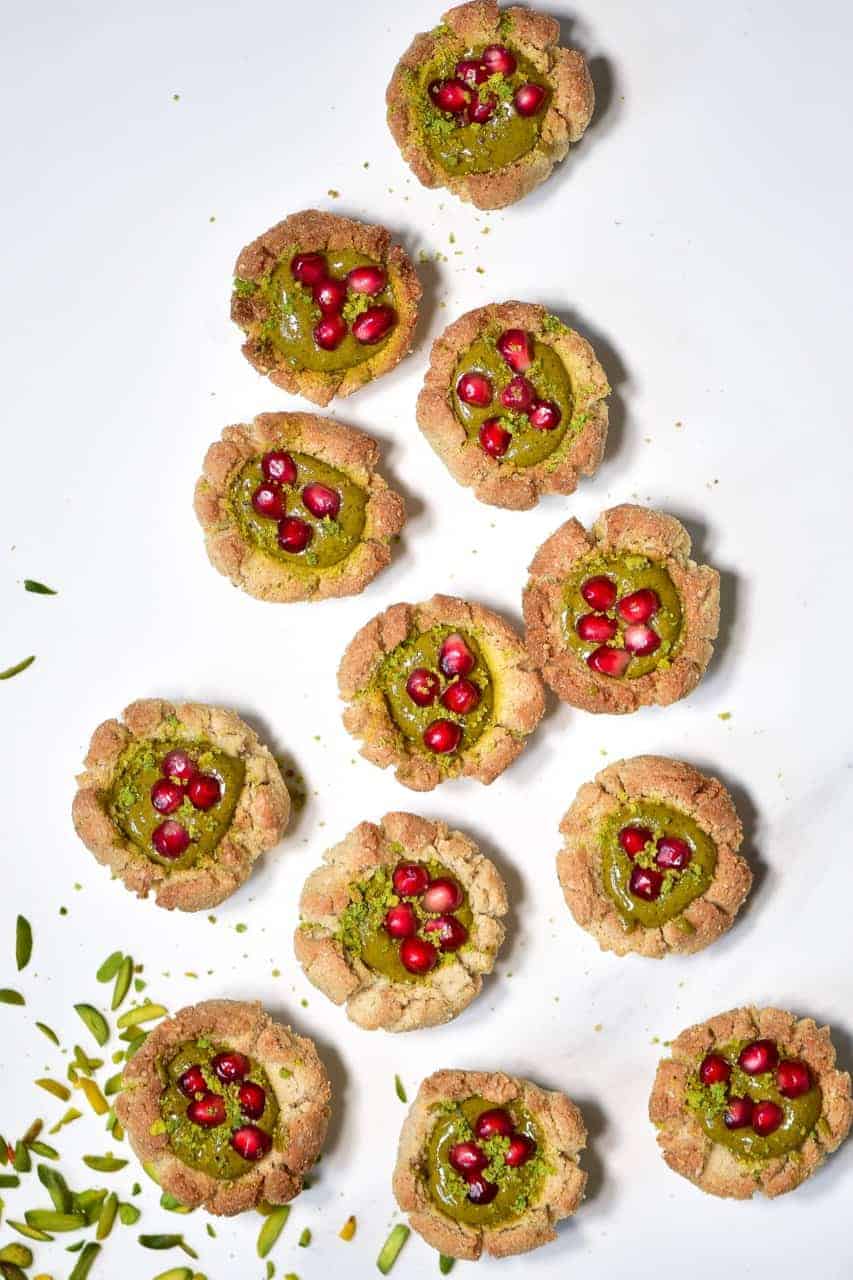
These almond pistachio thumbprint cookies are a delicious vegan and gluten-free cookies recipe using almond flour and pistachio butter. Unlike your generic shortbread thumbprint cookies, these vegan bite-size snacks have a delightful crumbly almond base and can be cooked or kept as a no-bake cookie recipe.
Depending on whether you want these as raw snacks or baked cookies, they are delicious. However, it’s worth noting that there will be some textural difference.
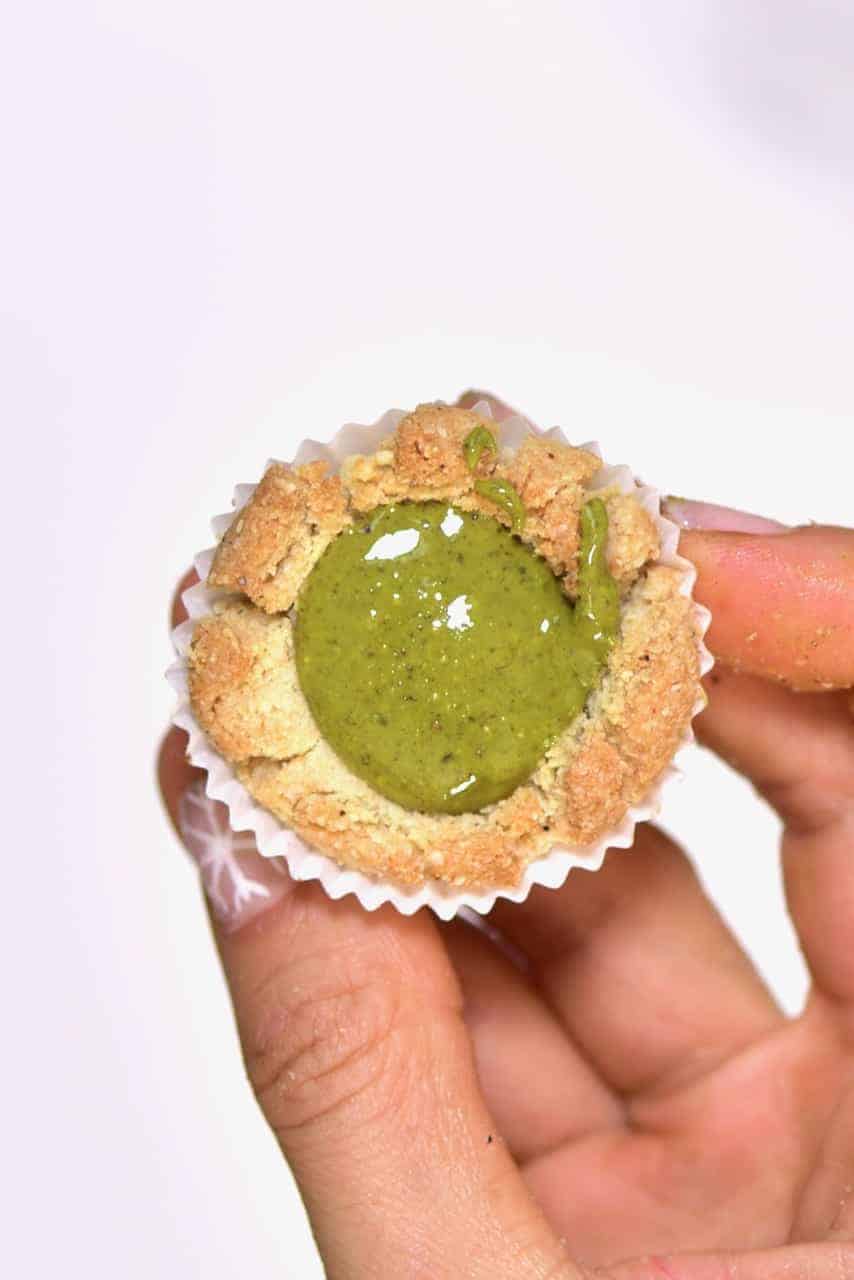
For the raw version, these pistachio thumbprint cookies are a little more gooey and moist. In comparison, when baked, these cookies are more crumbly.
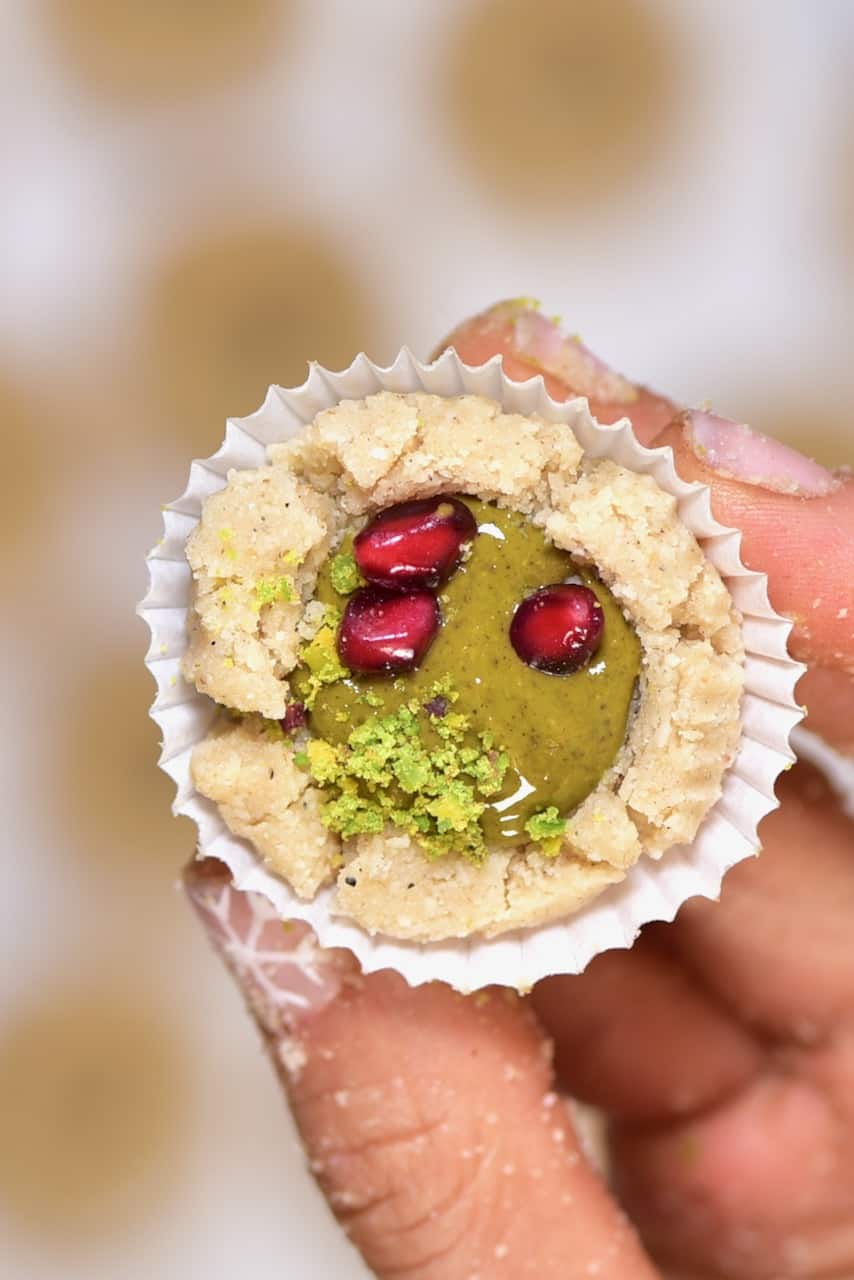
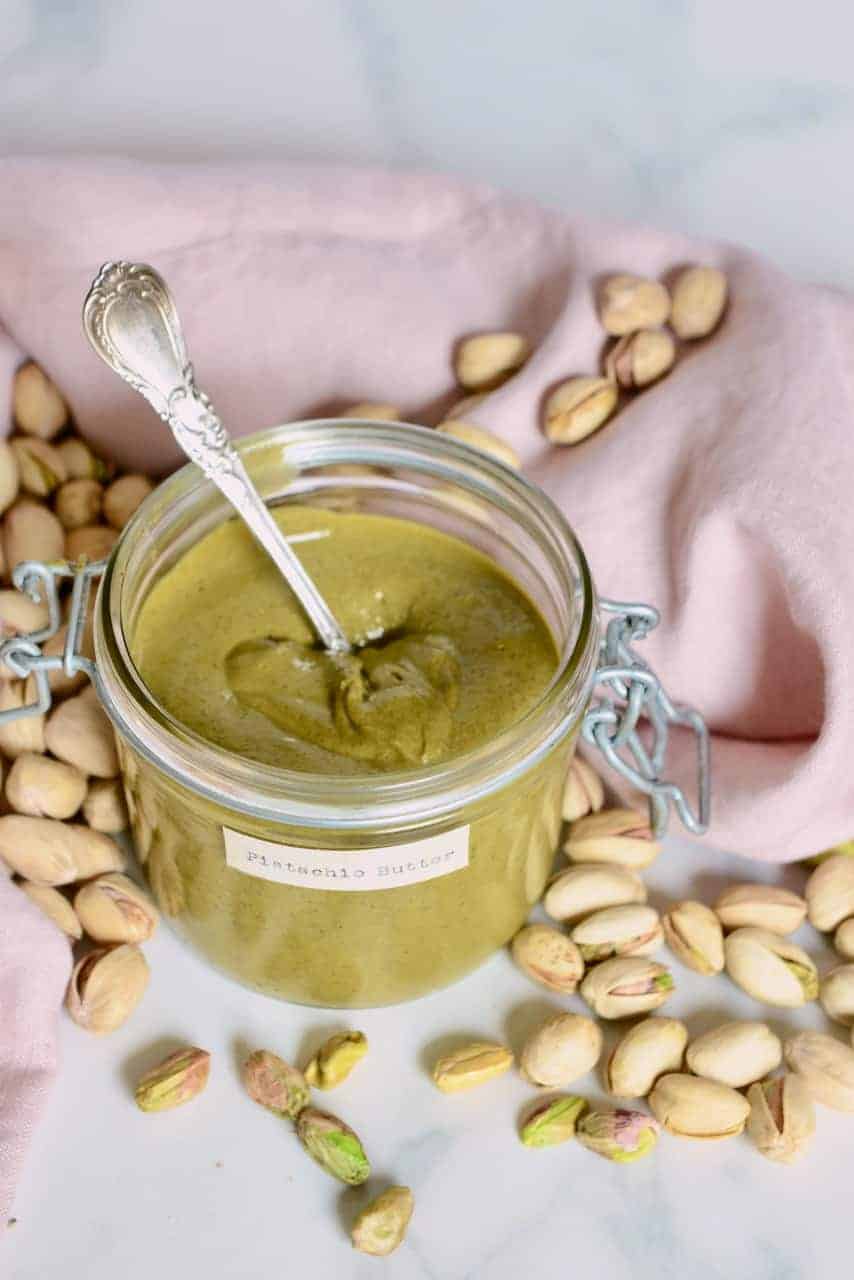
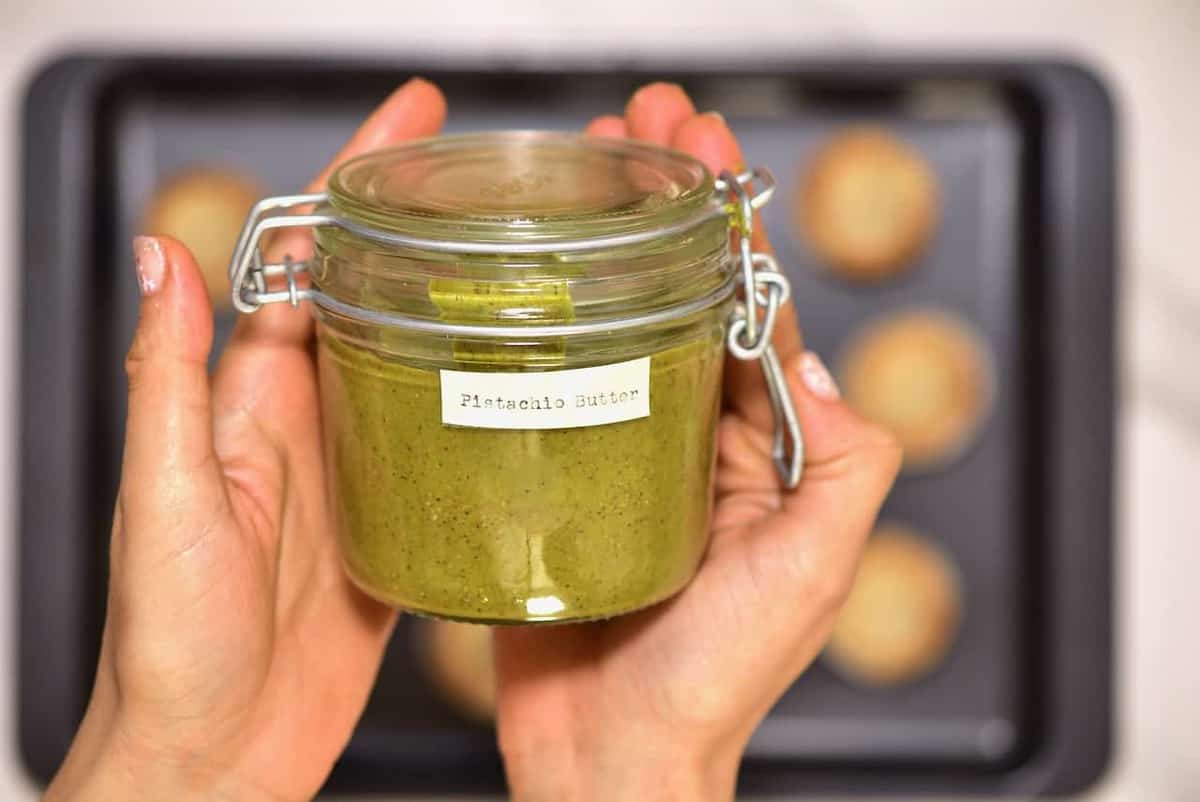
I always love to switch up classic recipes and decided that rather than using the usual choice of jam filling for this thumbprint cookie recipe, I used some homemade pistachio butter .
Pistachio butter is one of the most delicious, decadent version of all nut butters and yet can be made at home with just pistachios, salt and a blender or food processor. Plus the pistachio flavour compliments the flavour of the gluten-free almond cookies.
These cookies are then an excellent healthier cookie snack option. They can also be displayed in mini cupcake cakes, in a gift box, for a delicious homemade edible gift at Christmas (or any time of the year!).
If you’ve been following me on Instagram, you’ll know that I’ve been cooking up a storm this festive period, with a new recipe posted every day. Honestly, I couldn’t wait for the day to share these pistachio thumbprint cookies though because they are one of my favourite treats so far.
I’ve very recently compiled a post for the ultimate guide to homemade nut & seed butters, so I have spent a LOT of time this year in the kitchen blending up delicious nut butters and nut butter recipes. As much as I have a soft spot for good old almond butter, pistachio butter has taken my heart.
While it’s not a nut butter you’d want to eat by the spoonful every day (or rather you would – but your hips wouldn’t like it!), pistachio butter has an incredible luxury element that works well in so many different recipes. Check out my pistachio butter post for some inspiration.
Want to save this recipe?
- Variations on these thumbprint cookies
- How To Make The Thumbprint Cookies
- Other great snack recipes you may like
- Pistachio Almond Cookies Recipe
Variations on these thumbprint cookies
Obviously, my filling of choice is my homemade pistachio butter. However, you can experiment with various fillings including a delicious vegan homemade Nutella , the classic choice of jam, or even some vegan chocolate chips (that will melt from the heat and be heavenly!).
For a sweeter pistachio creme style filling, melt some white chocolate in a heatproof bowl then mix in some pistachio butter with a dash of homemade vanilla powder .
You can also make a delicious chocolate version of these pistachio thumbprint cookies by adding some cocoa powder into the base almond cookies recipe. If the biscuit mix feels too crumbly after adding the powder, add another tsp of coconut oil to offset the powder.
Plus, you can experiment with additional toppings for the pistachio thumbprint cookies. For example, a drizzle of melted white chocolate is a lovely dessert-like touch.
Note* For vegan cookies use dairy-free white chocolate and chocolate chips.
How To Make The Thumbprint Cookies
This pistachio thumbprint cookies recipe is super simple and can be made in just five minutes if you’re keeping them raw. Or around 20 minutes, if baking- which means they’re an excellent option for a last-minute edible gift idea or to whip up on busy days when you don’t have much time to spare.
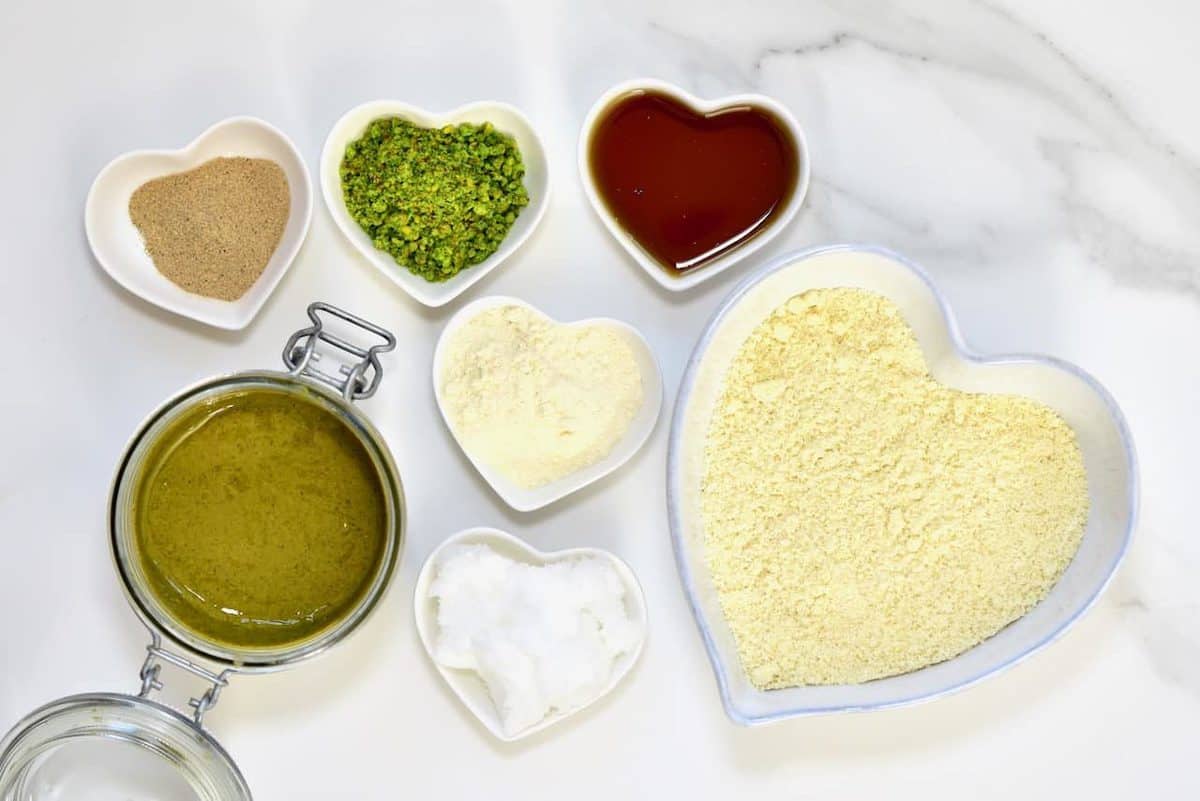
The almond cookies base is made up of almond flour, coconut oil, maple syrup, coconut flour and cardamon.
Don’t fret if you don’t have almond flour to hand though as this can be whizzed up in a couple of minutes. Blitz some raw almonds in a high-speed food processor for a couple of minutes and you’ll get homemade almond flour, which is a great gluten-free flour to have to hand at all times.
This recipe is also a great way to use leftover almond pulp after making homemade almond milk . Simply allow the pulp to dry out, and it’s ready to use as almond flour.
Note* For this particular recipe the ground almonds don’t have to be too fine, which is why any of the above options will work fine for the almond cookies recipe.
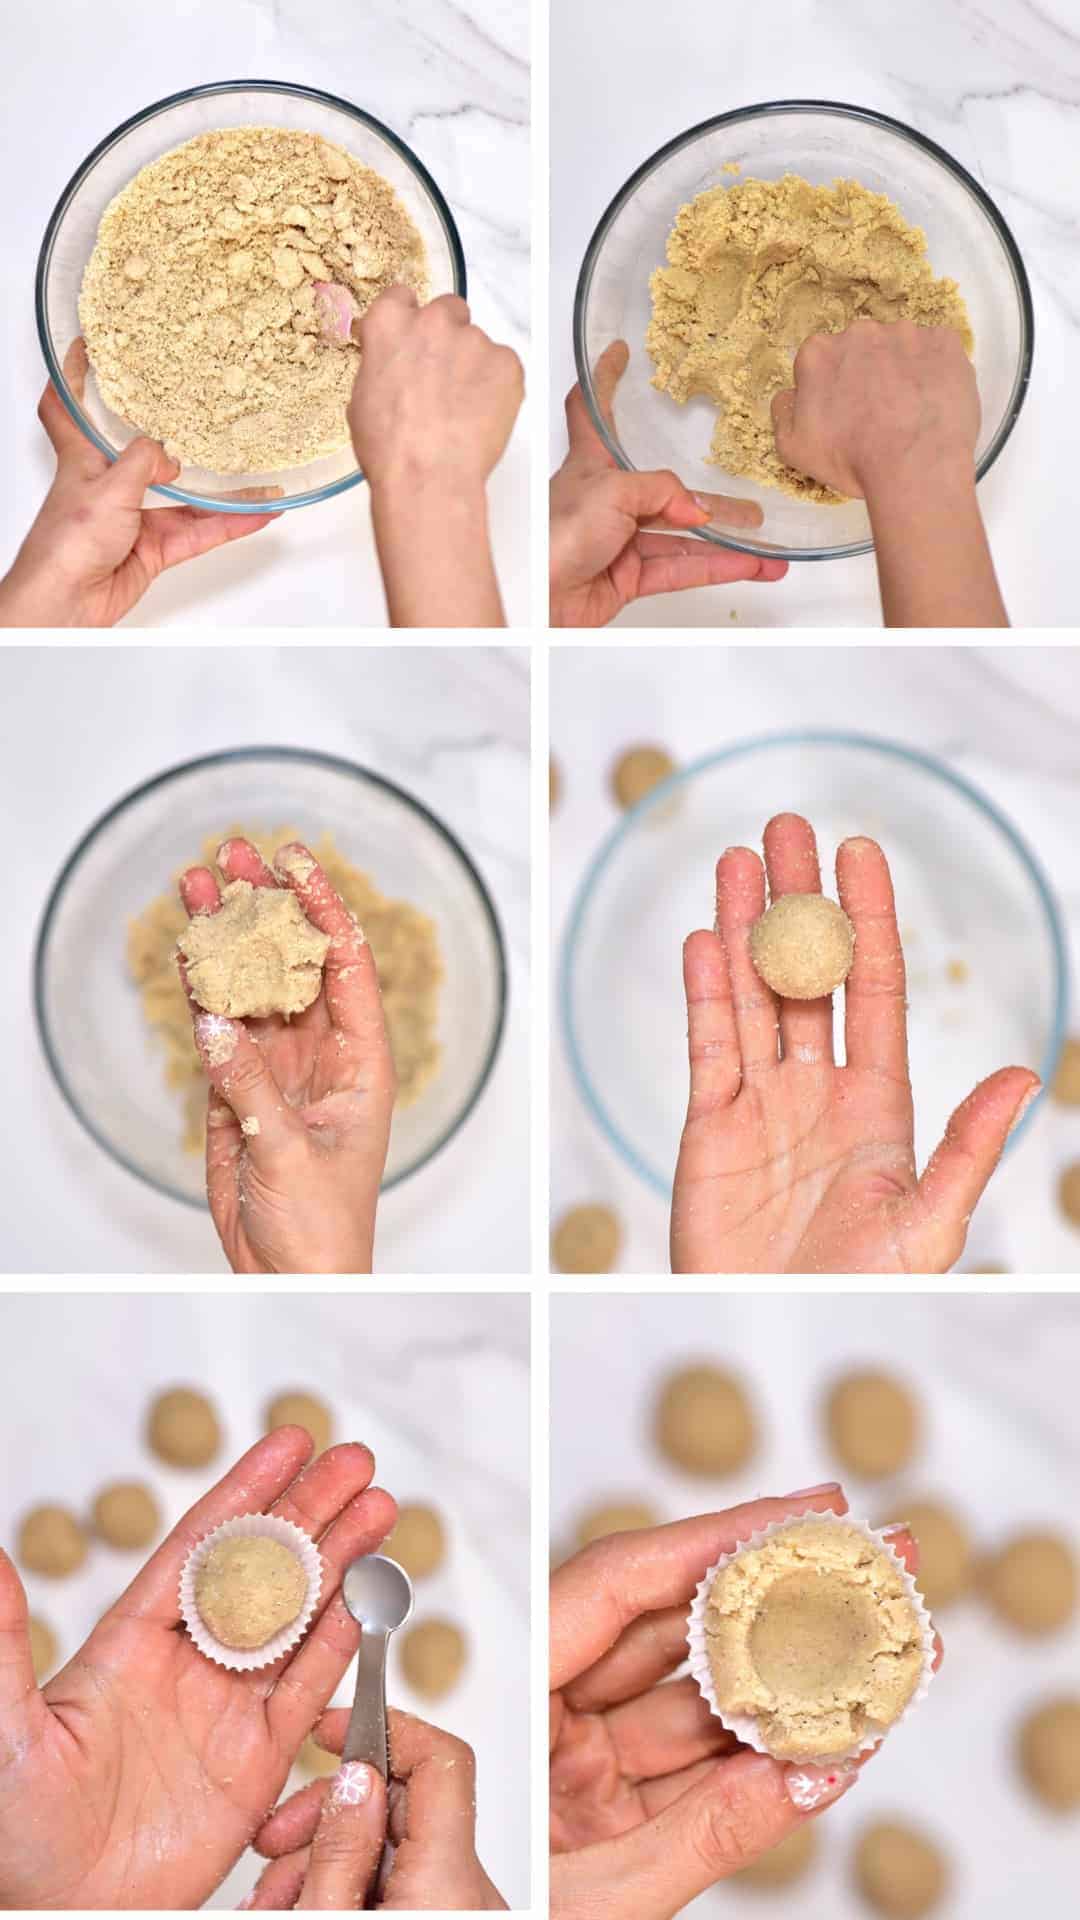
The method
To begin, mix the almond flour with the other base ingredients and then form small, one bite-sized cookies. If you want you can measure these out and use around 1tbsp per cookie. However, I eyeballed it and made 14 of them.
To make them into thumbprint cookies, the process is precisely what it says. Roll each piece of dough into a ball, and then you can use a finger/ thumb to make the indentations. You could also use the rounded back of a spoon. In fact, I used a small 1/2 tsp measuring spoon for an even indentation in each cookie.
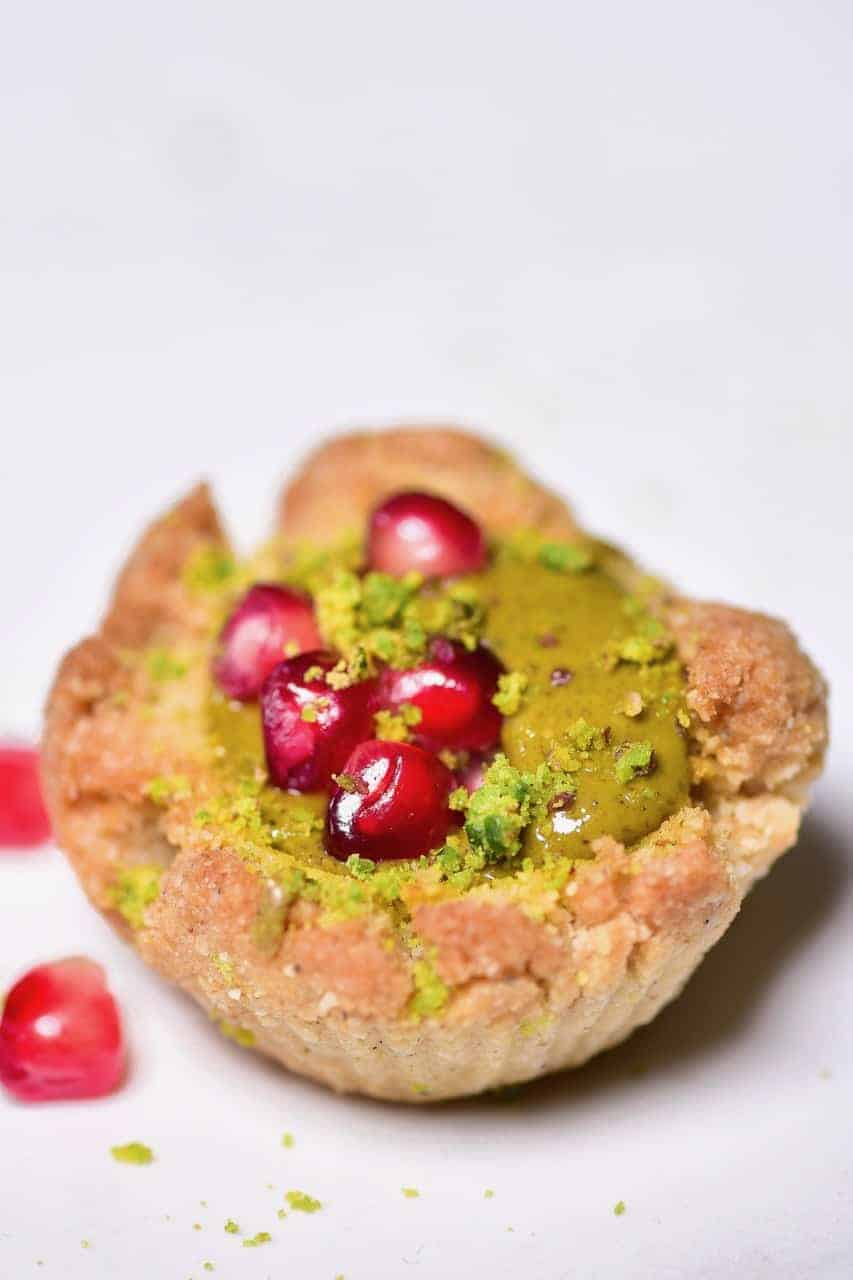
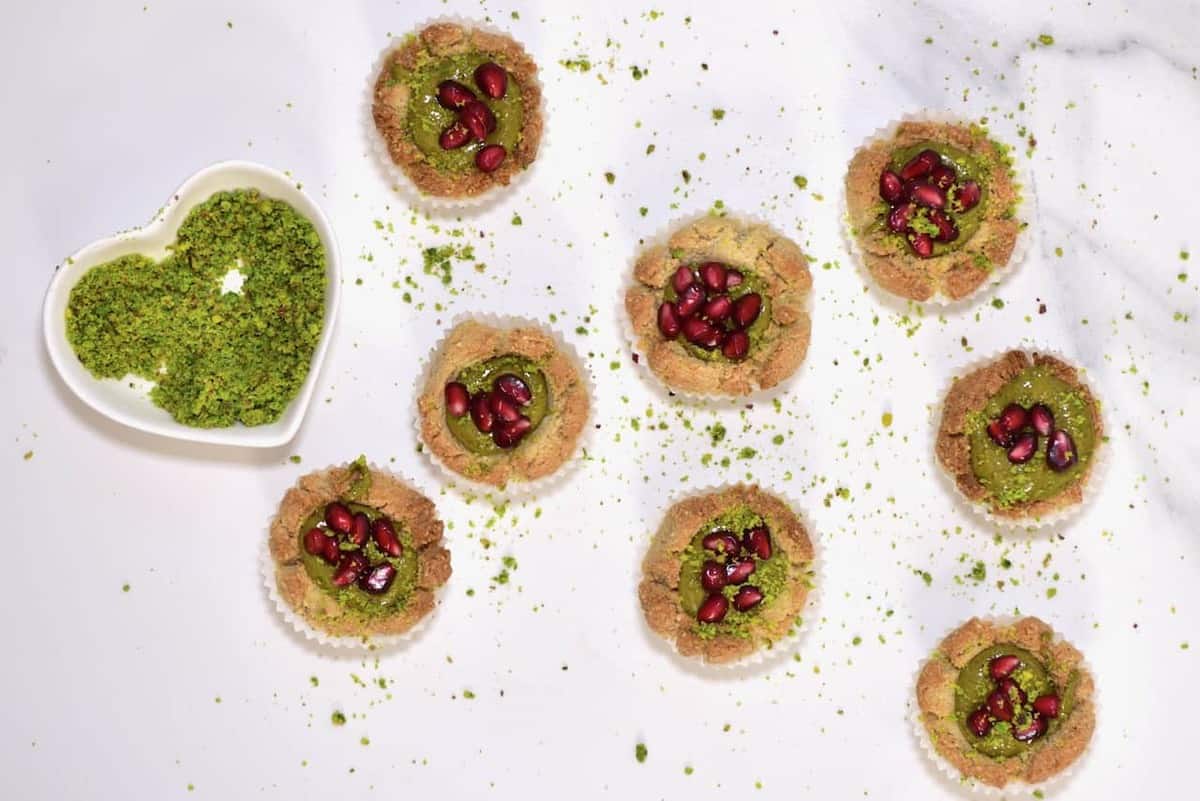
If you’re in a hurry to enjoy these delicious cookies, then you can have these as a no-bake cookie recipe by simply adding some pistachio butter to them now and decorating with some pomegranate seeds and chopped pistachios.
Note* Due to the gluten-free nature of these cookies and the lack of dairy, these cookies are more crumbly than general cookie dough so cracking around the edges when pressing your indentation is perfectly normal.
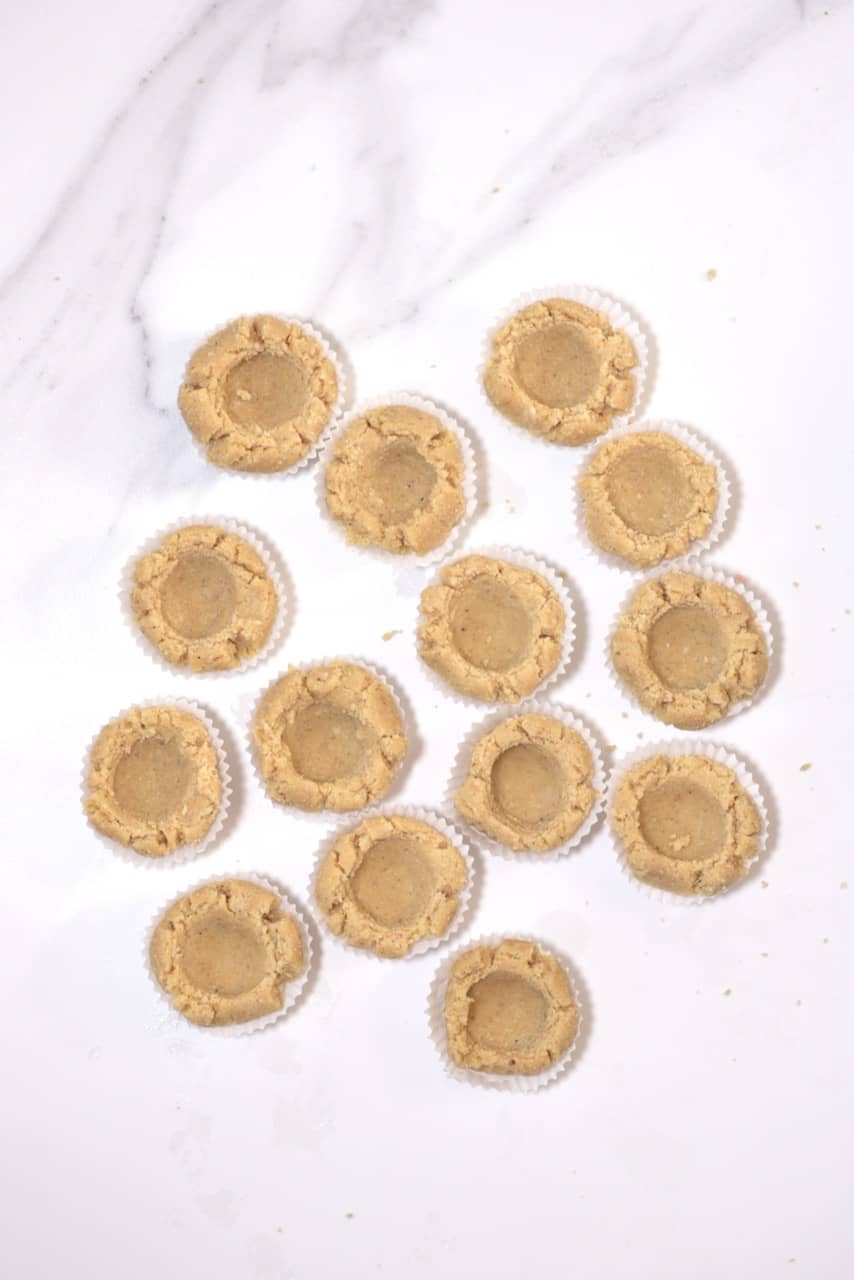
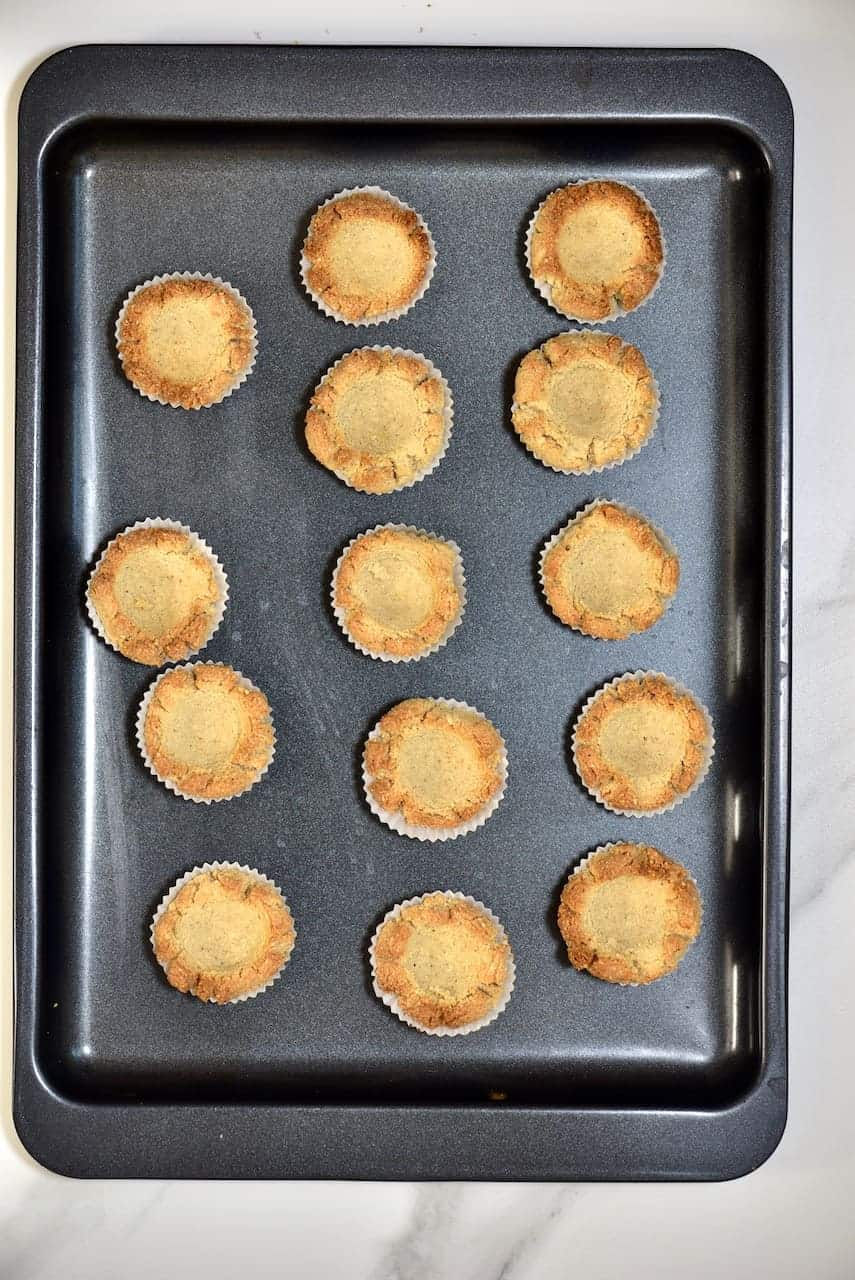
However, if you want to bake the cookies, then you can now bake them in the oven either in mini cupcake cups or on a baking tray lined with parchment paper.
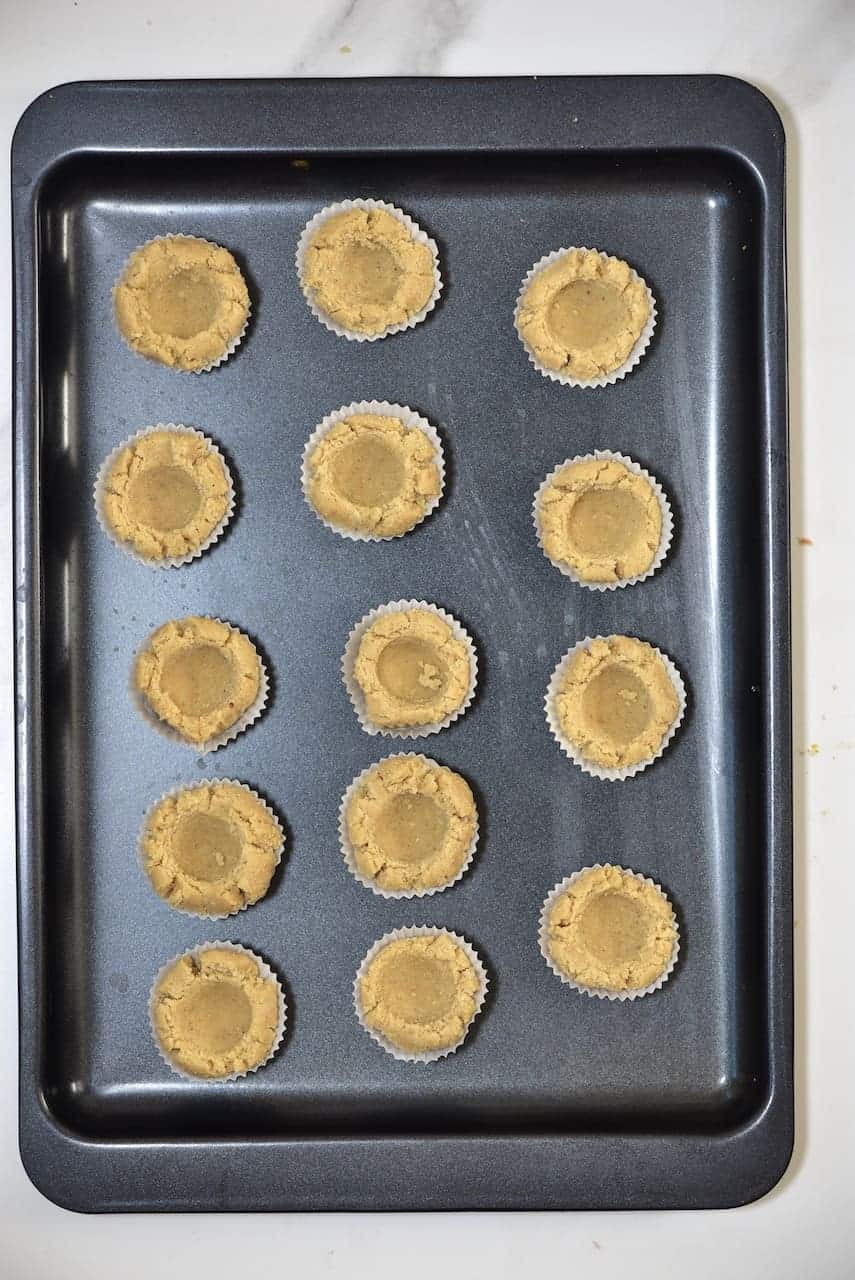
These only take ten minutes to bake in the oven and will turn a lovely golden colour around the edges.
If you want to use some chocolate chips as a filling, you’ll want to add these to the cookies while they’re still warm, so they melt into the thumbprint.
For the pistachio butter-filled cookies, allow the cookies to cool down a bit before filling them.
Again you can decorate the pistachio cookies with pomegranate seeds and ground pistachios or even a sprinkle of desiccated coconut. Also, feel free to experiment with other fillings and toppings of your choice.
For a sweeter, dessert-like version you can drizzle some white chocolate over the cookies at the end. Or, for a chocolate thumbprint cookie version, you can add some cocoa powder into the base almond cookie recipe.
Other great snack recipes you may like
For another delicious no-bake snack recipe, you may like these healthy cacao & almond protein balls or these coconut bliss balls . These 4-Ingredient Stuffed Dates: with home-made almond butter & Chocolate are always a winner too!
IngredientsUS CustomaryMetric1x2x3x
- ▢ 2 cups almond flour
- ▢ 3 tBsp coconut oil
- ▢ 1 tsp ground cardamom powder
- ▢ 2 tBsp maple syrup
- ▢ 2 tBsp coconut flour
- ▢ 1/4 cup pistachio butter
Toppings (optional)
- ▢ ground pistachios
- ▢ pomegranate seeds
Instructions
- To begin, mix the almond flour* with the other base ingredients and then form small, one bite-sized cookies. If you want you can measure these out and use around 1tbsp per cookie. However, I eyeballed it and made 14 of them.
- To make them into thumbprint cookies, the process is precisely what it says. Roll each piece of dough into a ball, and then you can use a finger/ thumb to make the indentations. You could also use the rounded back of a spoon. In fact, I used a small 1/2 tsp measuring spoon for an even indentation in each cookie.**
- If you’re in a hurry to enjoy these delicious cookies, then you can have these as a no-bake cookie recipe by simply adding some pistachio butter to them now and decorating with some pomegranate seeds and chopped pistachios.
- However, if you want to bake the cookies, then you can now bake them in the oven either in mini cupcake cups or on a baking tray lined with parchment paper.
- These only take ten minutes to bake in the oven at 160ºC (fan-assisted) and will turn a lovely golden colour around the edges.
- Once cooled down, add the pistachio butter and decorate.***
Video
Notes
Nutrition
Nutrition information is automatically calculated, so should only be used as an approximation.
How To Make Creamy Homemade Caramel Sauce
Ingredients
- 2 cups sugar white granulated
- 2/3 cup water
- 1.5 cups heavy cream (double cream)
- Lemon generous squeeze
- pinch sea salt more for salted caramel (around 1/2-1tsp or large flaked salt- but far less for small granules salt)
Instructions
Step 1: Melt & Caramelize the sugar
- Add the sugar, water, and lemon to your high-sided saucepan and heat over medium-high, bringing to a boil. Don’t stir the mixture at all - swirl the pan lightly rather than stirring.
- Once the mixture begins to boil, the sugar will eventually begin to caramelize and turn golden in color. The longer you heat it, the more the color will deepen from a honey yellow to an amber, then a deep amber. The caramel will turn from deep amber to burnt in seconds, so be careful not to leave it for too long. I like to move to the next step when my mixture is a medium amber color.
Step 2: Add the cream
- As soon as the mixture becomes a medium amber color (look at my photo for reference), carefully pour in the cream and add the salt. At this point, you can stir the mixture with a heat-proof silicone spatula or wooden spoon. Mix until it is thoroughly combined and into a smooth caramel sauce.
Step 3: Reduce further & add any flavoring
- If it’s too thick, you can add a little extra cream. If it’s too thin, then you can continue to reduce the caramel. Note that the caramel will be more liquidy while it’s still hot and will thicken up as it cools, and thicken even more when refrigerated.
- At this point, switch off the heat and add any extra flavorings, stirring them in well to combine fully. To taste the caramel and adjust any flavorings, add a little of the caramel to a cold saucer/plate and cool for 30-60 seconds, then taste.
- If you want to use the sauce immediately while warm, allow it to cool slightly, then serve. To save for later, allow the homemade caramel sauce to cool completely before transferring to a glass jar.
How To Store
- Store your homemade caramel sauce in a covered jar in the refrigerator for between 2-3 weeks. You can also freeze the caramel sauce in a freezer-safe container for up to three months. It will thicken up as it chills. If you want it thinner, then reheat it lightly in the microwave (15-20 seconds to thin, 40-45 for a heated sauce) or over the stove , stirring frequently. If it’s still too thick, then add in an extra splash of cream and stir well. once reheated, use the caramel immediately. Don’t return any of it back to the glass jar!
Video
Notes
- The type of cooker you use can affect the way the caramel is made . On an induction/electric hob, I find that you can wait for it to become a deep reddish amber color. However, on a gas hob, it’s usually best to move on to the next step when it’s a slightly lighter amber.
- If your caramel sauce is a little thin once it’s cooled, you can actually return it to the pan and boil for slightly longer to reduce it.
- If you still have issues with the sugar crystallizing on the side of the pot , there are two steps you can do. First, you could use a pastry brush dipped in water to brush the sugar down from the sides of the pan. Alternatively, when the sugar syrup begins to boil, cover it with a lid and keep it closed for a couple of minutes. During this time, the condensation will build up in the pan and wash down the sugar crystals.
- To fix crystallized caramel - add an extra 1/4 cup of water to the sugar mixture and bring it back to a boil (optionally, with a lid on to take advantage of the condensation). This will allow the sugar crystals to re-dissolve. Then, continue with the recipe.
Nutrition
Recipe on Alphafoodie: https://www.alphafoodie.com/how-to-make-homemade-caramel-sauce/
